


 2024-10-06
🇬🇧->🇵🇱 Przejdź do polskiej wersji tego wpisu / Go to polish version of this post
My post about the free VPS server from Oracle is a true hit on this blog. Looking at the stats, it has more views than all other posts combined. It’s no wonder, because I think everyone likes to save a little and get something cool for free. Of course, there will be voices saying that if something is free, then the product is actually us, or rather our data. Probably true, but I have to admit that personally, I didn’t think twice before taking advantage of this interesting Oracle promotion, where you can actually get three servers — one with a 4-core processor and 24GB RAM based on the ARM architecture, and two with much weaker processing power (1/8 OCPU) and only 1GB RAM based on AMD architecture. The first one is a real powerhouse, where you can do some seriously awesome things, and the other two are like satellites that work great as training grounds or for smaller projects. Interestingly, last week I completely wiped my Oracle infrastructure and set it up from scratch, which gave me the chance to check if the method I described still works, and I’m pleased to say it does. So, to officially answer the many questions I’ve received over the past months — yes, the servers in the Always Free Tier are still available, and my guide is up-to-date.
What interesting thing are we doing today?
In today’s post, on this free VPS from Oracle, we’re going to set up a private cloud for files, where we can store up to 200 GB of data. We’ll do this by launching a Docker container, which will host Nextcloud, and we’ll do it using Portainer. We’ll also link our own domain to it, using NGINX Proxy Manager, which will run as a separate container, and Cloudflare (though for those not keen on CF, I’ll also describe how to do it via FreeDNS::24). Of course, we’ll also take care of encrypting the communication, i.e., SSL/HTTPS, which we’ll achieve through NGINX Proxy Manager using a Let’s Encrypt certificate.
Table of Contents
- Obtaining a free VPS Server from Oracle
- Initial Server Configuration
- Firewall
- Docker and Portainer
- Connecting a domain via Cloudflare
- Alternative solution with FreeDNS::42 instead of Cloudflare
- NGINX Proxy Manager
- Nextcloud and MariaDB
- Closing ports (update 07-10-2024)
Obtaining a free VPS Server from Oracle
If you don’t have such a server yet, I described the entire process in great detail in a separate post. For the purpose of this guide, I suggest creating an instance with the following parameters:
- Region – EU-Frankfurt-1 (recently, I haven’t had any issues getting a VPS from the AD2 region),
- Shape (machine type) – go to the Virtual Machine tab, then Ampere, and choose VM.Standard.A1.Flex,
- Image – Ubuntu 22.04, which we will upgrade to 24.04 LTS during the initial setup, as Oracle claims (incorrectly) that 24.04 LTS does not work with this machine type (ARM is the issue for them?), so they don’t allow you to start directly with that version (I will prove this wrong),
- CPU – 4 cores,
- RAM – 24GB, we don’t need that much for Nextcloud, but let’s not limit ourselves and take the maximum available, as it will allow us to run other things in the future,
- Public IPv4 Address – make sure to assign it during the creation of the machine to simplify the process. Also, consider assigning an IPv6 address, which might be useful in the future,
- SSH keys – Oracle won’t let you proceed without this, which is a good practice. Simply create a new key and save it, or use your own and provide public part to Oracle,
- Disk capacity – (this is defined in the Boot volume section after selecting Specify a custom boot volume size) – for free, we can get a maximum of 200GB to be shared across all machines. You can assign all of it to this ARM machine, or split it so that some remains for the two AMD machines,
- Encryption of communication between the instance and storage – select the Use in-transit encryption option.
Initial Server Configuration
We start as usual by connecting to the previously created instance. I typically use the Termius application for this purpose, but you can also use PuTTY or any other method that allows for SSH communication. How to connect to servers via SSH is described in this post. And in this post on how to use SSH keys. I won’t repeat all of that again. Here, we will focus only on what is not obvious for this specific case. To connect via SSH, we essentially need four things:
- Server IP address
- Username
- Public SSH key
- Private SSH key
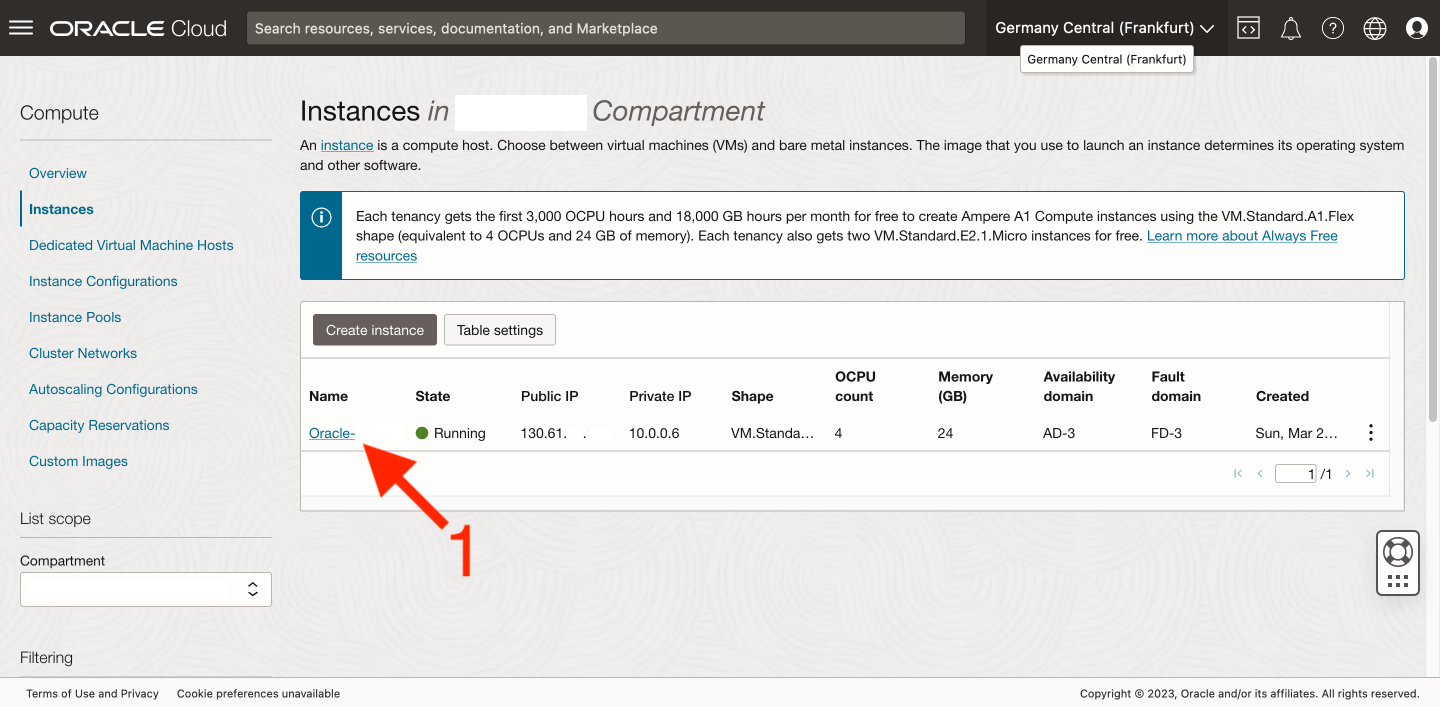
We will get the first two by accessing the Oracle instance management center. After successfully creating it, we should see it on the list of our instances, so let’s go to its properties [1].
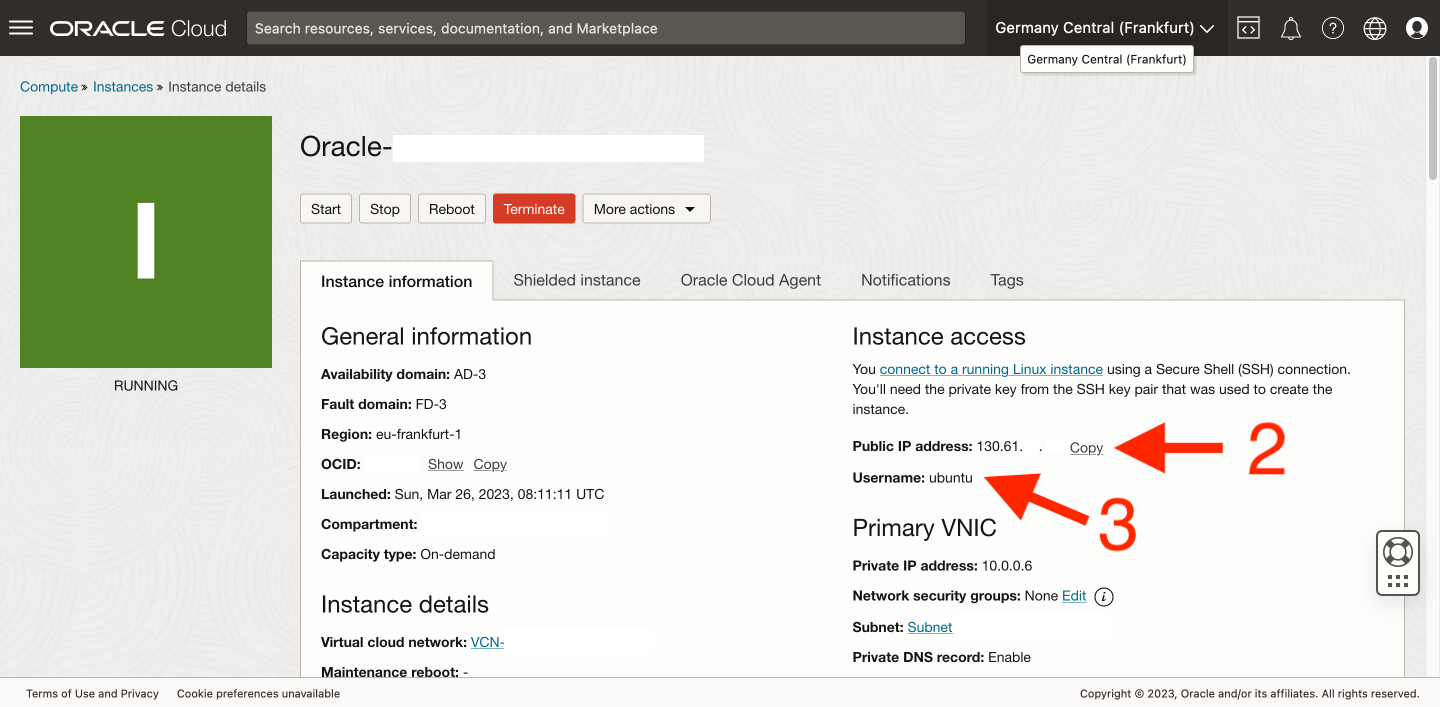
The information we’re looking for (server IP address [2] and username [3]) is located in the Instance information tab, in the Instance access section on the right-hand side.
The SSH keys required for authentication were already downloaded to our disk during instance creation. Now we have everything, so we just need to input all of this into Termius (or another program) and connect to our brand-new VPS.
Now, we will perform the basic server configuration. We’ll start, of course, by updating the packages. After completing this, you may consider restarting the server.
sudo apt update
sudo apt upgrade -y
sudo reboot now
For obvious reasons, you’ll be disconnected from the server. Wait a moment for it to restart, and then reconnect via SSH. Now, we will proceed to upgrade the Ubuntu system from version 22.04 to 24.04 LTS.
sudo do-release-upgradeThe entire process is intuitive, so I won’t go into detail here. Maybe one day I’ll make a separate post about it if there’s a demand for it. If you need confirmation that the upgrade was successful, you can use the command:
lsb_release -aThe result of the command should look something like this:
No LSB modules are available.
Distributor ID: Ubuntu
Description:    Ubuntu 24.04.1 LTS
Release:        24.04
Codename:       noble
As part of the basic configuration, I always check the SSH authorization settings, as they’re often not configured the way I prefer. So, let’s open the text editor and modify the entries in the sshd_config file.
sudo nano /etc/ssh/sshd_configWe need to find the appropriate lines and change their values to the ones below. Note that these lines may not only be in different places but also in a different order.
PubkeyAuthentication yes
AuthorizedKeysFile .ssh/authorized_keys
PasswordAuthentication no
Firewall
When using Oracle, I actually use a three-layer firewall. The first layer is the firewall in the Oracle infrastructure. The second is iptables on the server, and the third is the ufw package, which I always install myself. Let’s configure them one by one.
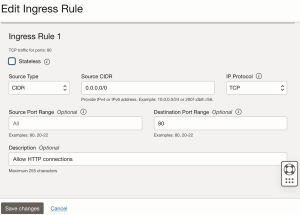
How to open ports in the Oracle infrastructure is described in this post. In short, you do it by going to Virtual Cloud Networks (remember to select the correct Compartment first) -> find your network on the list and go to its properties -> from the Resources menu on the left, select Security Lists -> there should be only one list called Default Security List for…. Here, we’re interested in Ingress Rules, and by using the Add Ingress Rules button, we add rules to open ports 80, 443, 81, 444, 9443. We do this by filling out the form for each port, as shown below, where I demonstrate how to do it for port 80.
We have now opened the following ports:
- 80 – standard HTTP for NGINX Proxy Manager,
- 443 – standard HTTPS for NGINX Proxy Manager,
- 81 – HTTP port for the NGINX Proxy Manager admin panel,
- 444 – HTTPS port for Nextcloud,
- 9443 – HTTPS port for Portainer.
That’s all you need to do on the Oracle side. The next step is to update iptables on the server. This is an internal table of network rules that determines what traffic to and from the server is allowed. Let’s go to the server and use the following commands:
sudo su
nano /etc/iptables/rules.v4
This will open a text editor. Find the line:
(...)
-A INPUT -p tcp -m state --state NEW -m tcp --dport 22 -j ACCEPT
(...)
Right after it, add the following new lines:
-A INPUT -p tcp -m state --state NEW -m tcp --dport 80 -j ACCEPT
-A INPUT -p tcp -m state --state NEW -m tcp --dport 443 -j ACCEPT
-A INPUT -p tcp -m state --state NEW -m tcp --dport 81 -j ACCEPT
-A INPUT -p tcp -m state --state NEW -m tcp --dport 444 -j ACCEPT
-A INPUT -p tcp -m state --state NEW -m tcp --dport 9443 -j ACCEPT
We save and close the rules.v4 file by using “control + x”, “y” and ENTER. Now, we still need to configure the last gateway, which is the ufw application.
sudo apt install ufw
sudo ufw disable
sudo ufw reset
sudo ufw default deny incoming
sudo ufw default allow outgoing
sudo ufw allow 22
sudo ufw allow 80
sudo ufw allow 443
sudo ufw allow 81
sudo ufw allow 444
sudo ufw allow 9443
sudo ufw enable
sudo ufw status verbose
The final result should look like this:
Status: active
Logging: on (low)
Default: deny (incoming), allow (outgoing), deny (routed)
New profiles: skip

To                         Action      From
--                         ------      ----
22                         ALLOW IN    Anywhere
80                         ALLOW IN    Anywhere
443                        ALLOW IN    Anywhere
444                        ALLOW IN    Anywhere
81                         ALLOW IN    Anywhere
9443                       ALLOW IN    Anywhere
22 (v6)                    ALLOW IN    Anywhere (v6)
80 (v6)                    ALLOW IN    Anywhere (v6)
443 (v6)                   ALLOW IN    Anywhere (v6)
444 (v6)                   ALLOW IN    Anywhere (v6)
81 (v6)                    ALLOW IN    Anywhere (v6)
9443 (v6)                  ALLOW IN    Anywhere (v6)
To be sure, we should still verify that the ufw service will start automatically with the system (e.g., after a restart). This option should be enabled by default, but it’s always good to check it yourself. We go into the ufw configuration file:
sudo nano /etc/ufw/ufw.confHere, we want to ensure that the ENABLED variable is set to yes:
# Set to yes to start on boot. If setting this remotely, be sure to add a rule
# to allow your remote connection before starting ufw. Eg: 'ufw allow 22/tcp'
ENABLED=yes
Now, all that remains is to restart the machine.
sudo reboot nowDocker and Portainer
I have described this in detail in a separate post, so here I will only quickly go over it as a reminder.
sudo apt install docker.io -y
sudo groupadd docker
sudo usermod -aG docker $USER
Docker is installed, so we move on to creating a volume for Portainer data.
docker volume create portainer_dataThe next step is to create a properly configured container.
docker run -d \
-p 9443:9443 \
-v /var/run/docker.sock:/var/run/docker.sock \
-v portainer_data:/data \
--name Portainer \
--restart unless-stopped \
portainer/portainer-ce:latest
Portainer is running on port 9443, so now we need to locate the server address we used for the SSH connection, open a browser, and type in the address bar:
https://<oracle_vps_ip>:9443
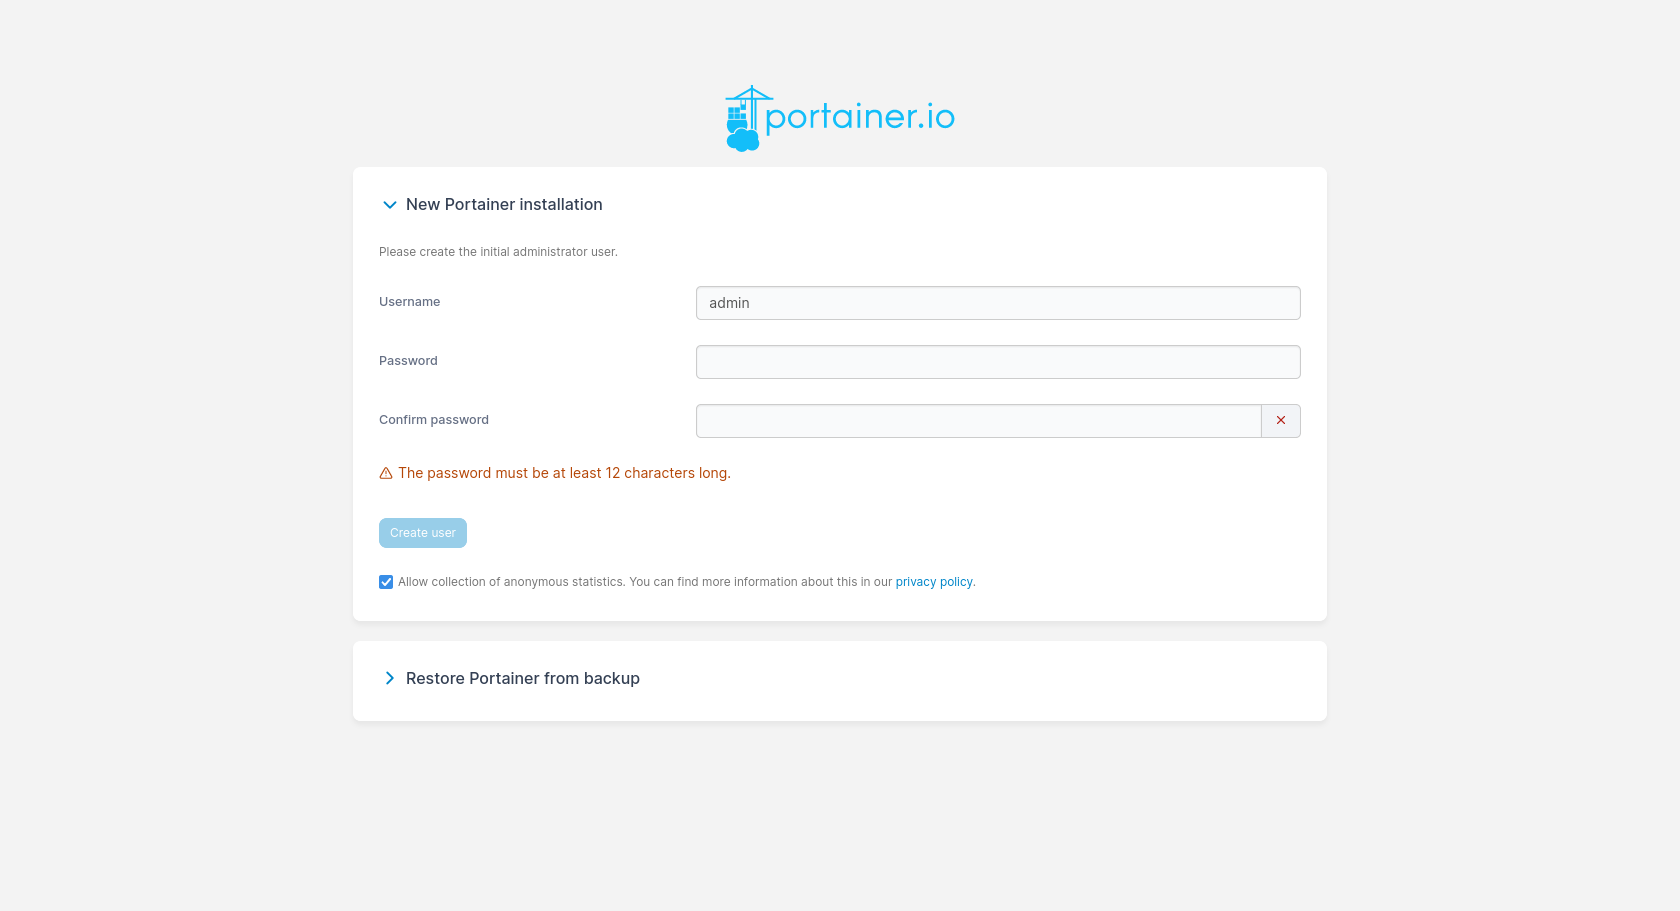
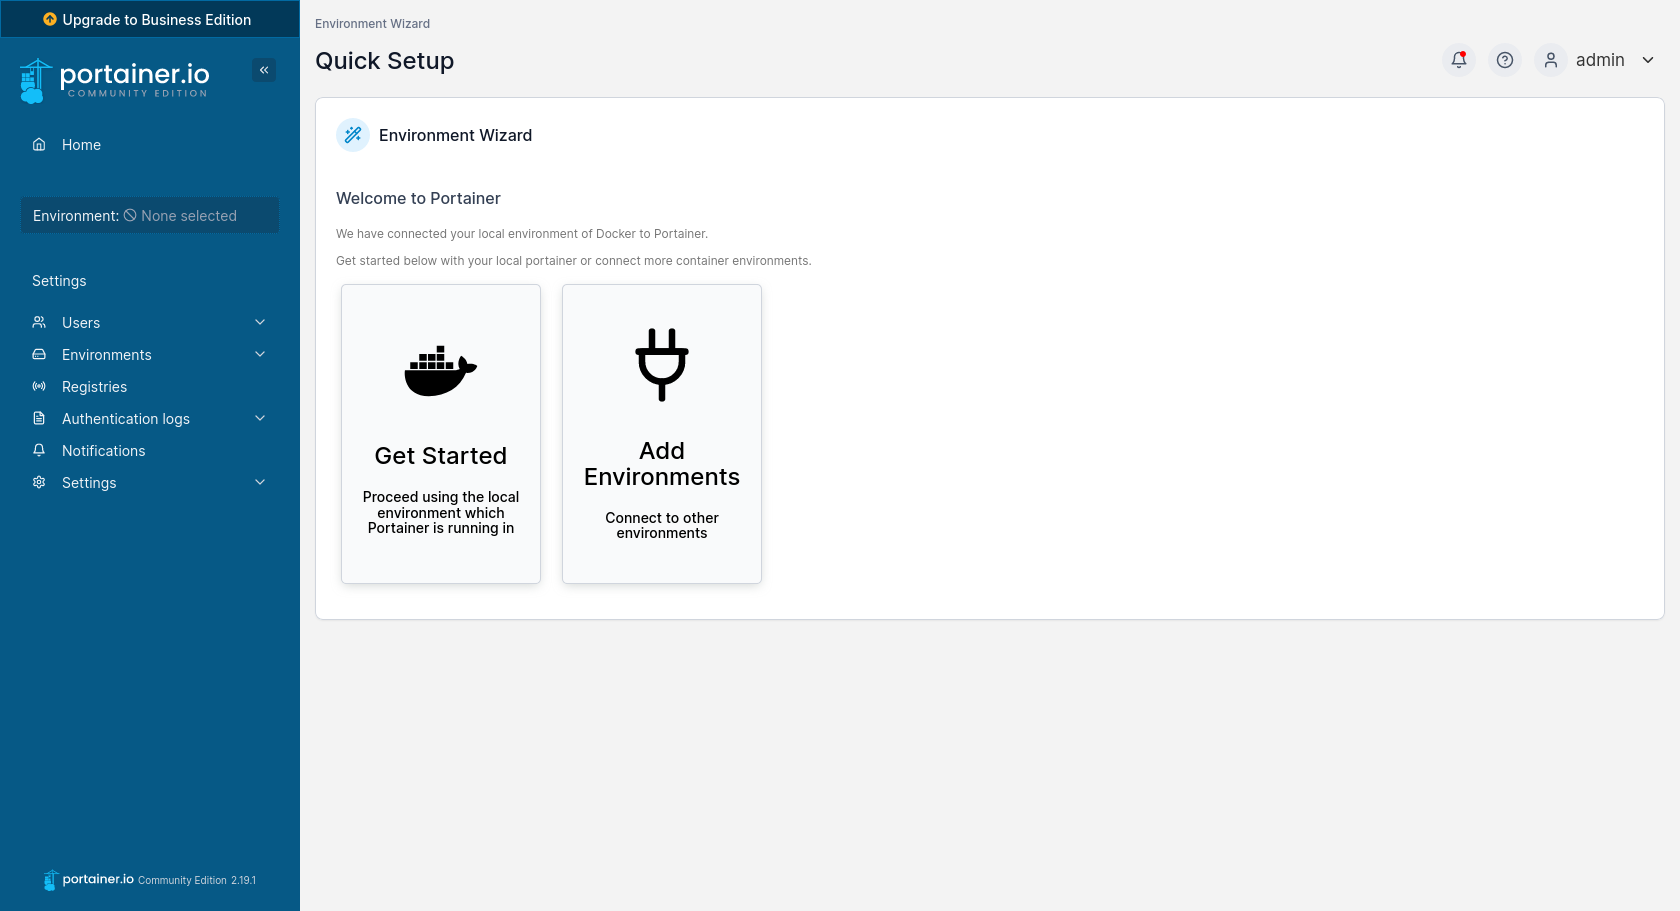
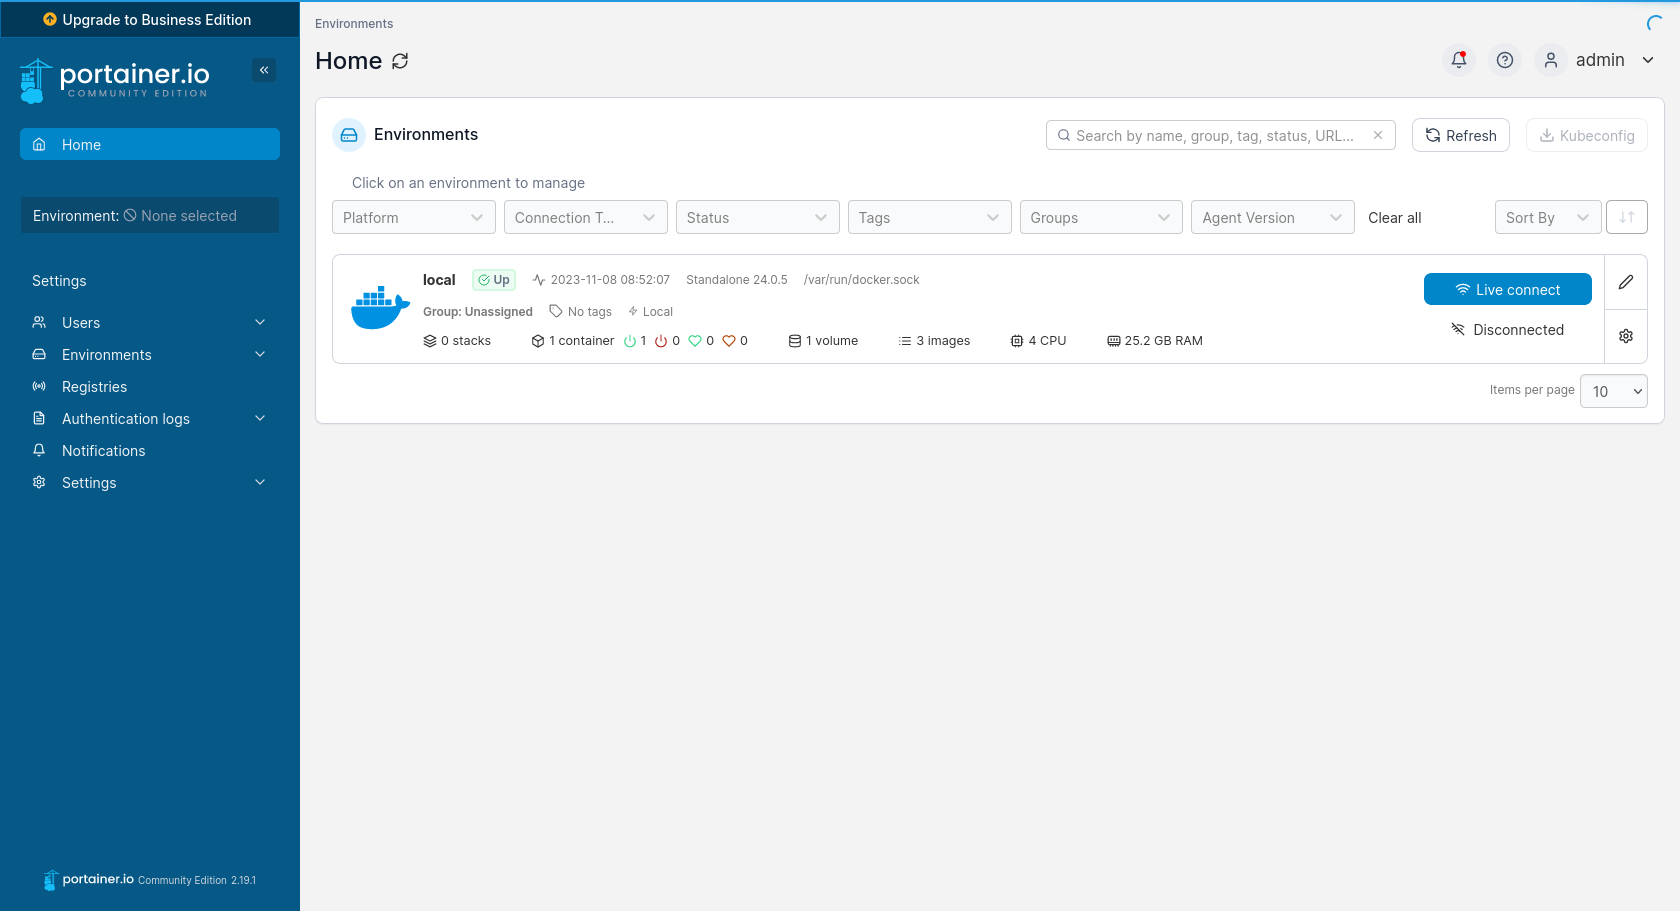
A very simple installer will appear before us, where we only need to set the login and password for the administrator. On the next page, we select the Get Started button, as we want Portainer to use the environment located on the local machine it is running on. Finally, we will be taken to the list of available environments, where there will be only one called local. To start managing this environment, press the blue Live connect button on the right-hand side. As a result, tabs with management options will appear on the left instead of Environment: None selected.
Connecting the domain via Cloudflare
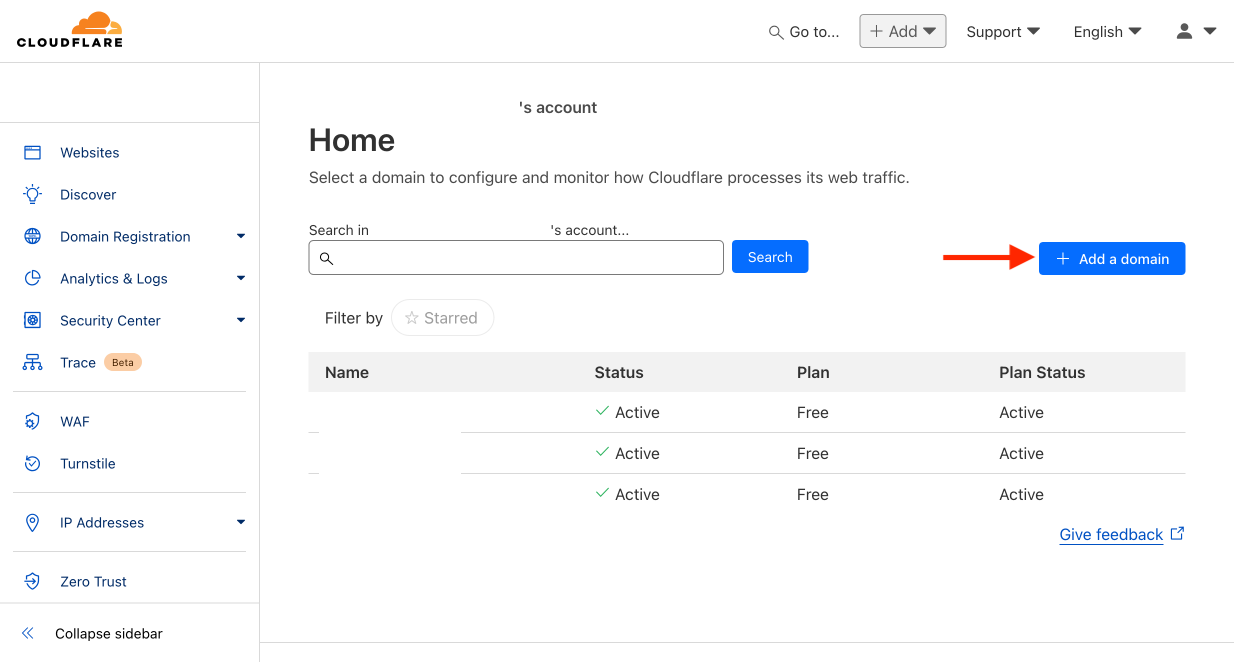
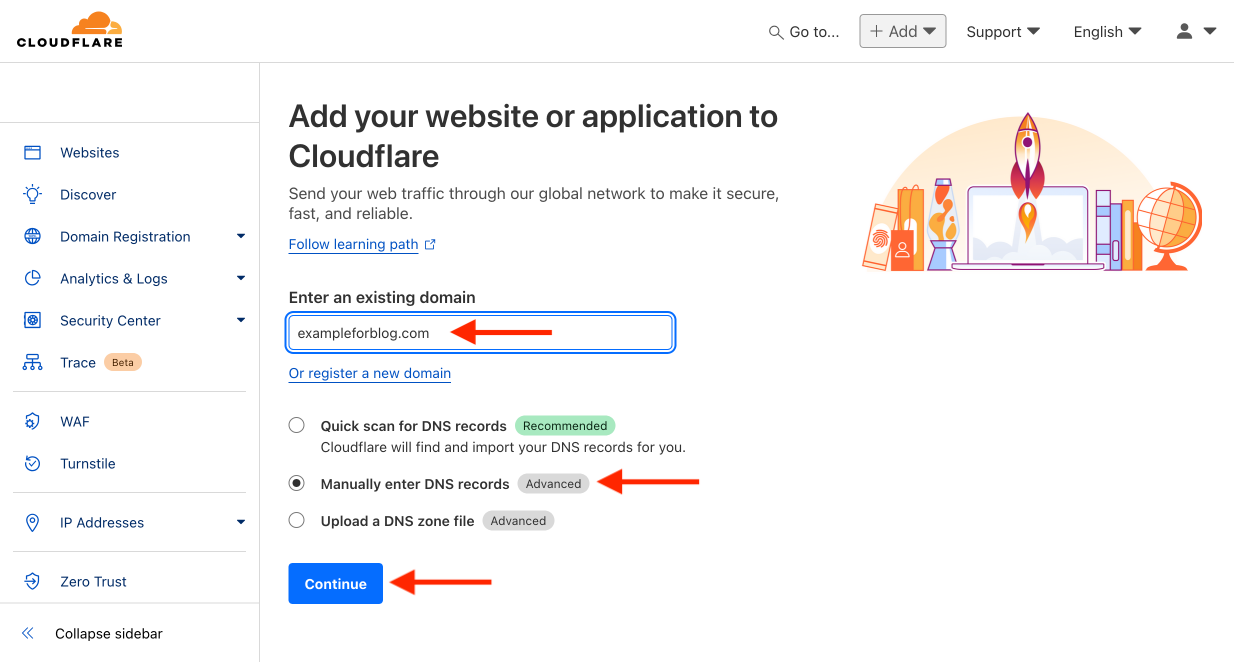
- Log in to Cloudflare.com and press the Add a domain button.
- Enter the address of your domain. In my case, it’s the example exampleforblog.com. Choose Manually enter DNS records because we want to start with a clean slate without CF guessing which records we want. Confirm with the Continue button.
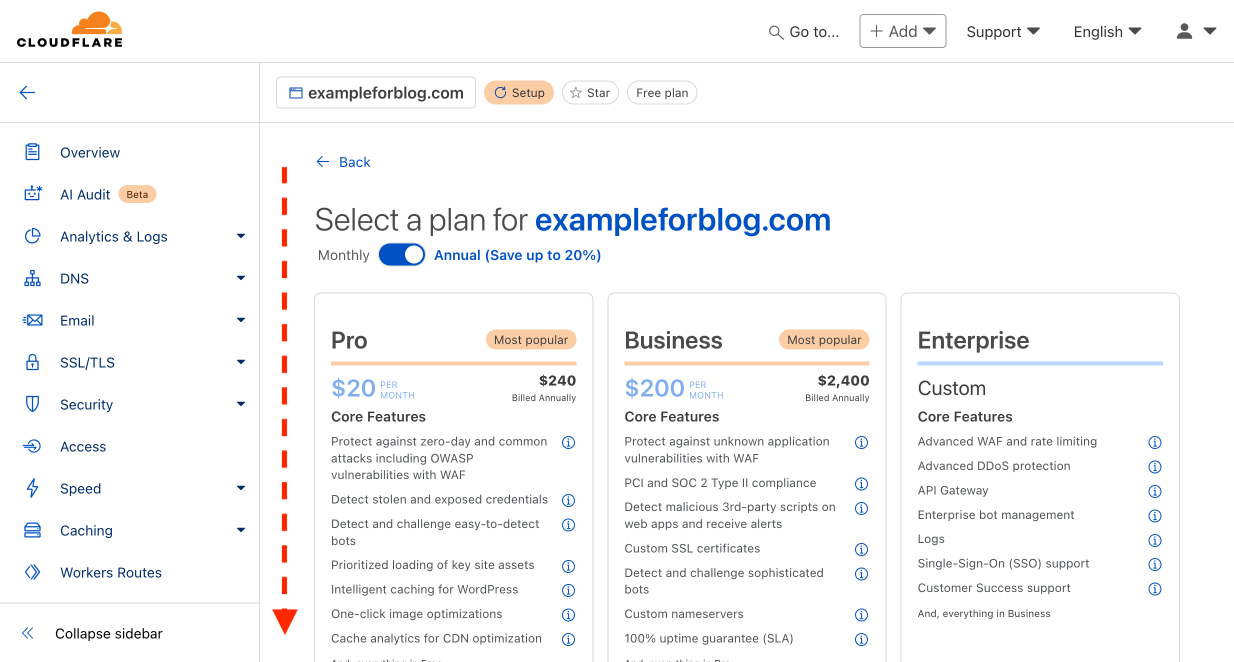
- On the next page, scroll down because the plan we are interested in (obviously the only right one, the free one) is at the very bottom.
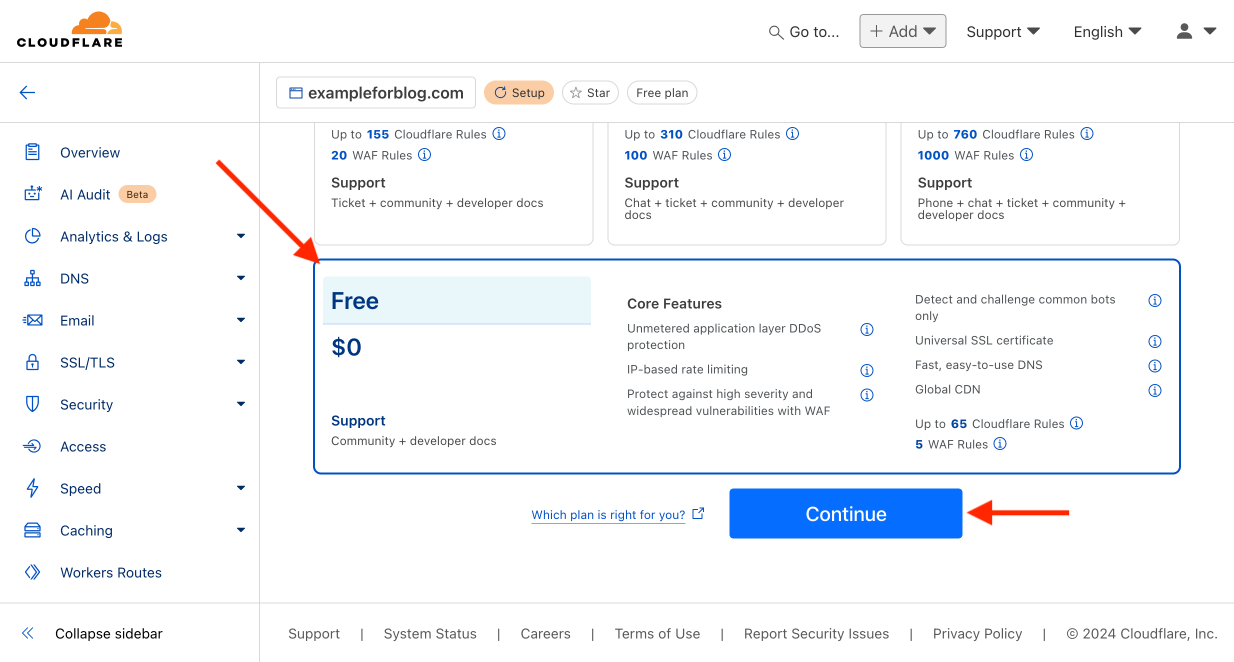
- Select the Free plan and confirm by pressing Continue.
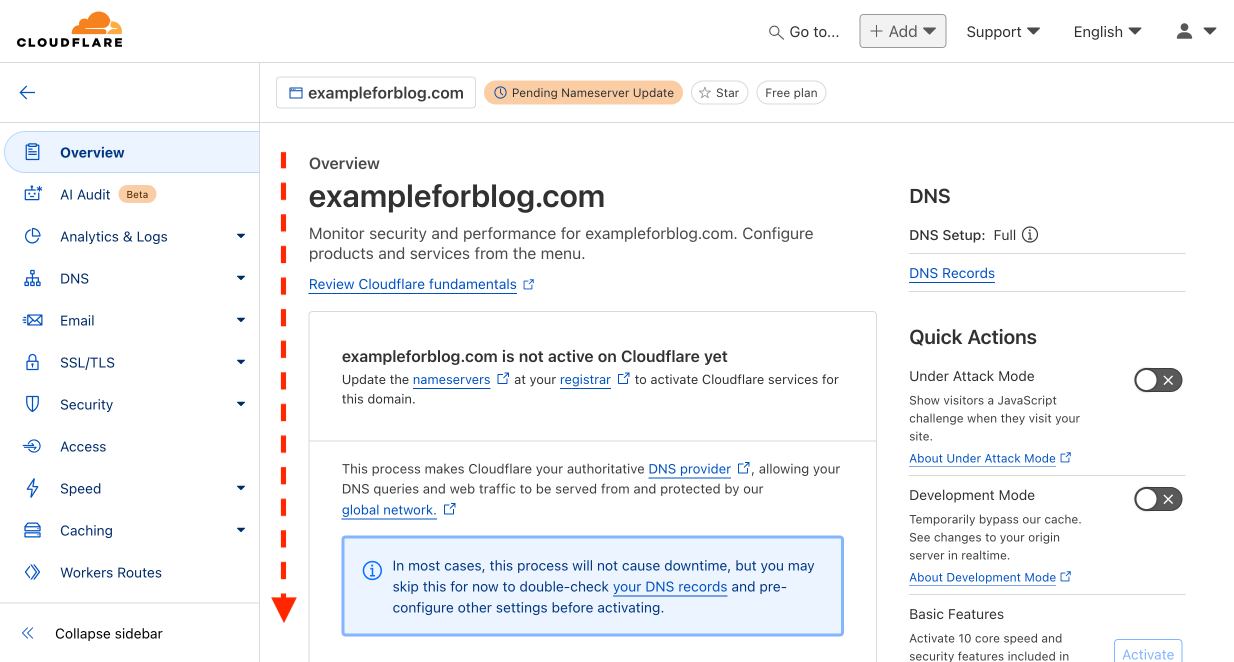
- On the next page, scroll down to the information that interests us.
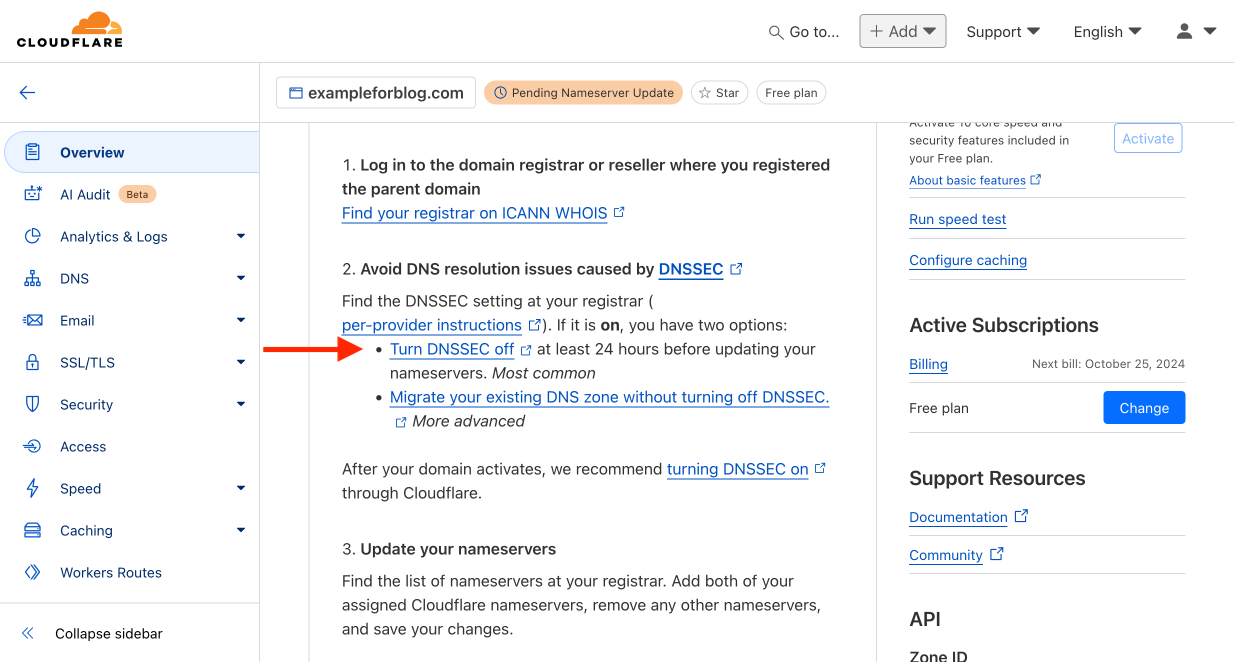
- First, CF asks us to disable the DNSSEC feature at our domain provider. Not all providers enable it by default, but for example, OVH probably does, so I thought it was worth mentioning.
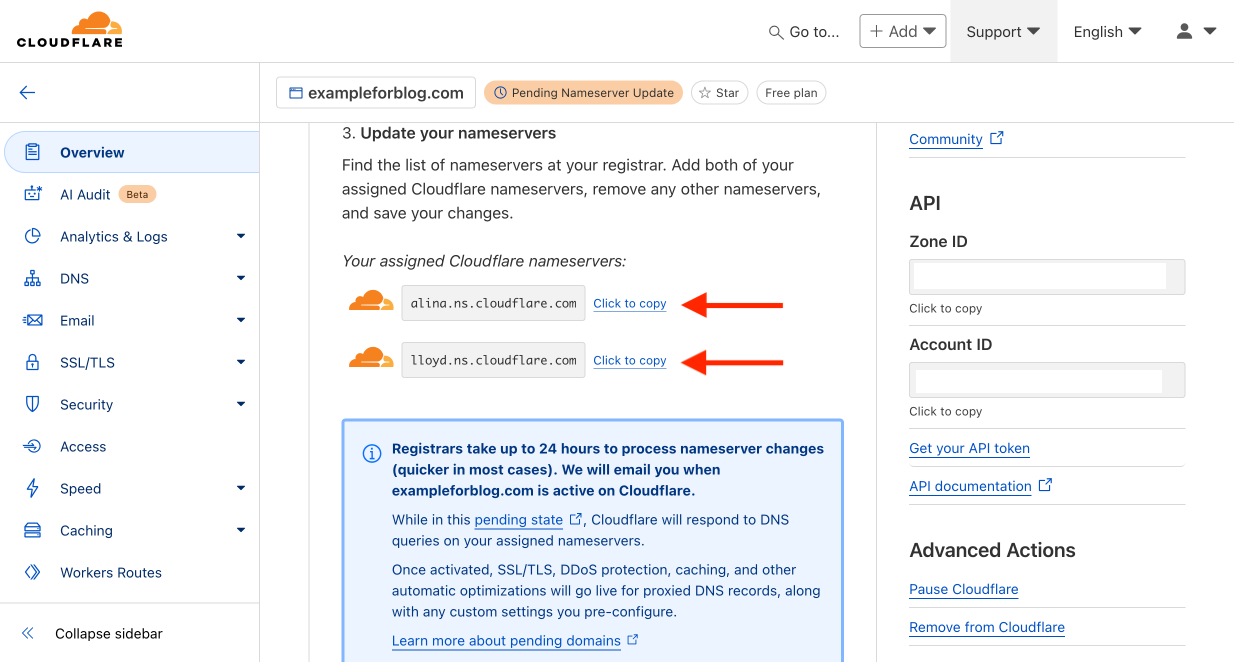
- On the same page, but lower, CF lists two DNS addresses to which we need to point all traffic from our domain. This is done on the domain provider’s site.
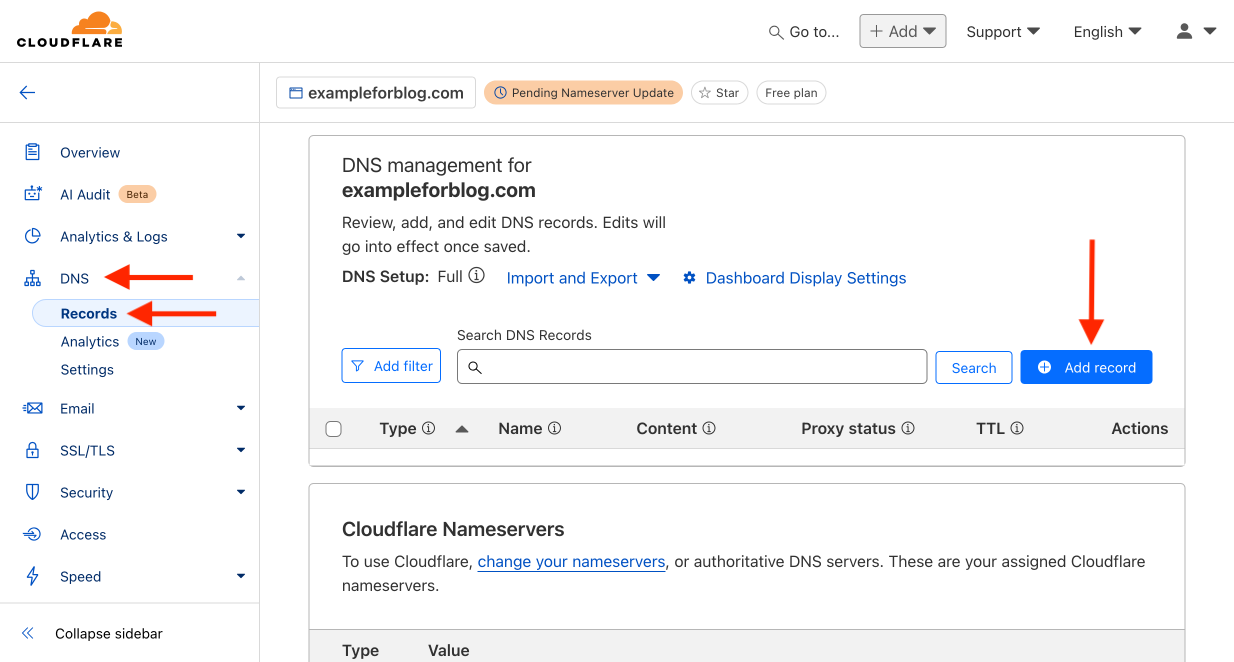
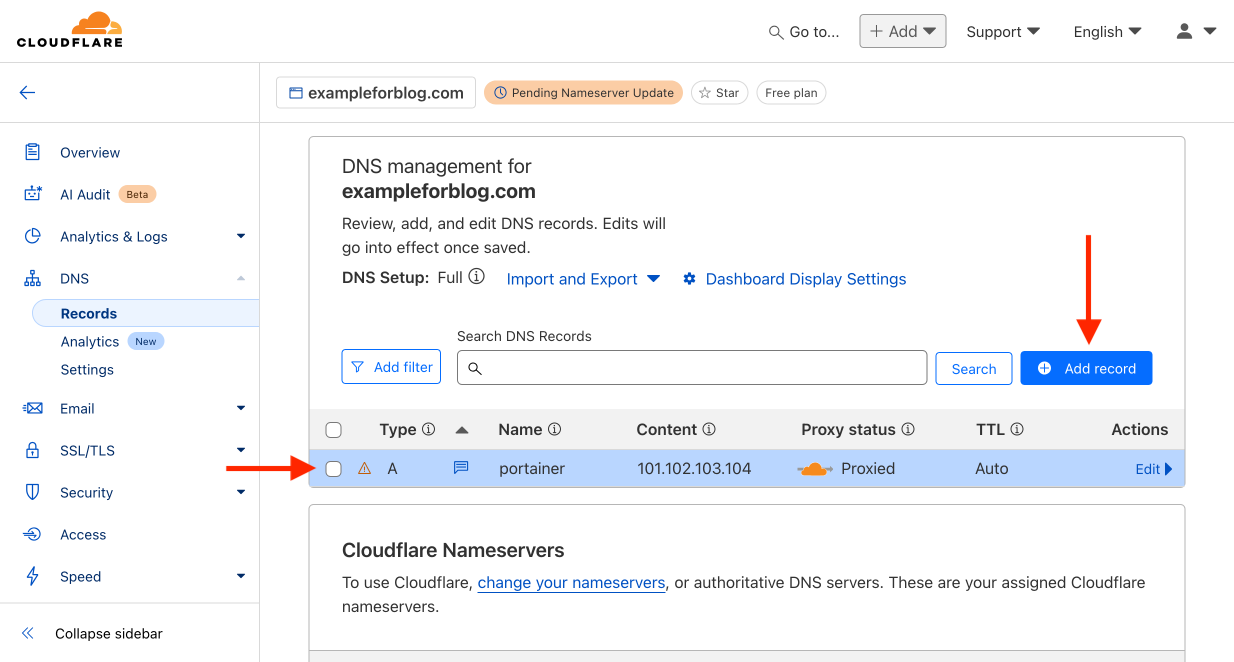
- From the left menu, select the DNS tab and then Records. Start adding records by pressing the Add record button.
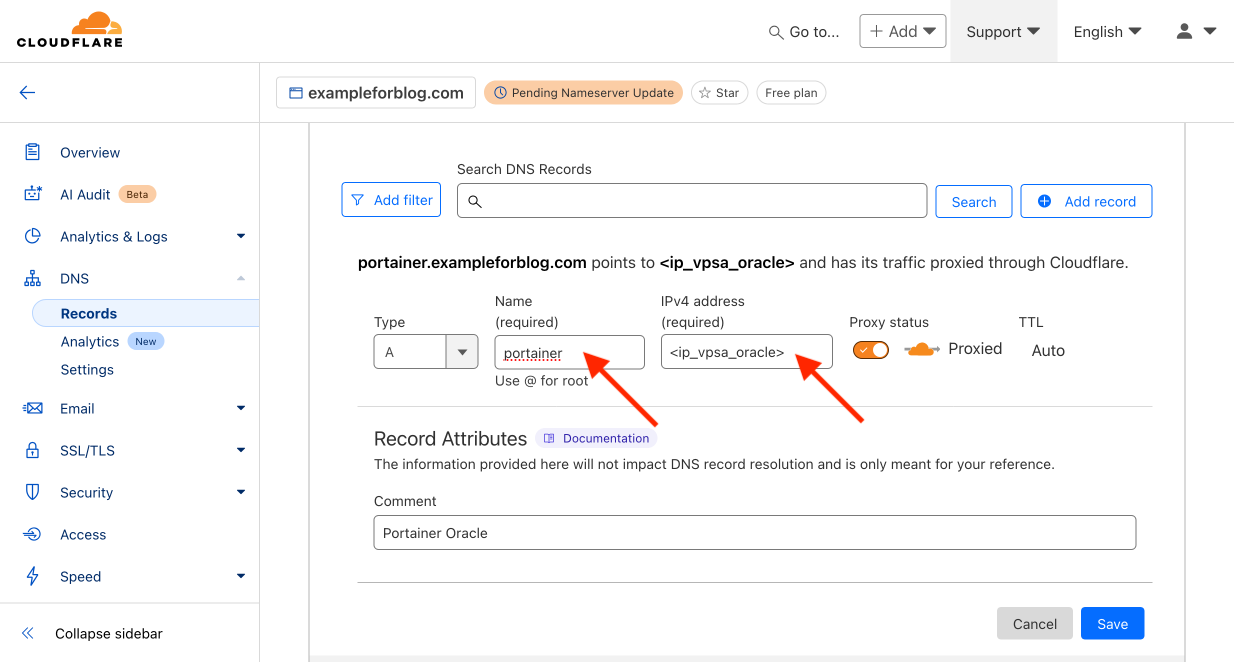
- Leave A as the default in the Type field. In the Name field, enter portainer. In the IPv4 address field, provide the address of your VPS server from Oracle—the bare address without any ports, e.g., 101.102.103.104 (I made up this address, so enter yours here). We want the traffic to be proxied by CF, so leave the Proxied setting. TTL remains Auto. In the Comment field at the bottom, you can enter any comment to help you understand what this record is for and where it came from in the future. Just write in your own words what you want and how you will use this record. Finally, confirm by pressing the Save button.
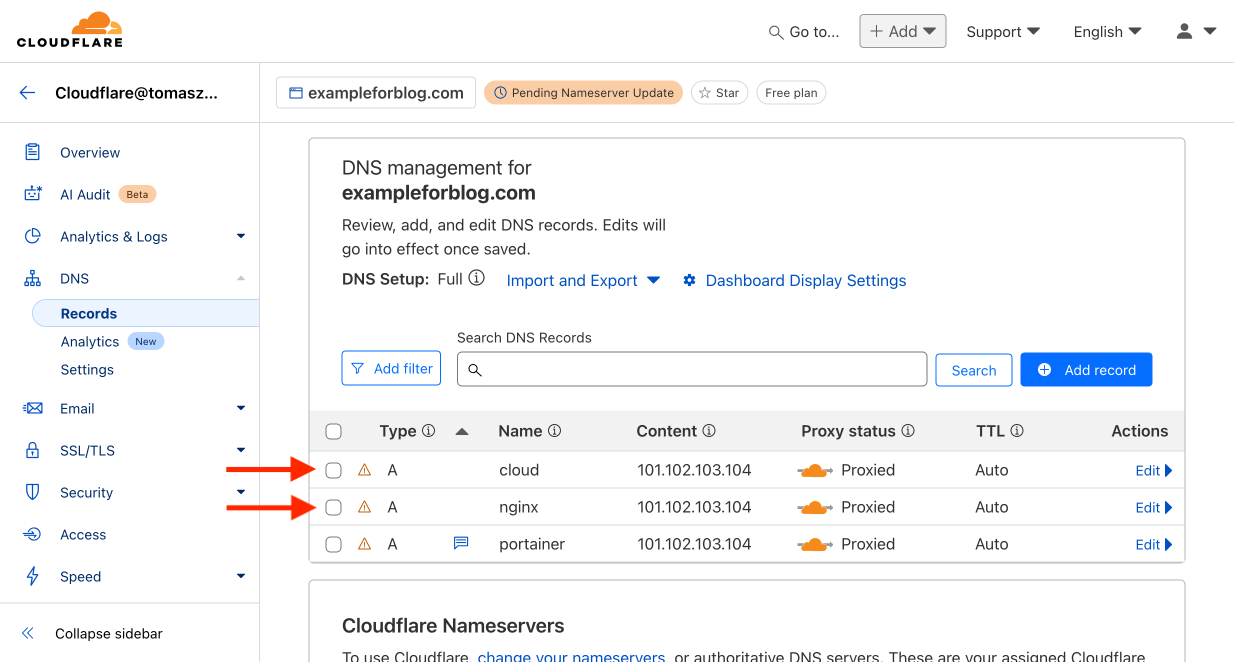
- The first record is added, but for this guide, we will need a total of three, so add more using the Add record button again.
- In this way, we will also add records for Name – cloud and nginx. What we have done now is created three subdomains for the parent domain. They are, respectively, portainer.exampleforblog.com, cloud.exampleforblog.com, and nginx.exampleforblog.com.
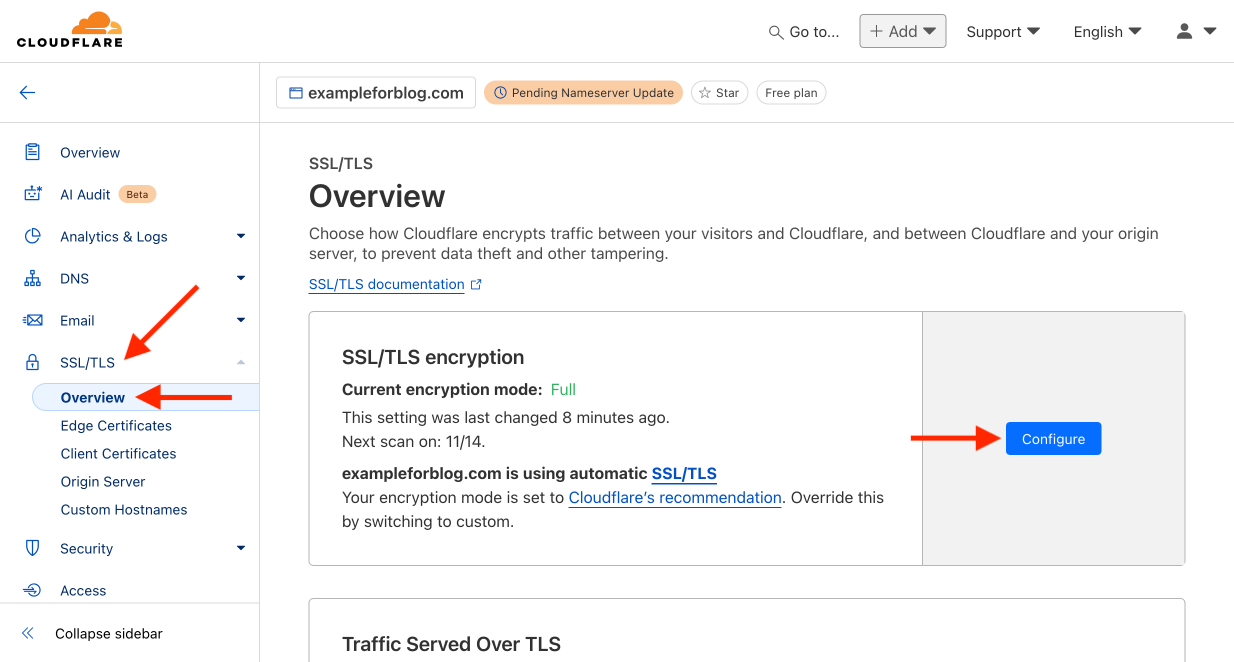
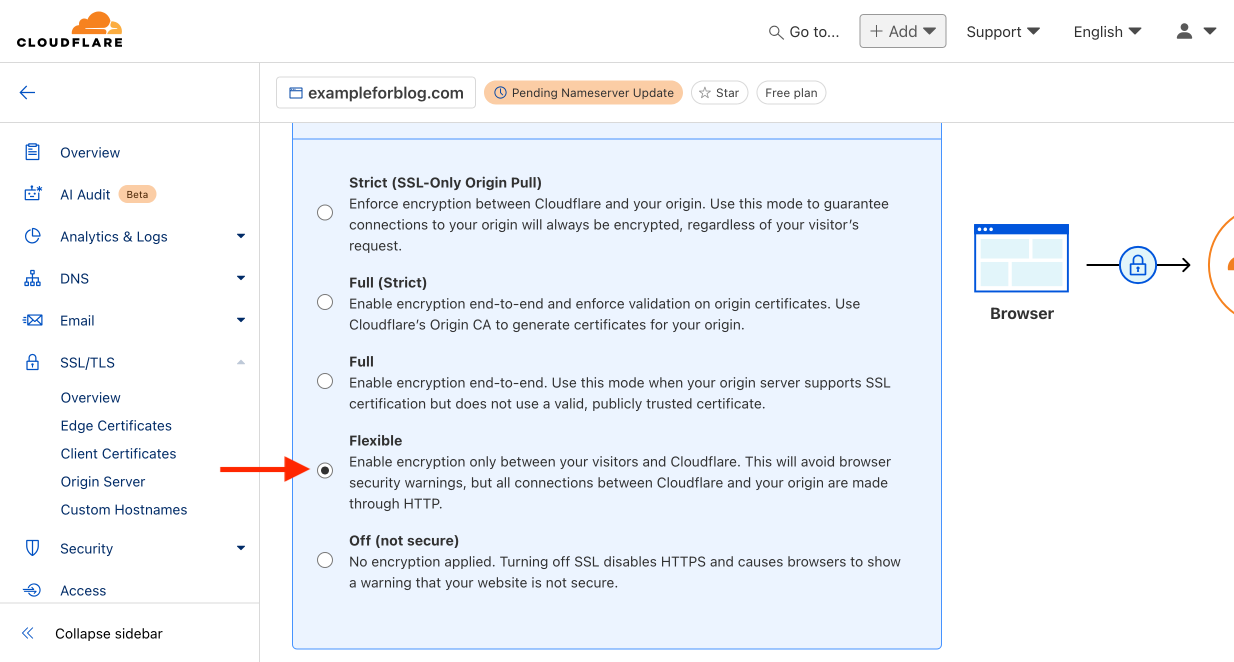
- Go back to the menu on the left and this time select the SSL/TLS tab, and from there Overview. In the section labeled SSL/TLS encryption, press the Configure button.
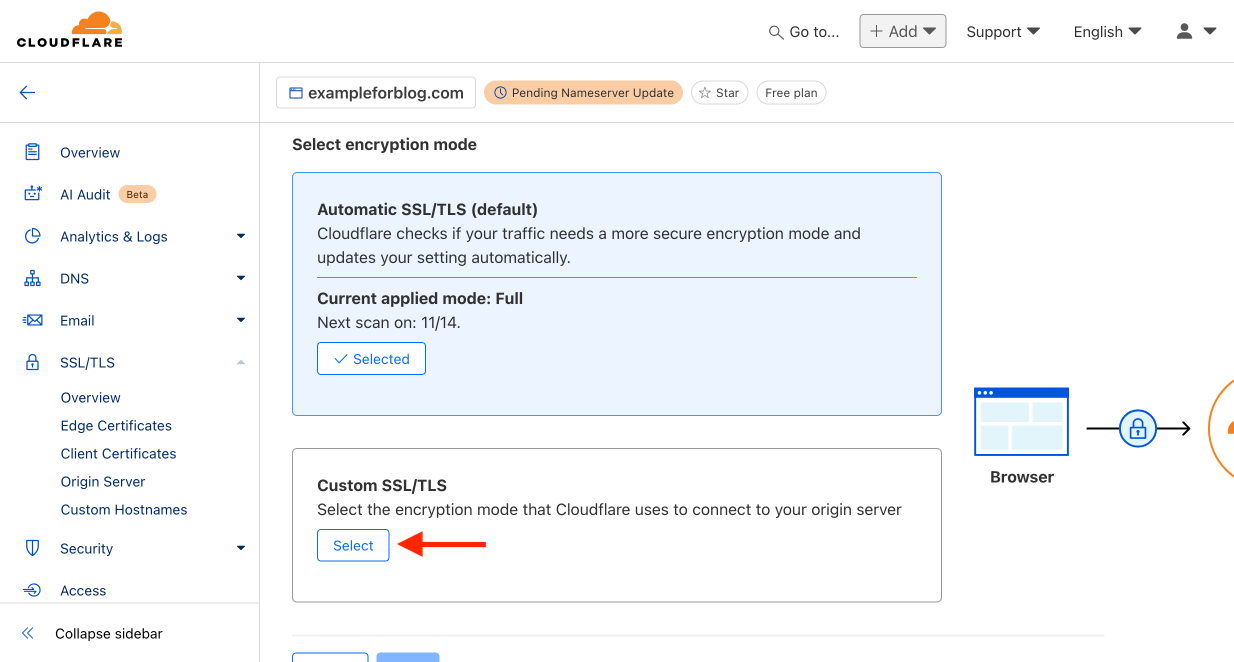
- In the window labeled Custom SSL/TLS, press the Select button.
- Change the option from Full to Flexible and confirm your choice by pressing Save.
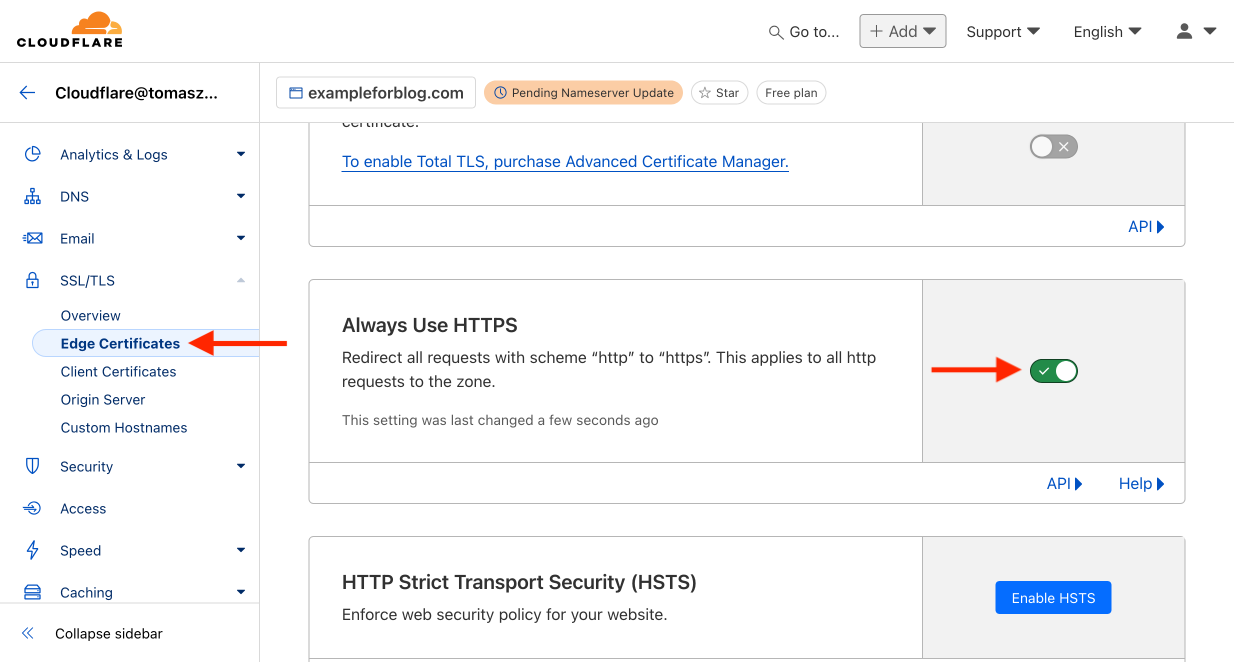
- In the same tab from the left menu, select Edge Certificates. Find the window labeled Always Use HTTPS and enable this feature.
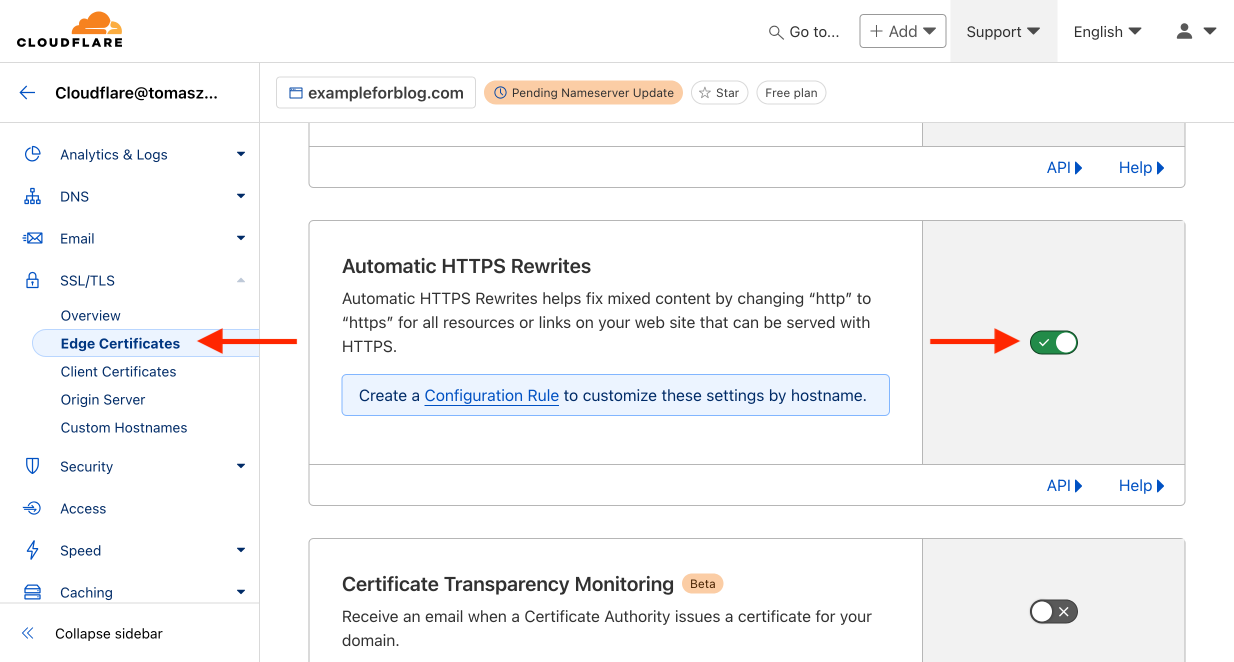
- Scroll down, find Automatic HTTPS Rewrites, and also enable this feature.
Done. We can now log out of Cloudflare and proceed to the next step.
Alternative solution with FreeDNS::42 instead of Cloudflare
The same result as in Cloudflare can be achieved by using, for example, FreeDNS::42 or another similar tool.
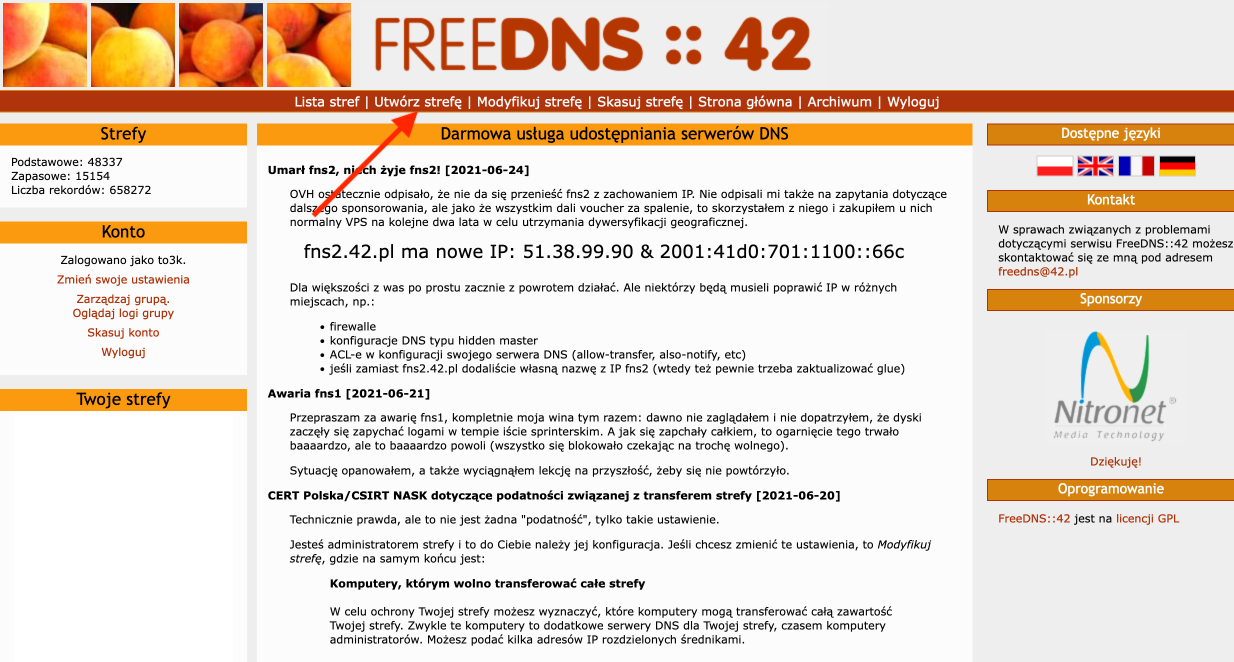
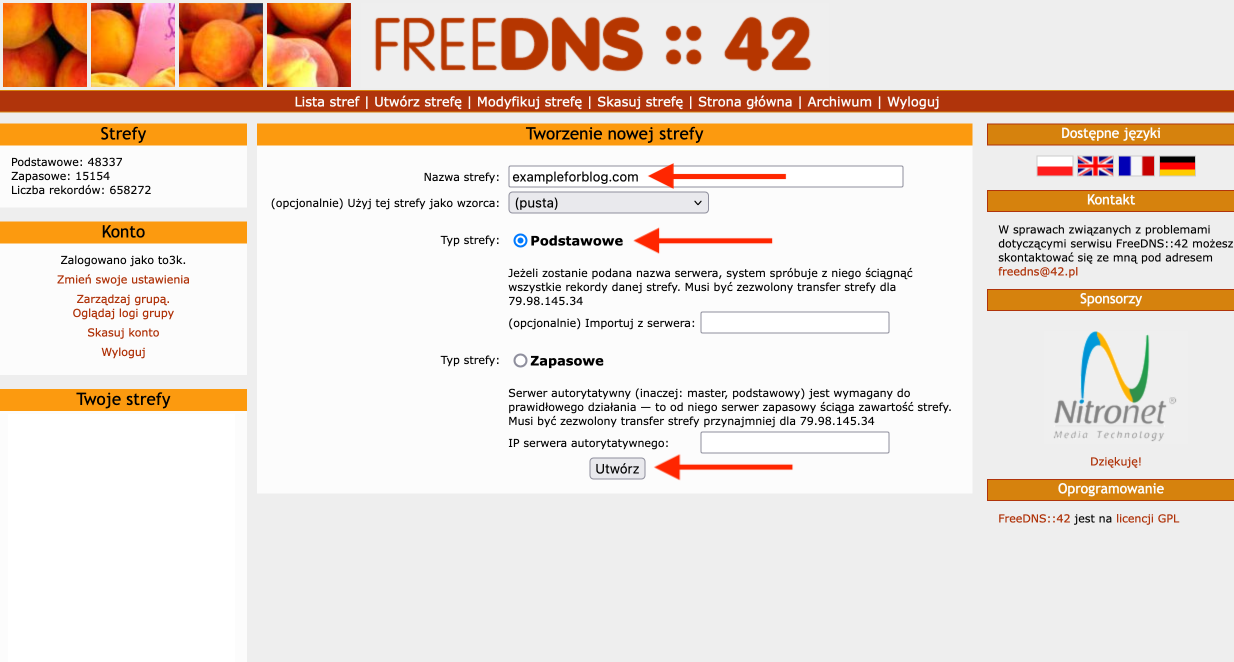
- We start by logging into our FreeDNS::42 account. Then, we go to Create Zone.
- For Zone Name, we enter our domain. For Zone Type, we select Primary. Then, we press the Create button.
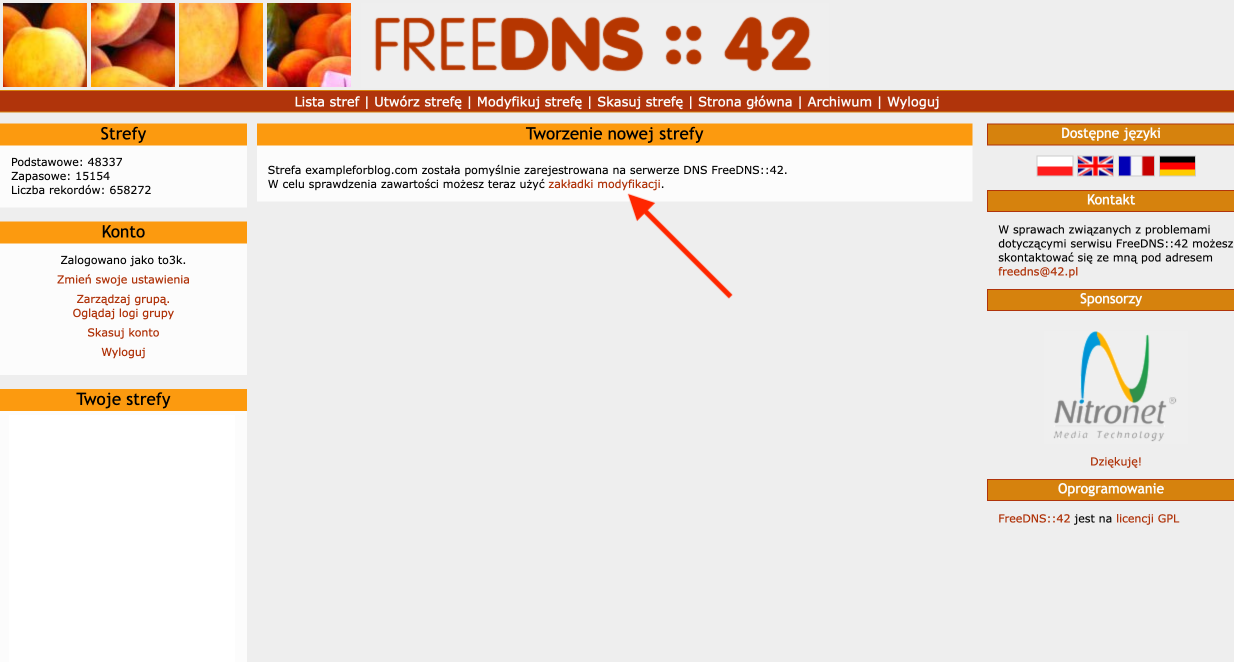
- Now that the zone is created, we move to the modification tab.
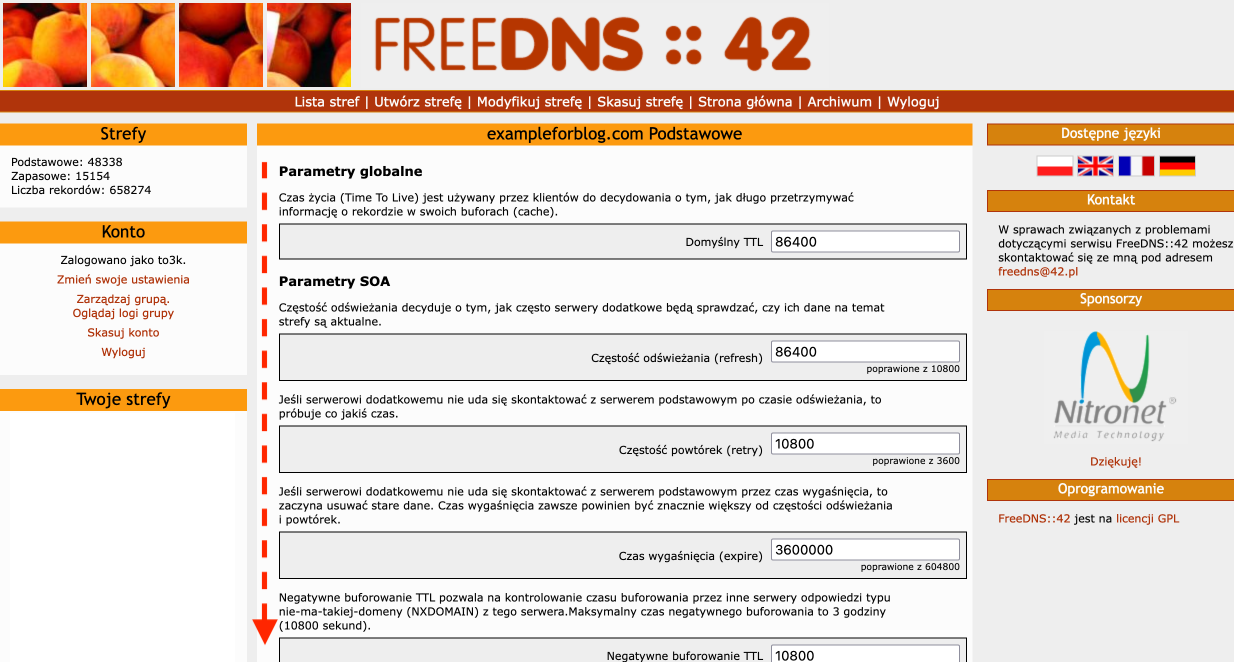
- Scroll down…
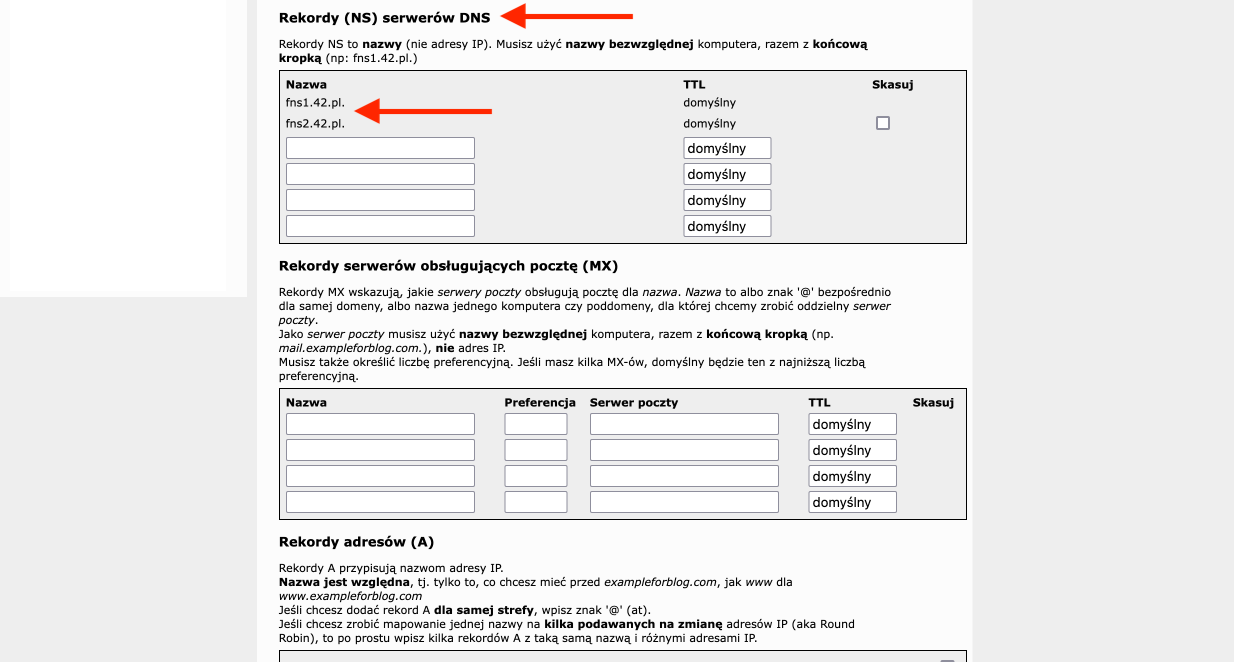
- … until we find the DNS Server Records (NS) section. It will show two addresses: fns1.42.pl and fns2.42.pl. We need to point all traffic from our domain to these DNS addresses. This is done on the domain provider’s website.
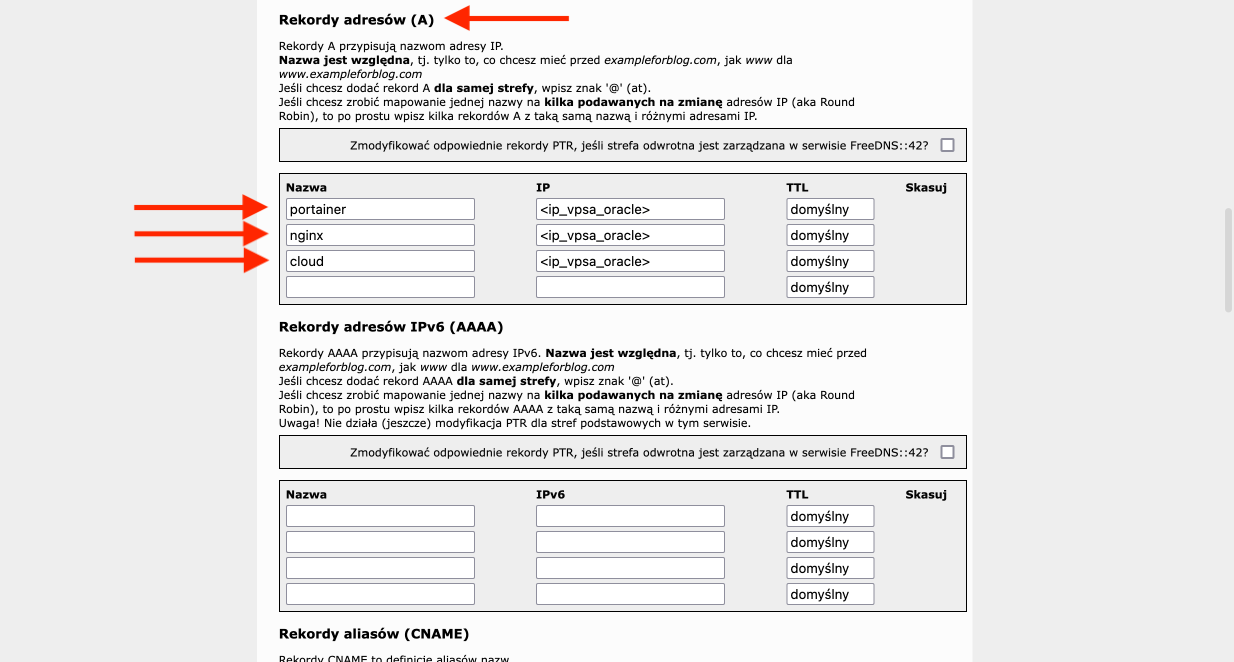
- On the same page, scroll a little further down to the Address Records (A) section, where we add three records. In the Name column, they will have the following values: portainer, nginx, and cloud, respectively. In the IP column, we enter the IP address of our VPS from Oracle three times.
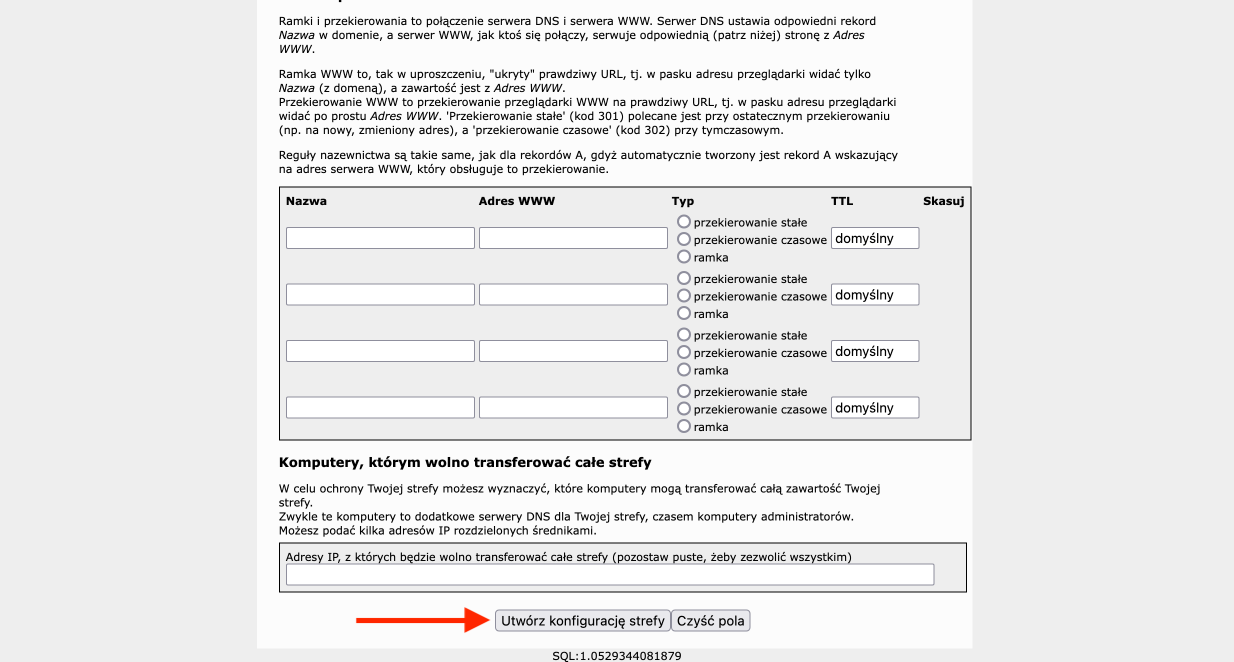
- We finalize this configuration by pressing the Create Zone Configuration button at the very bottom.
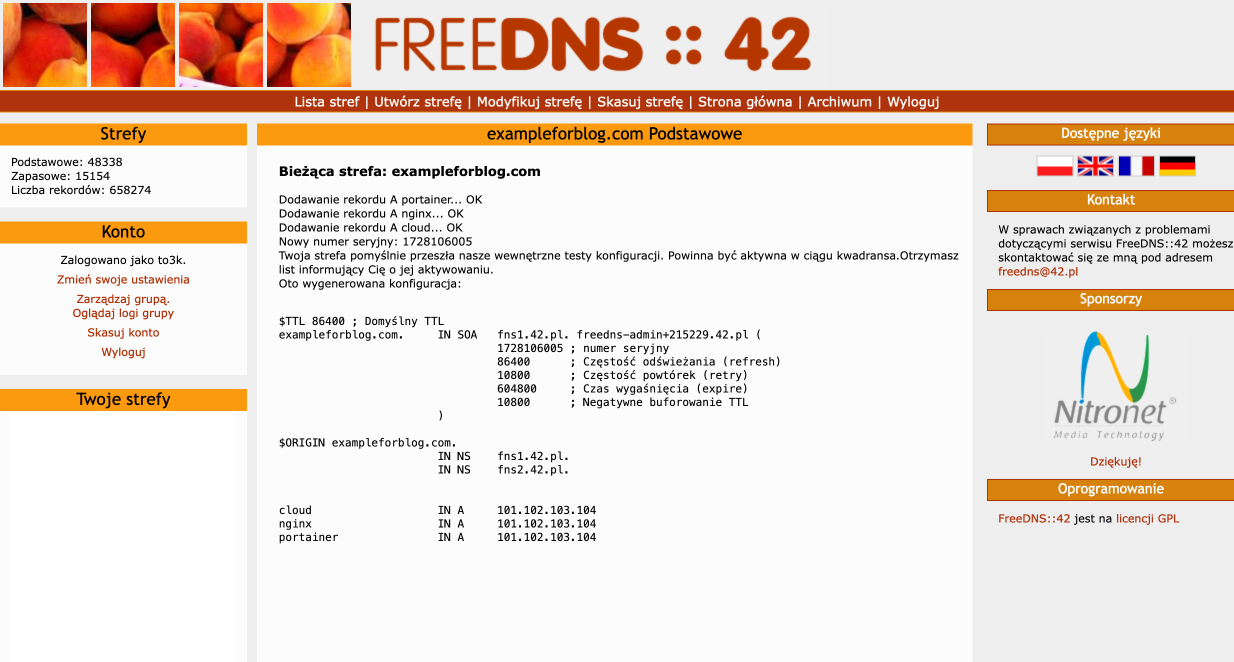
- Finally, a summary will be displayed where we can check if everything is correct.
NGINX Proxy Manager
NGINX Proxy Manager will be used for properly routing traffic to our server via the domain that we just added in Cloudflare/FreeDNS::42. The goal is to ensure that, for example, traffic from the subdomain portainer.exampleforblog.com is directed exactly to port 9443, which is where the Portainer admin panel is running. In simple terms, NGINX Proxy Manager acts as a traffic sign.
We start launching the NGINX Proxy Manager container by logging into the Portainer admin panel. In the Environments section, we select local and press the Live connect button. From the menu on the left, select Stacks and press the Add stack button. In the Name field, enter nginx_proxy_manager. In the Build method section, leave the default Web editor. Paste the following code into the Web editor text area:
version: '3.8'
services:
  app:
    image: 'jc21/nginx-proxy-manager:latest'
    restart: unless-stopped
    ports:
      - '80:80' # Public HTTP Port
      - '443:443' # Public HTTPS Port
      - '81:81' # Admin Web Port
    volumes:
      - /var/lib/docker/volumes/nginx_proxy_manager/data:/data
      - /var/lib/docker/volumes/nginx_proxy_manager/letsencrypt:/etc/letsencrypt
Let me briefly comment on it. We are using the image jc21/nginx-proxy-manager, which will be downloaded from Docker Hub. The container will automatically restart every time it stops, unless we manually stop it ourselves. It will use ports 80 (HTTP), 443 (HTTPS), and 81. The admin panel will be accessible via the last port. This is where we will point the subdomain nginx.exampleforblog.com to. We are creating two volumes to extract the folders /data (configuration data) and /etc/letsencrypt (where the SSL certificates will be stored) from the container.
After pasting this code, there’s not much else we need to do because we only need to create this configured container by using the Deploy the stack button located in the Actions section at the bottom. Doing this from the Stacks level has the advantage that everything is handled at once, i.e., creating the container and the volumes needed for it to function.
Let’s now proceed to the NGINX Proxy Manager admin panel. You can access it through the browser by typing in the address bar:
https://<oracle_vps_ip>:81
You will be greeted by the login form. But what’s the username and password? The documentation helps us out here, stating that the container is created with default credentials, which you are required to change upon first login. These are:
Email:    admin@example.com
Password: changeme
Log in with these credentials, and immediately create a new administrator account based on your own details. Go to the Hosts tab at the top bar and select Proxy Hosts. Using the Add Proxy Host button, add the first one. In the Domain Names field, enter portainer.exampleforblog.com (of course, replace exampleforblog.com with your own domain). In the Scheme field, select https. In Forward Hostname / IP, enter your server’s local IP address. To find it, you need to install net-tools:
sudo apt install net-toolsAnd use the following command:
ifconfigThe IP address you’re looking for will be in the enp0s6 section. Here’s a snippet from the output of the ifconfig command:
enp0s6: flags=4163<UP,BROADCAST,RUNNING,MULTICAST>  mtu 9000
        inet 10.0.0.195  netmask 255.255.255.0  broadcast 10.0.0.255
        inet6 ...  prefixlen 128  scopeid 0x0<global>
        inet6 ...  prefixlen 64  scopeid 0x20<link>
        ether 02:00:17:06:21:40  txqueuelen 1000  (Ethernet)
        RX packets 335922  bytes 763693420 (763.6 MB)
        RX errors 0  dropped 0  overruns 0  frame 0
        TX packets 301753  bytes 418933520 (418.9 MB)
        TX errors 0  dropped 0 overruns 0  carrier 0  collisions 0
The address we are looking for is in my case 10.0.0.195 (in your case it will almost certainly be different). All that’s left to do is to enter 9443 in the Forward Port field. The correctly filled form in my case looks like this:
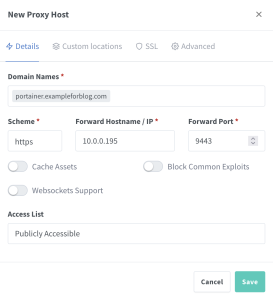
But this is not the end, because we still need to switch from the Details tab to SSL, where from the drop-down menu titled SSL Certificate we select Request a new SSL Certificate. Additionally, we select the Force SSL option and I Agree to the Let’s Encrypt Terms of Service.
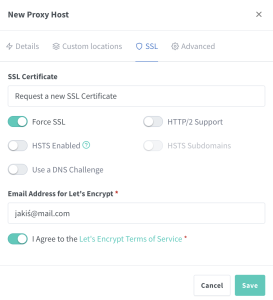
Now we can confirm by clicking the Save button. We repeat this same process two more times for the remaining two subdomains we created in Cloudflare.
- for nginx.exampleforblog.com enter port 81
- for cloud.exampleforblog.com enter port 444
Nextcloud and MariaDB
The last thing we have to do is create a Nextcloud container, for which the database will be MariaDB running in a separate but linked container. We will do this similarly to how we did it for the NGINX Proxy Manager, i.e., through Stacks in Portainer. So we go to Stacks and press the Add stack button. For Name, enter nextcloud, and in the Web editor, paste the following ready-made code:
version: '2'

services:
  db:
    image: mariadb:latest
    restart: unless-stopped
    command: --transaction-isolation=READ-COMMITTED --binlog-format=ROW
    volumes:
      - /var/lib/docker/volumes/Nextcloud_Database:/var/lib/mysql
    environment:
      - MYSQL_ROOT_PASSWORD=<database_root_password>
      - MYSQL_PASSWORD=<nextcloud_user_password>
      - MYSQL_DATABASE=nextcloud
      - MYSQL_USER=nextcloud

  app:
    image: lscr.io/linuxserver/nextcloud:latest
    restart: unless-stopped
    ports:
      - 444:443
    links:
      - db
    volumes:
      - /var/lib/docker/volumes/Nextcloud_Application/config:/config
      - /var/lib/docker/volumes/Nextcloud_Application/data:/data
    environment:
      - MYSQL_PASSWORD=<nextcloud_user_password>
      - MYSQL_DATABASE=nextcloud
      - MYSQL_USER=nextcloud
      - MYSQL_HOST=db
      - PUID=1000
      - PGID=1000
      - TZ=Europe/Warsaw
This code essentially creates a tandem of two containers. The first is the database, and the second is our Nextcloud cloud. Interestingly, I didn’t assign any port to the database, though I could have, as I might want to use it in the future. This isn’t a major problem, since it can be modified later. For Nextcloud, I assigned port 444, as port 443 is already used to handle NGINX Proxy Manager, but we’ve already sorted that out with proper forwarding during the NGINX Proxy Manager configuration stage. As for the Docker image, I used the lscr.io/linuxserver/nextcloud, not the official image, which is also available on Docker Hub. The reason is that the image from linuxserver (probably) was the first to support the ARM architecture, and I’ve just been using it for a long time. I’ve also had mixed experiences with the official one, so I prefer this one and recommend it. Note that in the code, there are two placeholders <database_root_password> and <nextcloud_user_password>, so replace them with your chosen passwords. This parameterized Stack is created by confirming with the Deploy the stack button, and we’re done.
To access our freshly created cloud, we no longer need to fiddle with IP addresses, just type cloud.exampleforblog.com in the browser’s address bar. All that’s left is to create an admin account and complete the installation. During the installation, you may need to re-enter the database credentials for MariaDB, as for some unknown reason, they occasionally don’t get saved properly in the container during its creation. This is not a major issue, as you just need to expand the advanced settings menu during the Nextcloud installation, select MariaDB, and fill in the four fields with the data you provided when creating the Stack in the Web editor.
MYSQL_PASSWORD=<nextcloud_user_password>
MYSQL_DATABASE=nextcloud
MYSQL_USER=nextcloud
MYSQL_HOST=db
I wrote quite a bit about Nextcloud in two posts, so I’ll link them here as they may be useful:
Finally, here’s one more thing that everyone will probably encounter, and that’s this error message:
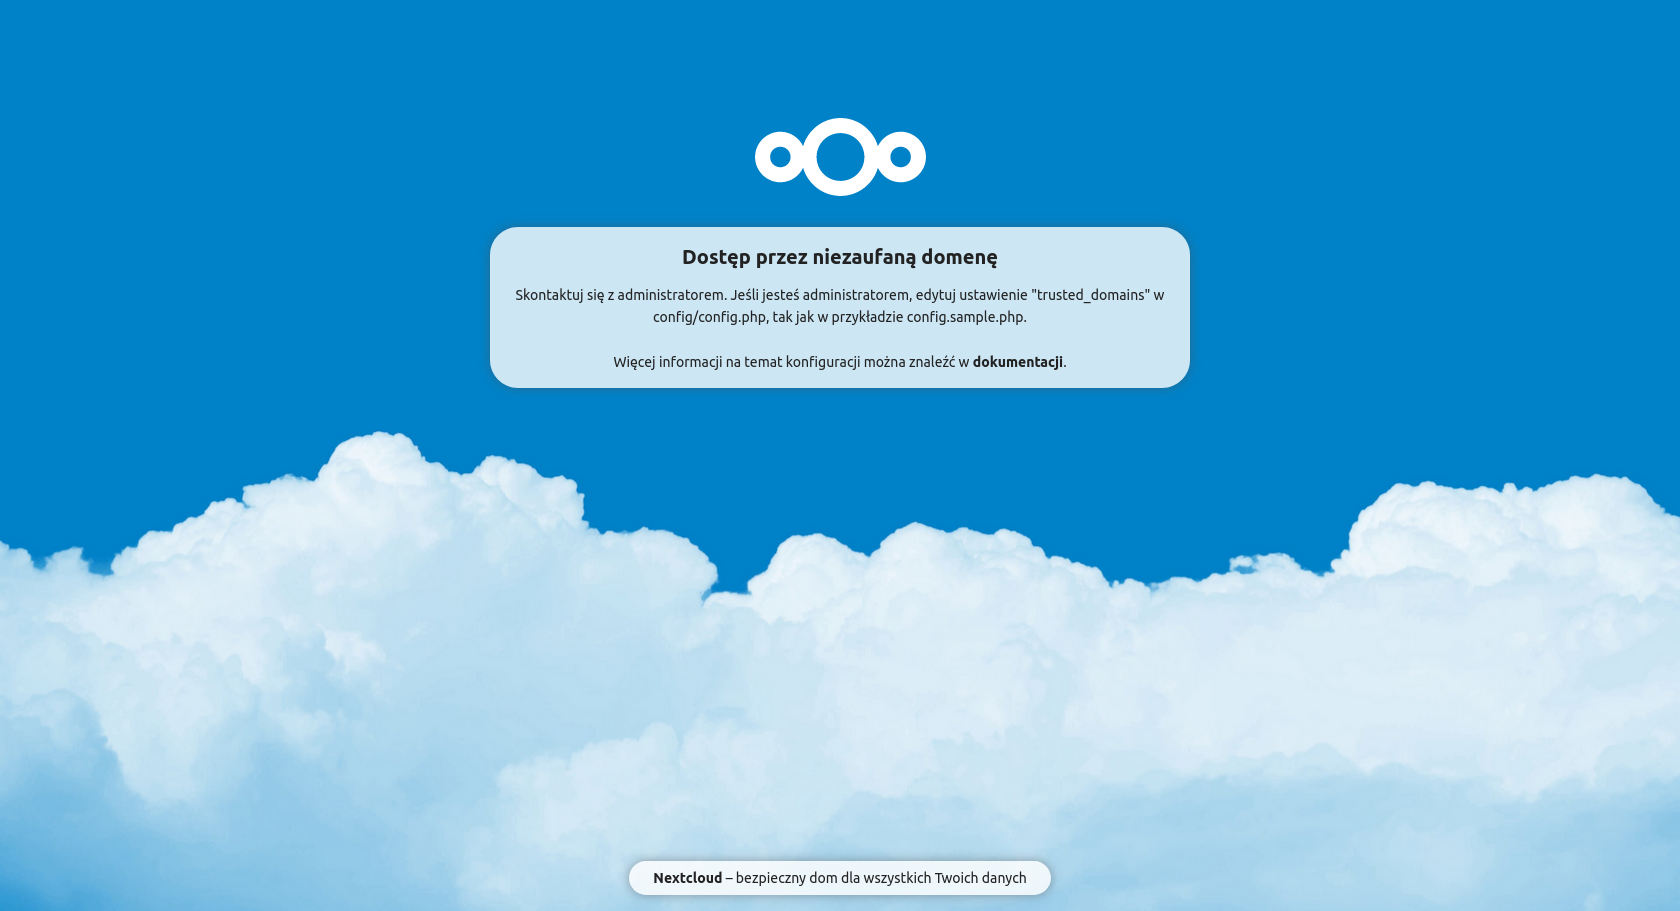
The solution to this problem is relatively simple, but finding it is not so straightforward, as it requires some searching through the documentation. They could have made it definitely more intuitive… Fortunately, you have me, the guy who has already done all the work and will soon present a ready and concise solution. We open the config.php file mentioned in the message in a text editor.
sudo su
nano /var/lib/docker/volumes/Nextcloud_Application/config/www/nextcloud/config/config.php
We find the section trusted_domains and fill it out similarly to this:
(...)
'trusted_domains' =>
    array (
      0 => 'localhost',
      1 => 'cloud.exampleforblog.com',
  ),
(...)
Of course, instead of cloud.exampleforblog.com, you should provide your subdomain, which you configured earlier. Now refresh the page in your browser, and access will be possible.
Closing ports (update 07-10-2024)
Lastly, we can also close ports 81, 444, and 9443 at the Oracle and iptables firewall levels. This isn’t a necessary security measure, but it’s certainly considered good practice. These ports are removed in the same way they were added, so I won’t describe that. However, I will mention that doing this will ensure that Portainer, NGINX Proxy Manager, and Nextcloud will still be accessible from the outside, but only through the appropriate subdomains we assigned to them in the NGINX Proxy Manager. It will no longer be possible to access, for example, Portainer by entering https://<oracle_vps_ip>:9443. However, the ports must remain open at the ufw level, because if they are closed there, it won’t be possible to access the resources from the outside even through NGINX.
Summary
Once again, I’ve ended up with a terrible lengthy post, but I believe you like it. This entry contains a piece of solid information. I hope it will be useful to someone. If it helped you, feel free to contact me in any way possible (comment below, Mastodon, etc.) and show off your new and, most importantly, fully free cloud. Recommend this method to your friends, so they can benefit from it too. If you encounter any problems, also don’t hesitate to write. I promise I will do my best to help as much as I can. Good luck!
Oh, and finally, note that this environment, as created, is basically an ideal foundation for setting up various other valuable services on this server. I think I will return to this topic more than once in future posts. If you have any interesting ideas on how to use such a machine, I would love to read about it!
If you liked this post then you can support me! 🙂


 Poprzedni wpis
Pingback: Darmowa chmura ~200GB na Twoje pliki – Tomasz Dunia Blog
Pingback: IT Security Weekend Catch Up – October 12, 2024 – BadCyber