![Free VPS with 4 OCPU, 24GB RAM and 200GB storage [ENG 🇬🇧]](/images/oraclefreetier.png)
🇵🇱 Przejdź do polskiej wersji tego wpisu / Go to polish version of this post
Table of contents:
- What do I have from it?
- What’s the deal here?
- Registering with Oracle Cloud
- Creating an Oracle Cloud Instance
- SSH connection to the instance
- Opening ports
- IPv6 Support
- Summary
Surprisingly, it’s not a scam, and despite the title sounding like clickbait, in fact it’s not! We’re talking about Oracle Cloud Free Tier. Don’t ask me how they manage to offer it completely for free, especially with such specifications… Is there a catch? It’s possible, but I don’t see it. Perhaps the only one is that Oracle is another huge corporation that is eager to get its hands on our data, and we’re giving it to them by using their seemingly free services. Everyone will have to make their own decision whether to use this offer or not. In this post, I will describe step by step how to get such a VPS (let’s remind ourselves that this acronym stands for Virtual Private Server).
What do I have from it?
I’ve mentioned this before, but I’ll repeat it again here: as usual, I’m not playing any affiliate links or partner programs, which means that I’m not receiving any financial benefits for recommending this solution to you. Content on my blog is free from such tactics, and I create it solely with the purpose of sharing knowledge, as well as to have a creative outlet from my daily activities. However, if you, dear Reader, feel like supporting me financially, it would be greatly appreciated! You can do this through my accounts on Patreon and/or Patronite.
What’s the deal here?
Returning to the topic of free VPS, the point is that Oracle has something called the Free Tier program, which can be accessed after registration and confirmation of identity by attaching a credit or debit card. You don’t need to do anything else. On the start, you also get an additional $300 (which in Polish currency is 1150PLN) for 30 days, which can be used to test paid features. We won’t be using that, as we will focus on the Free Tier itself, which is a program offering free (supposedly forever) VPSs. Of course, there are certain limitations on what is free and what is not, but I am leaning towards this solution because in my opinion, you can get quite a decent machine out of it. An additional bonus is that Oracle also offers a dedicated public IPv4 address, which is a huge advantage that is not even available in some paid VPSs from other providers. Thanks to this option, we won’t have to deal with any Dynamic DNS configurations.
The limits refer to the fact that larger cloud solution providers like to charge everything on an hourly basis. On the one hand, it is convenient for both them and the user, who firstly has the option of flexibly renting services, and secondly, can easily scale them. However, on the other hand, it is really difficult to calculate the real cost that will be incurred, for example, after a month or a year. Oracle has two main converters: OCPU hours and GB hours. OCPU stands for Oracle Compute Unit, and in this converter, it is about how much computing power we use per month. In the case of Oracle’s free plan, we have the option of using up to 4 virtual machines equipped with a Ampere A1 processor in ARM architecture, with a maximum of 3000 OCPU hours per month. It depends on you what structure you plan to run in the Oracle cloud, but I will consolidate all these parameters into one machine, so I will create a VPS with 4x OCPU. The GB hour converter refers to the amount of RAM we use. In the Free Tier, we get 18000 GB hours per month, which, when divided by the number of days in a month and the number of hours in a day, gives us 25GB per hour, so we can run one or many machines with a total of 24GB of RAM. Of course, I will put the entire 24GB of RAM into one machine.
An additional restriction that Oracle imposes on the Free Tier program is the amount of available disk space. We have a total of up to 200GB of memory for data to use. It can be divided into parts of 50GB between machines or assigned as a whole to one, which is exactly what I intend to do.
There is also an option to run up to two instances based on AMD processors in parallel, but they do not have parameters that match the specification mentioned earlier, because they are virtual machines with only 1/8 OCPU power and 1GB of RAM. Therefore, we will stick to the solution based on the ARM architecture. ARM has been on the market for some time now and it’s really hard to find software that has not yet been ported to this architecture and does not work on it. As a reminder, the entire Raspberry Pi platform and its alternatives run on ARM.
Registering with Oracle Cloud
I will simplify the process only to points enriched with screenshots, describing step by step the whole process.

-
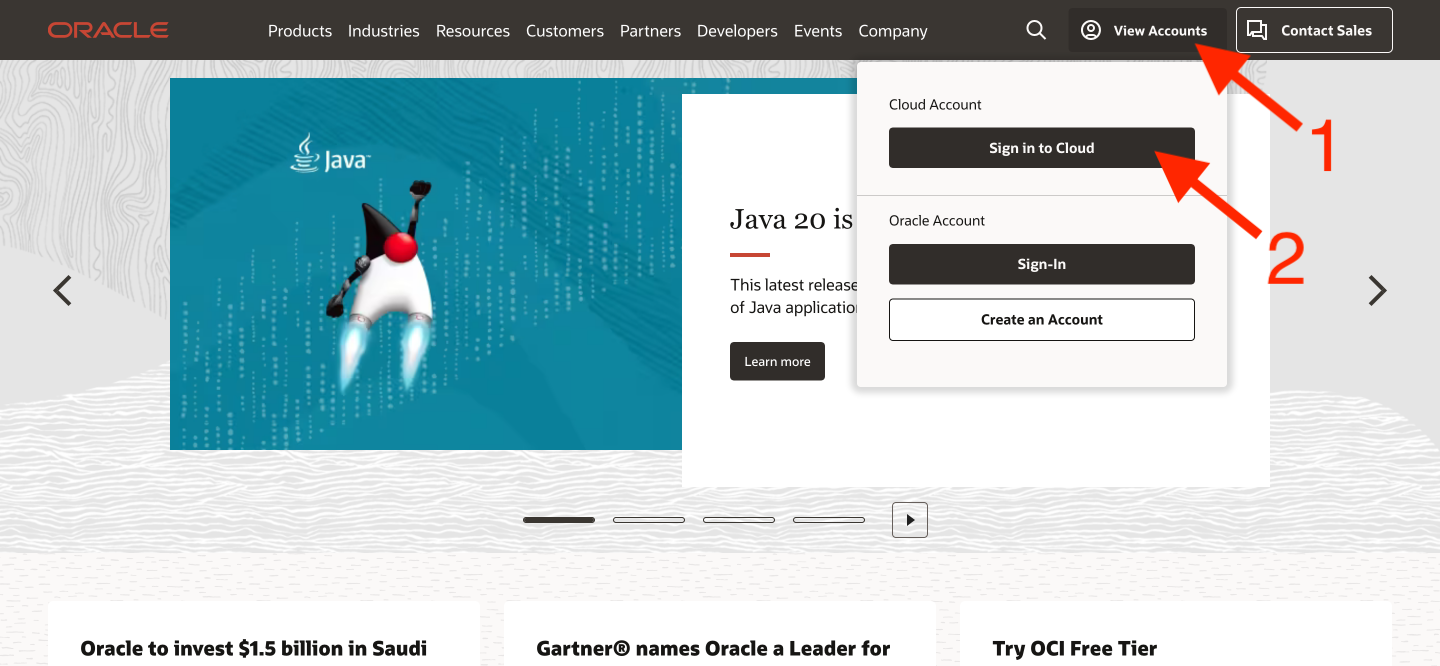
Go to oracle.com, find the View Accounts button [1] in the upper right corner, and click it to bring up a window. Then click the Sign in to Cloud button [2].
-
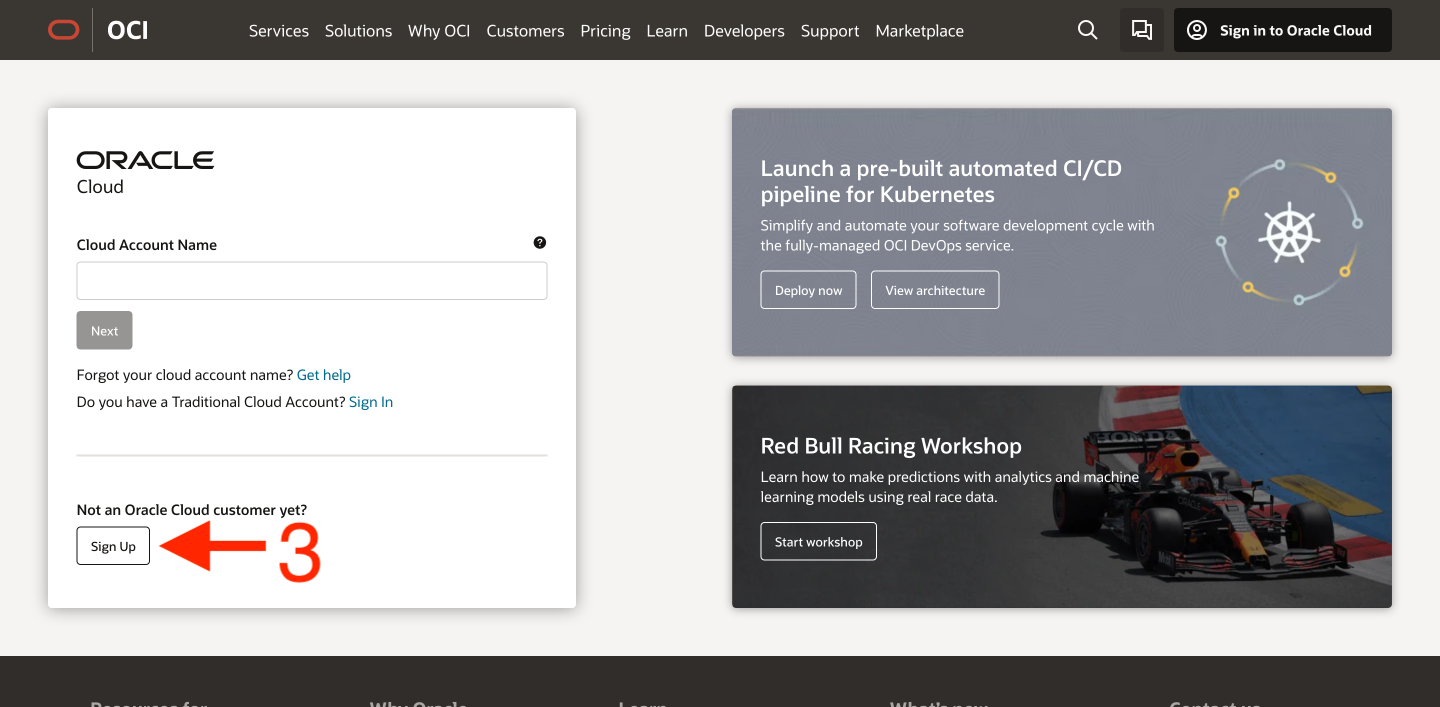
You will be redirected to the login panel. Under the section Not an Oracle Cloud customer yet?, click the Sign Up button [3].
-
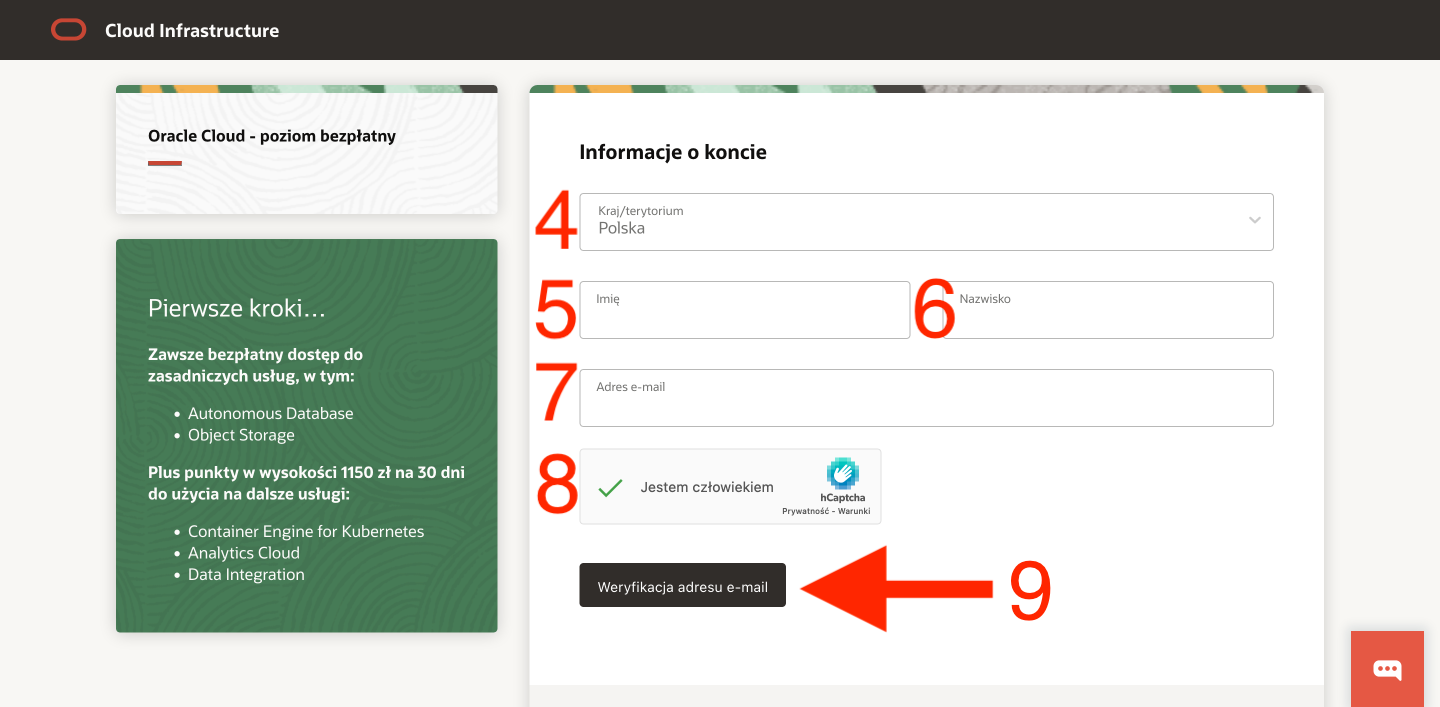
The page will take you to a registration form, where you provide basic information such as your country [4], first name [5], last name [6], and email address [7]. You will receive a confirmation email at the email address you provided, so it must be a valid one. Note that some people like to use temporary email solutions (such as a 10-minute email) in these cases. Finally, confirm that you are not a robot [8] and click the Email Verification button [9].
-
Check your email inbox for an email from Oracle, which will contain a button to confirm your email address [10]. In my case, it took quite a while for the email to arrive, despite the fact that the website states that the email is valid for 30 minutes. Nonetheless, it worked out eventually. It is possible that you will need to be patient, as the Oracle registration system seems to be quite buggy… Nevertheless, you can take this time to do something else entirely and even close the Oracle Cloud registration form tab, as you will be redirected back there after clicking the link in the email.
-
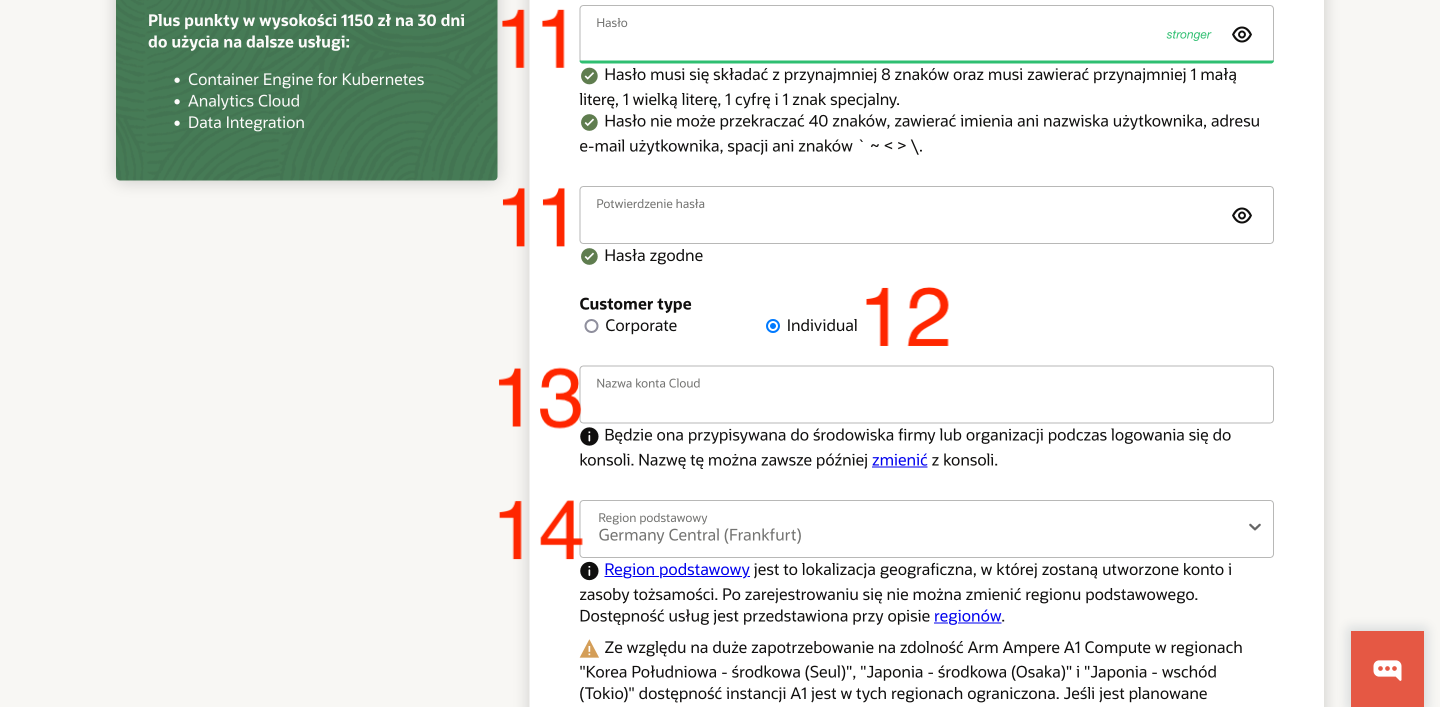
After confirming the email and returning to the form, its scope expands. We provide the password for the account twice [11]. In the Customer type section, we select Individual [12] (interesting that this is seemingly the only thing that has not been translated into Polish). In the Cloud Account Name field, we enter our identifier [13], which we will use to log in, and it is important to note that this is not a login, as the email address is used as the login during the login process. However, this name is equally important during the login process, so it must be remembered. Finally, we need to set our primary region [14]. The region selection is important because with a free account, machines can only be registered in the region that we declare during registration. Only in a paid plan is it possible to have access to all regions. I recommend choosing the region that is closest to our place of residence, so for Poland, it will be the German Frankfurt. Anyone who has ever bought a VPS knows that in Europe, the two most popular regions are Helsinki (Finland) and Frankfurt (Germany).
-
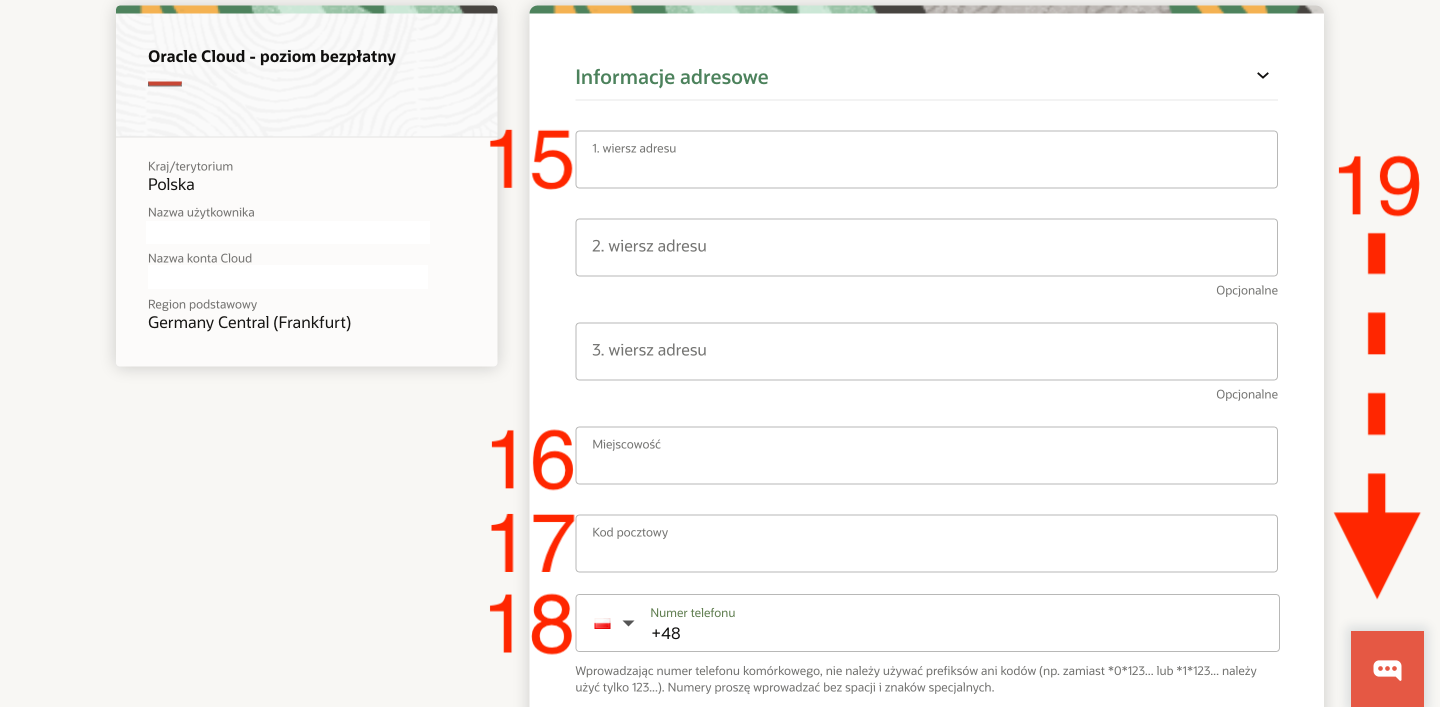
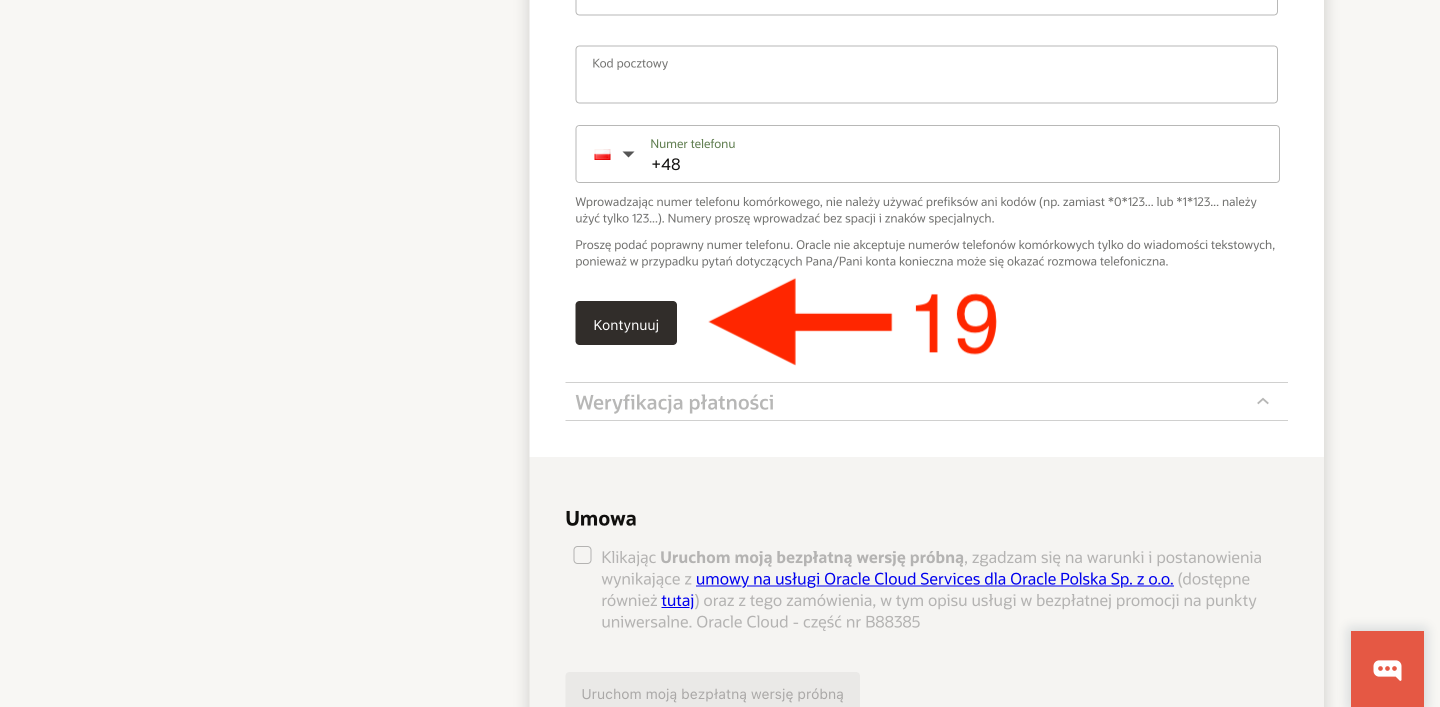
The next page concerns address data, so we provide our residential address [15], city [16], postal code [17], and phone number [18]. After that, we confirm by clicking the Continue button [19].
-
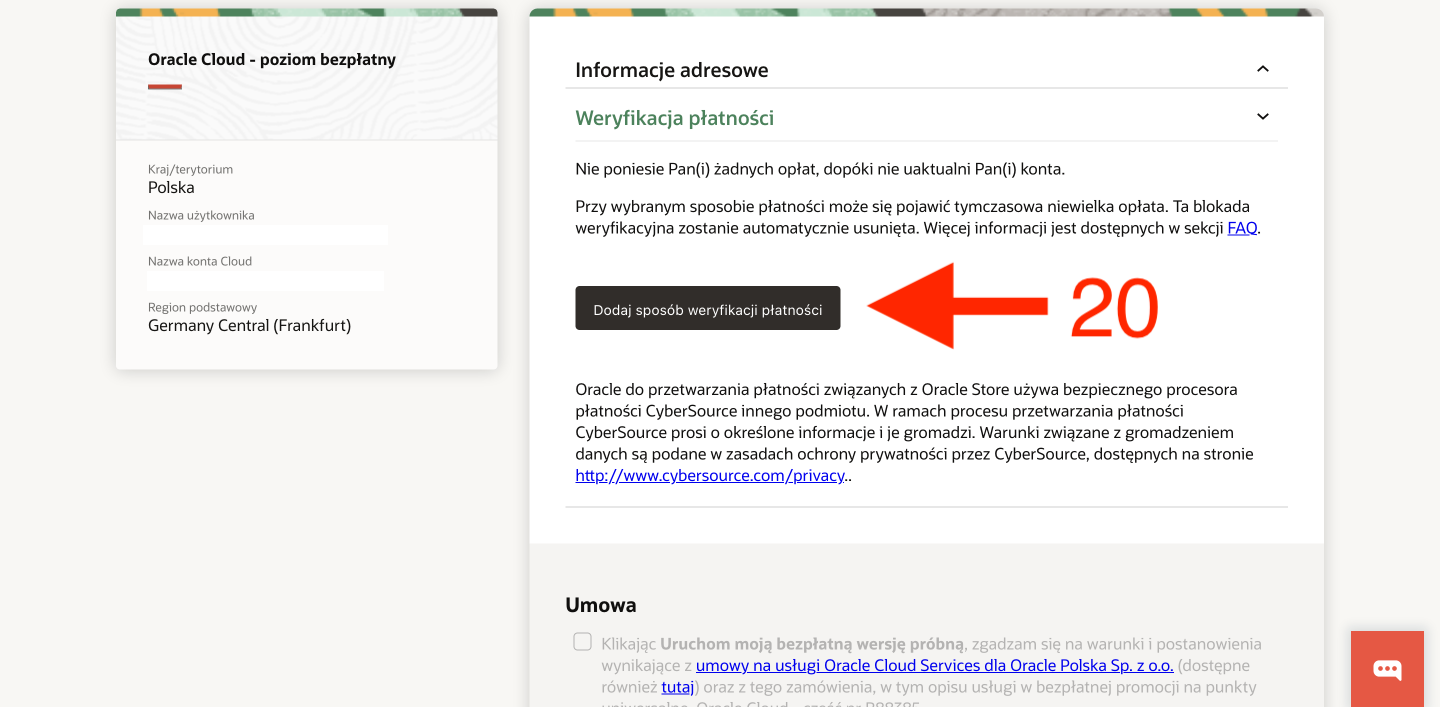
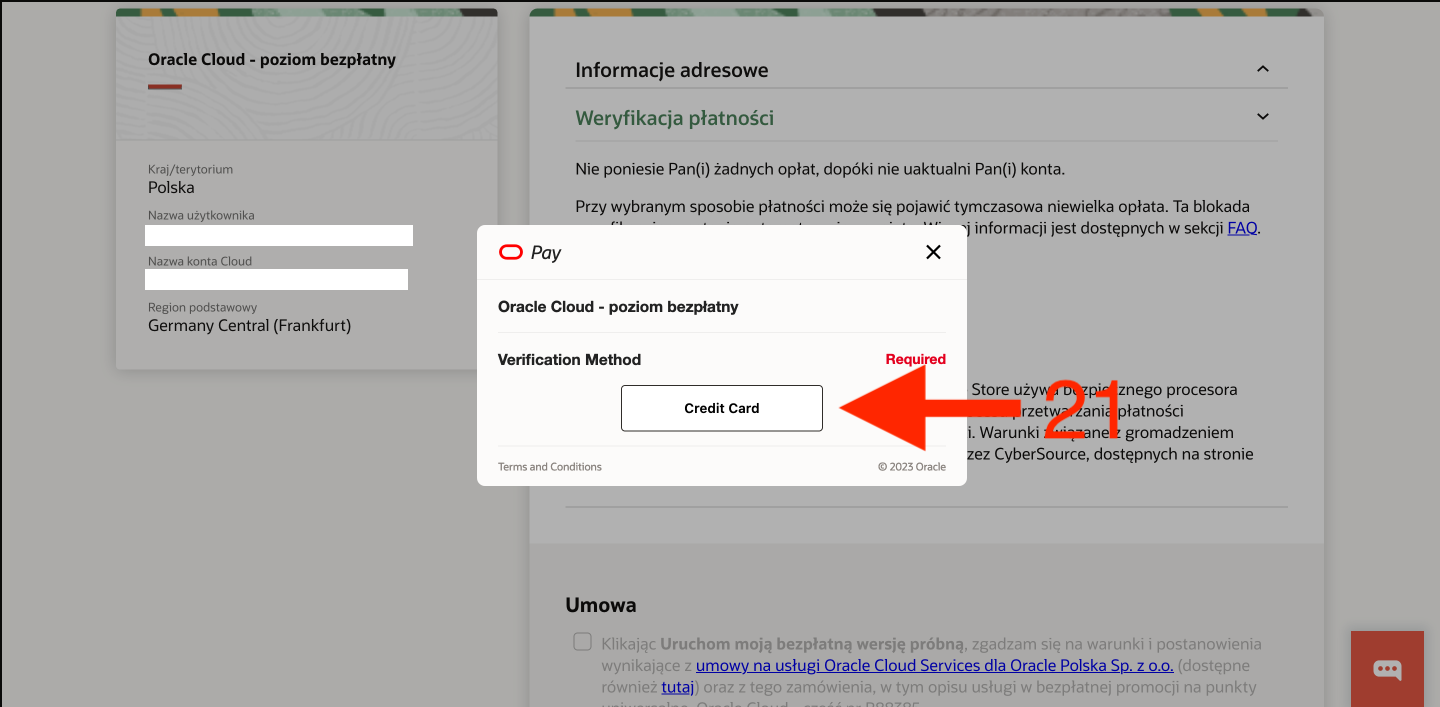
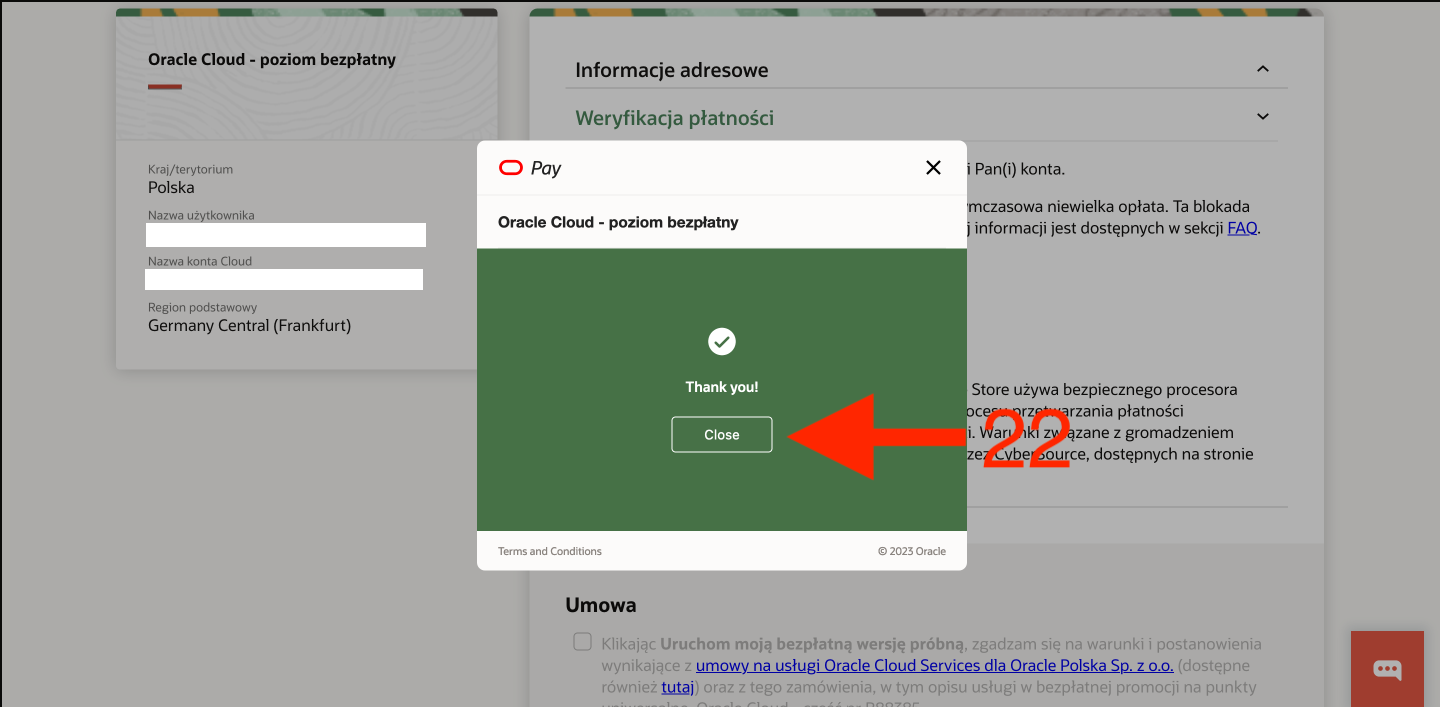
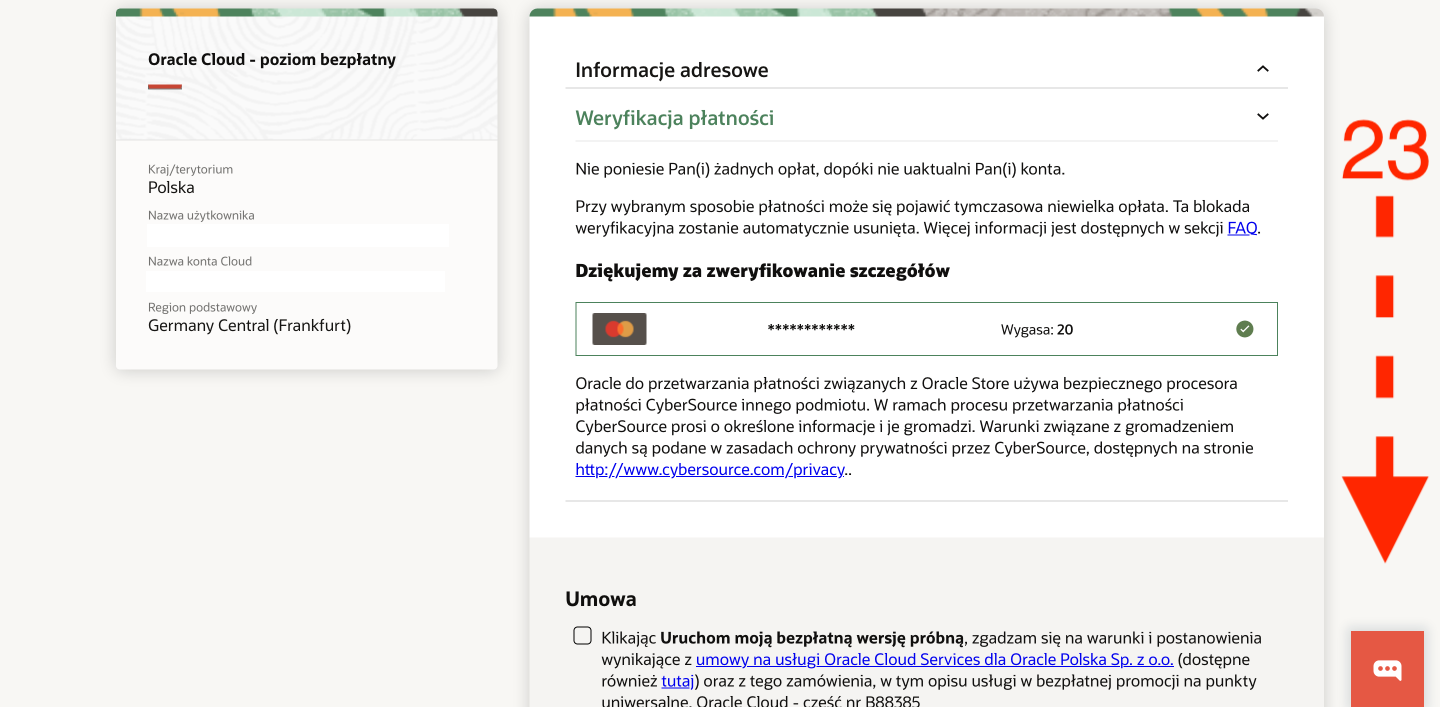
The section concerning the address is collapsed, and identity verification through payment card is expanded. Here, I am not sure, because I did not check, but I assume that the card information on the card must match what we provided earlier. I am writing this because if a minor reads this and performs all of this with parental consent and also uses their card, they must provide the parent’s information from the very beginning, not just now. After clicking the Add Payment Verification Method button [20], a window will appear, which was supposed to be a selection window, but in practice, it only allows us to choose the Credit Card option [21], which we also select. At this point, the payment form will open, pre-filled with the previously provided data, and at the end of it, there are fields where we should enter the card number, expiration date, and CVV number. We start the payment process, and here it will look different for each bank. I assume that for most, we will have to confirm this transaction on the phone or in the transaction service. The verification process is standard and involves Oracle charging us a sum of about $1 (when I did it, it was 4.80 PLN) and then returning the same amount after a second. In most banks, the transaction is immediately treated as invalid and will not appear on the billing at all. I also have to add that Oracle is quite picky when it comes to accepting some cards, as confirmed by the opinions that can be found on the Internet. Virtual or temporary cards will most likely be immediately rejected. Apparently, there is also a general problem with Revolut. I tried with a card from mBank, and it didn’t work, so for the second attempt, I used Citi Bank, and it went through. After a successful verification, we will receive a green window…
-
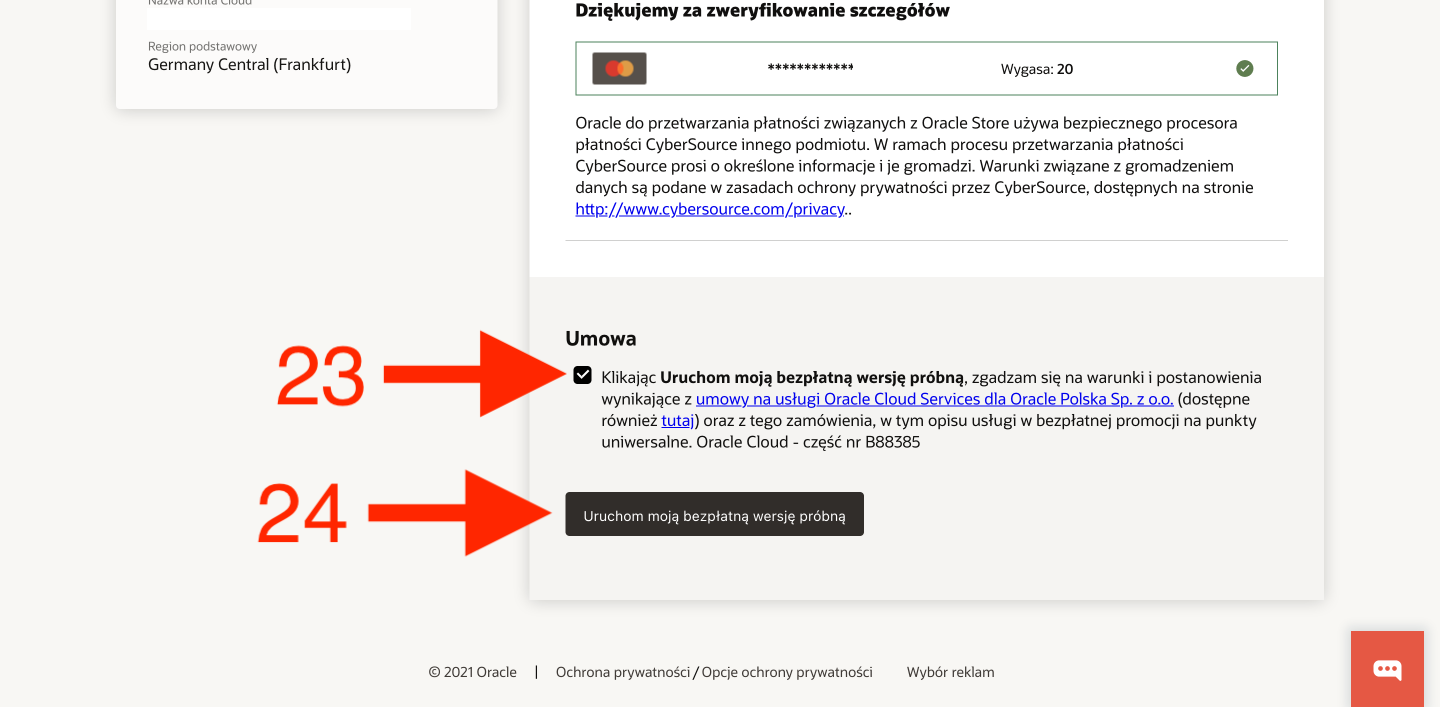
After closing the aforementioned window, we return to the registration form, where our card should have been added. We scroll down the page, select the required consent to activate the free trial version [23], and finalize everything with the Launch my free trial button [24].
-
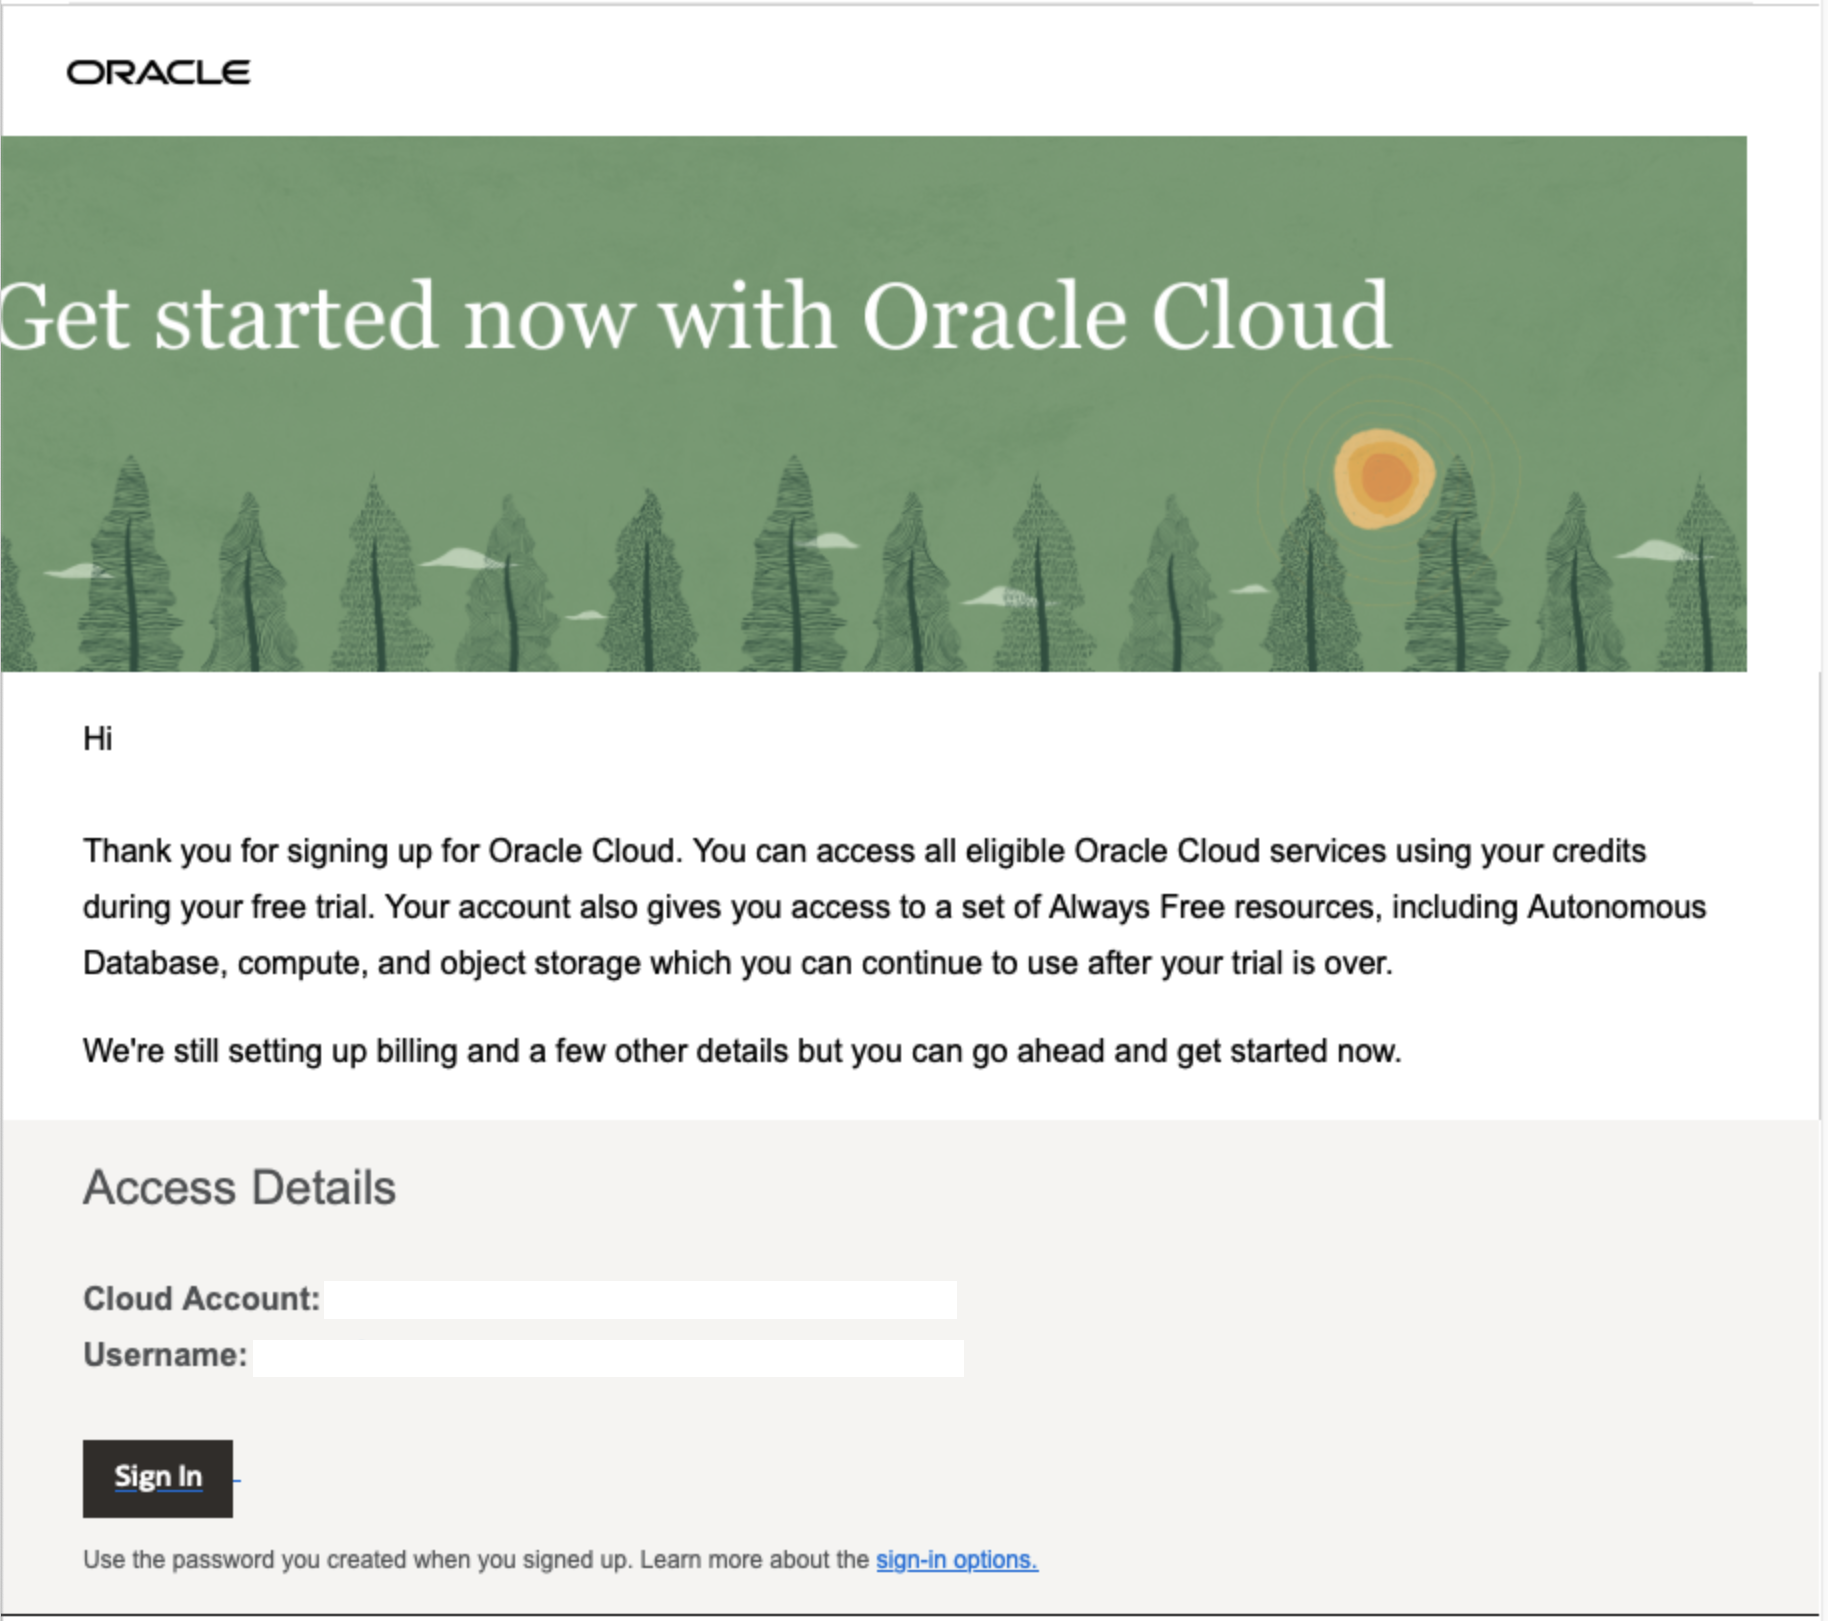
Now we just have to wait for the confirmation email that our account has been successfully created and all the resources available with the free account have been granted to us.
Creating an Oracle Cloud Instance
Oracle refers to virtual machines as instances. In this chapter, we will create exactly such an instance as described in the title of this post and in one of the above chapters.
-
Just like in the previous chapter, we go to oracle.com, find the View Accounts button in the upper right corner, and after clicking it, a window will pop up where we click the Sign in to Cloud button.
-
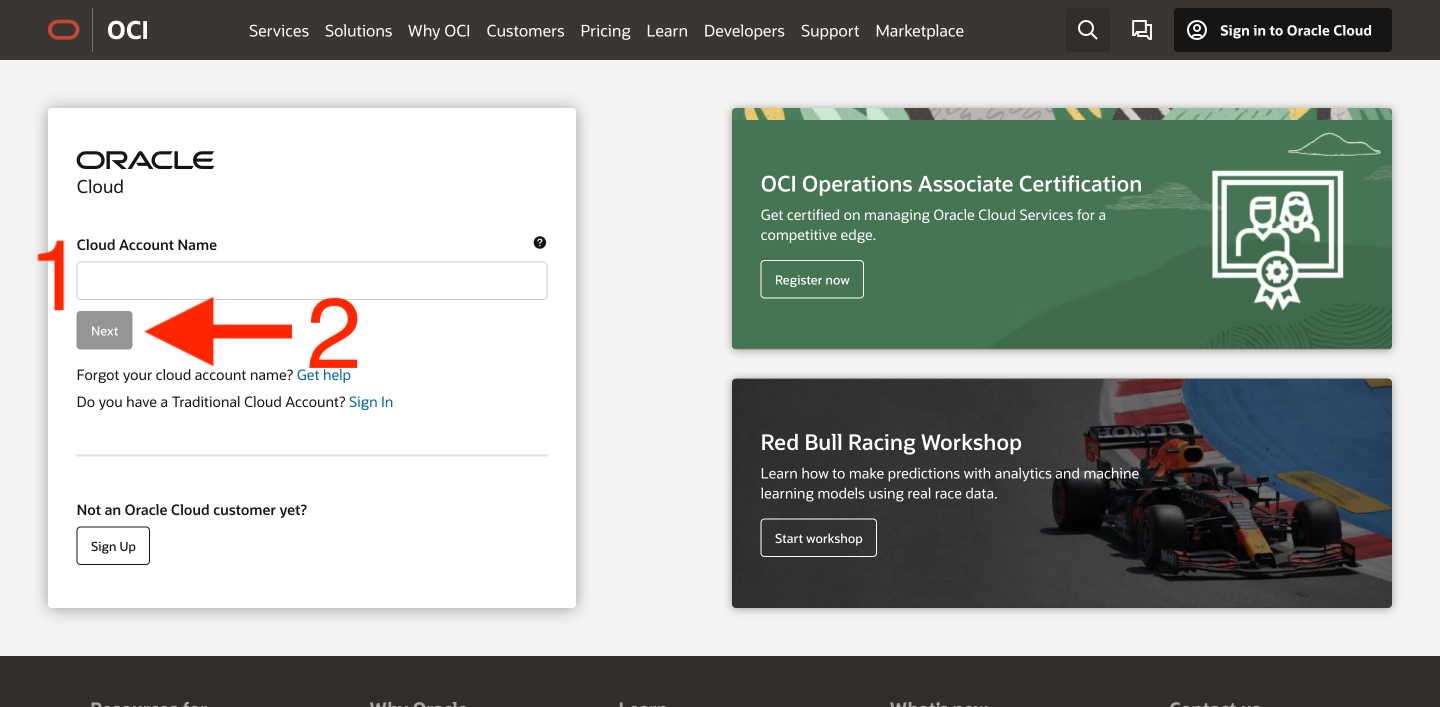
We will be redirected to the login panel and this time we fill in the Cloud Account Name [1] field according to what we entered in the Cloud Account Name field during registration (this is the important identifier I wrote about earlier). We confirm with the Next button [2].
-
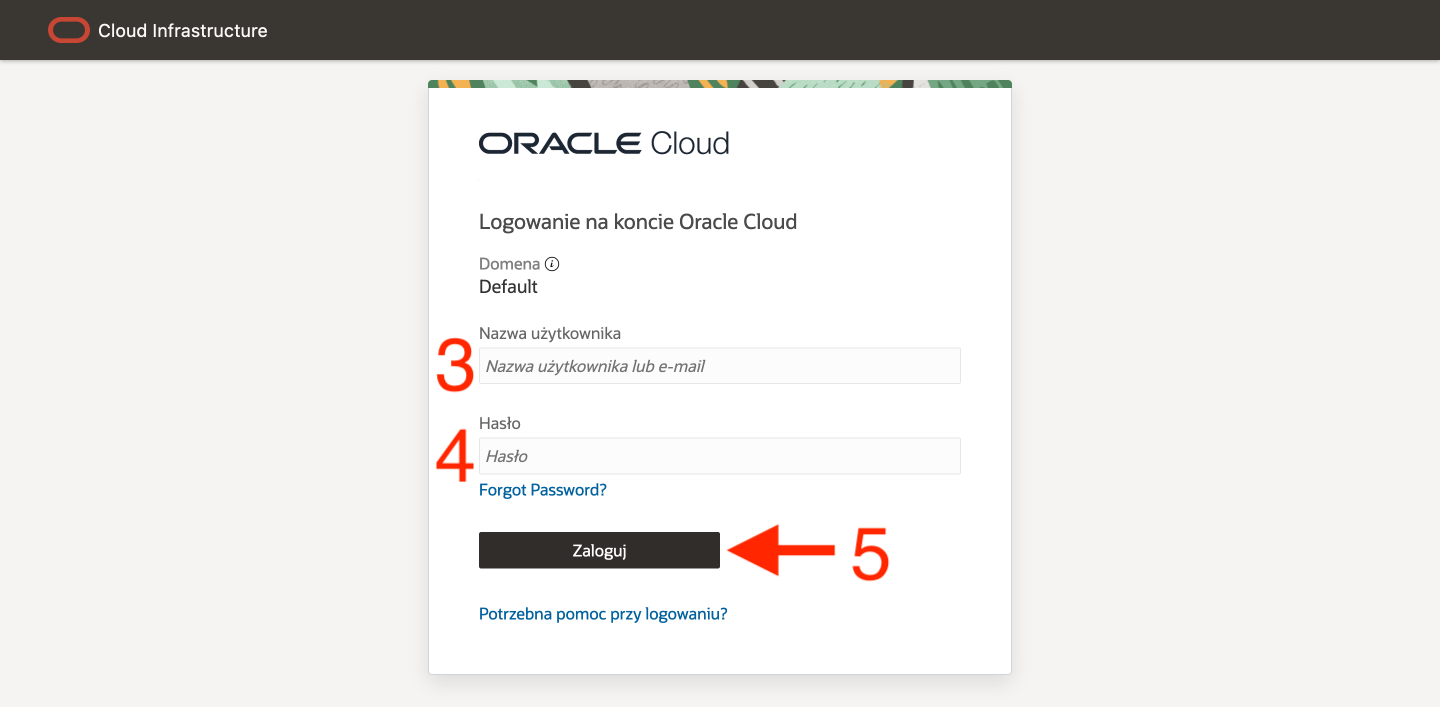
We go to the standard login page where we enter our email address as the login [3] and password [4], and then confirm with the Log in button [5].
-
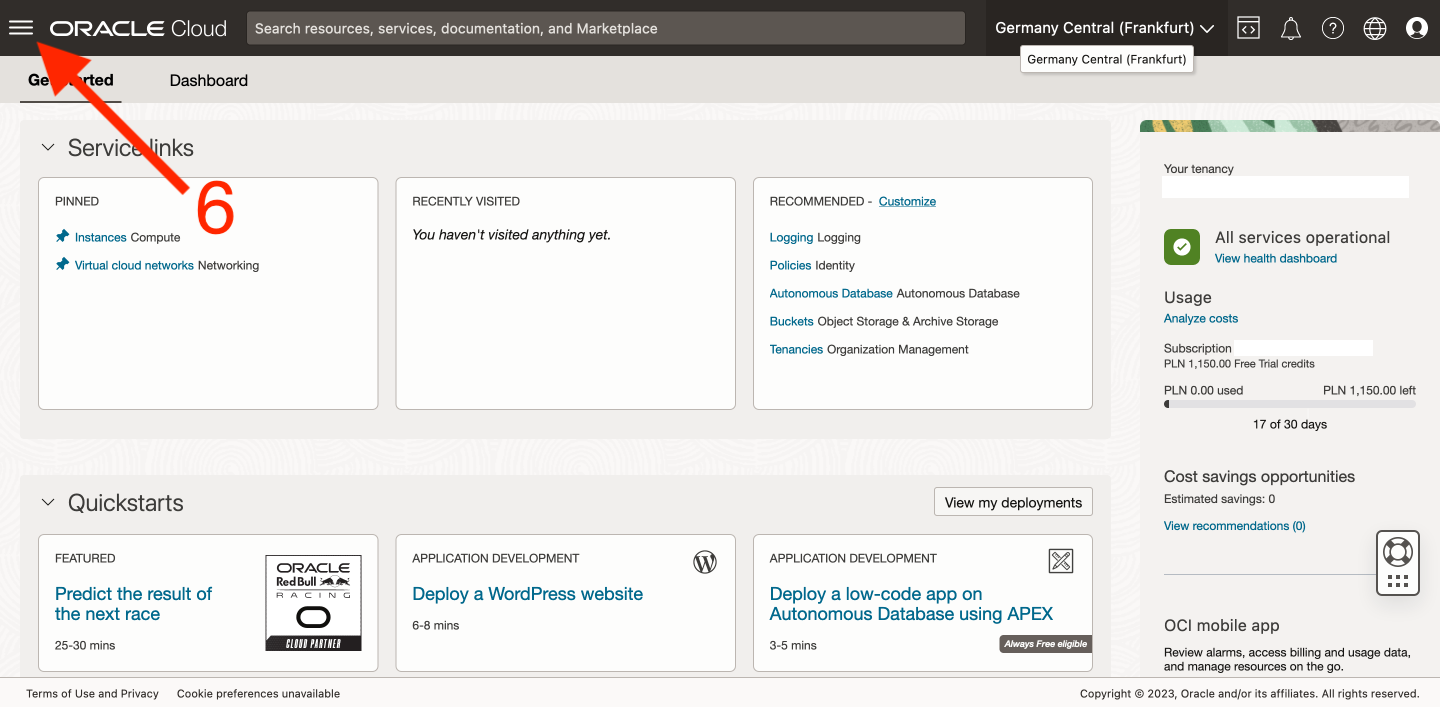
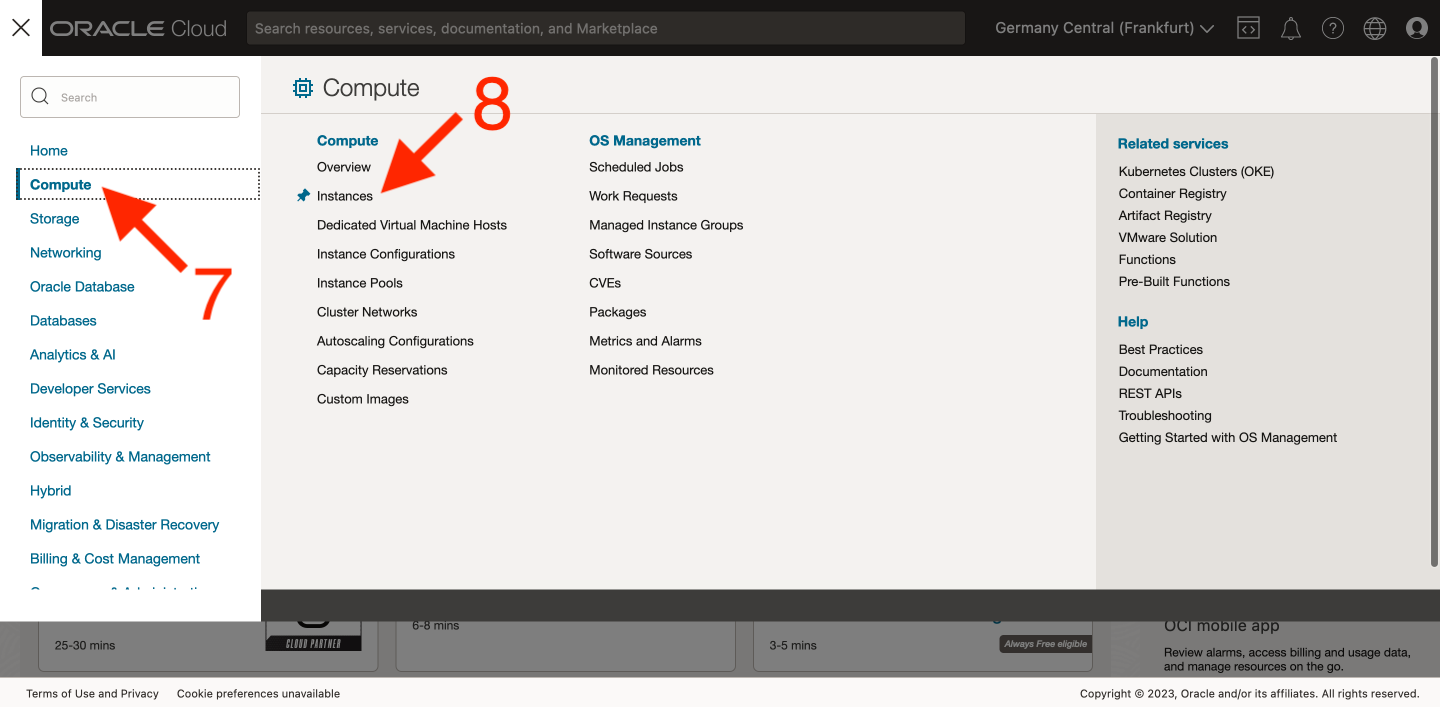
We are in our control center. We activate the main menu by clicking the button with three horizontal lines in the upper left corner [6]. Then go to the Compute tab [7], and in it, select Instances [8].
-
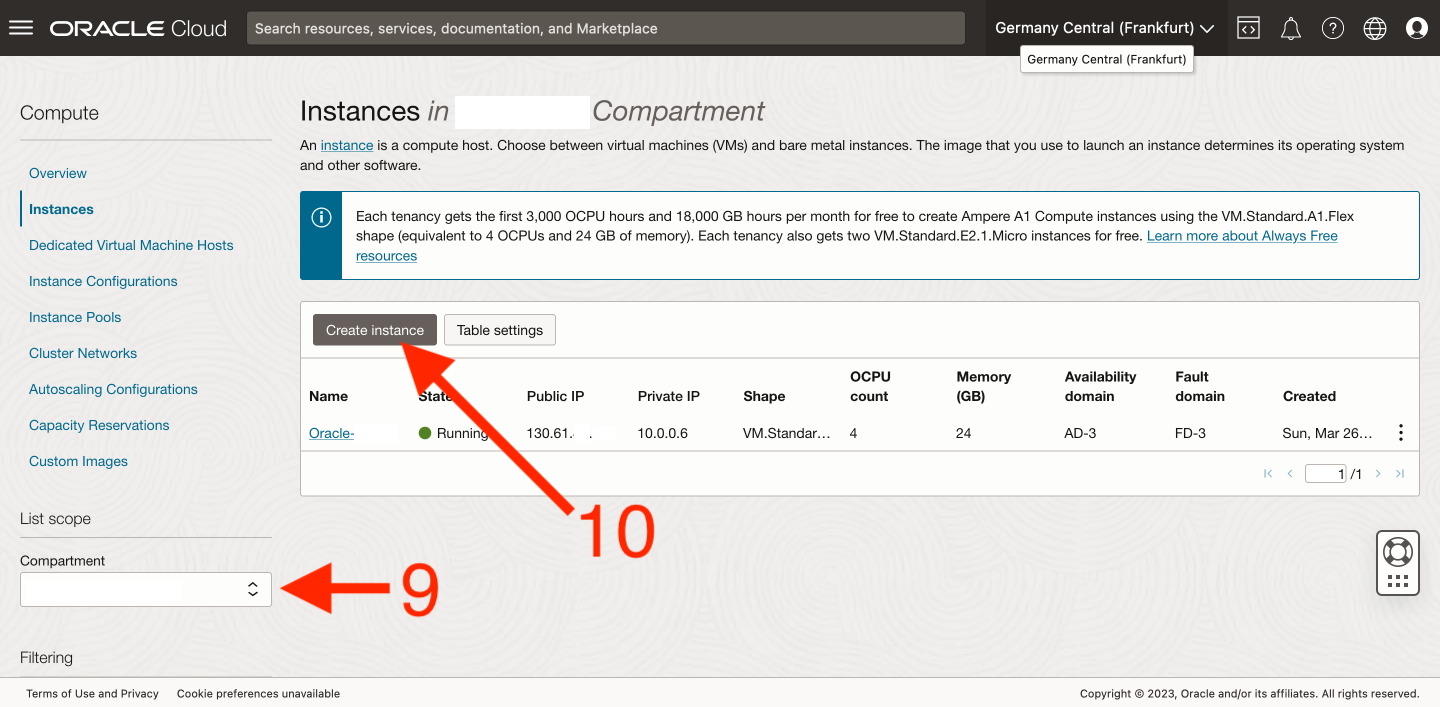
We will be taken to the center for managing our instances (virtual machines). First, if not already selected, we need to choose the Compartment [9], we will only have one choice, which will be [our account name] (root). In the screenshot I made, you can see that there is already one instance, in your case, it won’t be there because we are just about to create it. We click the Create instance button [10].
-
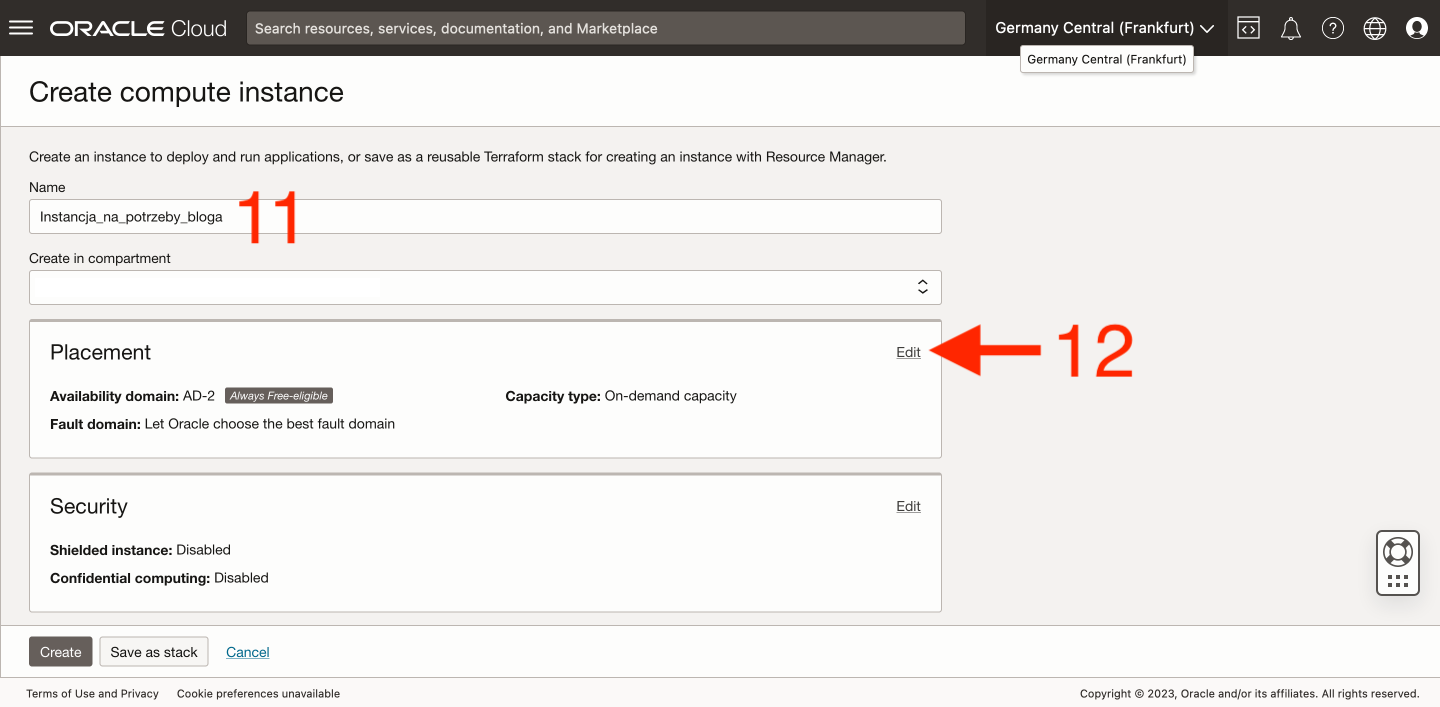
We will be presented with a new instance creator. The first step is to give it a name [11], which can be anything and probably doesn’t need to be unique in a global context, only within our instances. The next step is to expand the Placement section by clicking Edit [12].
-
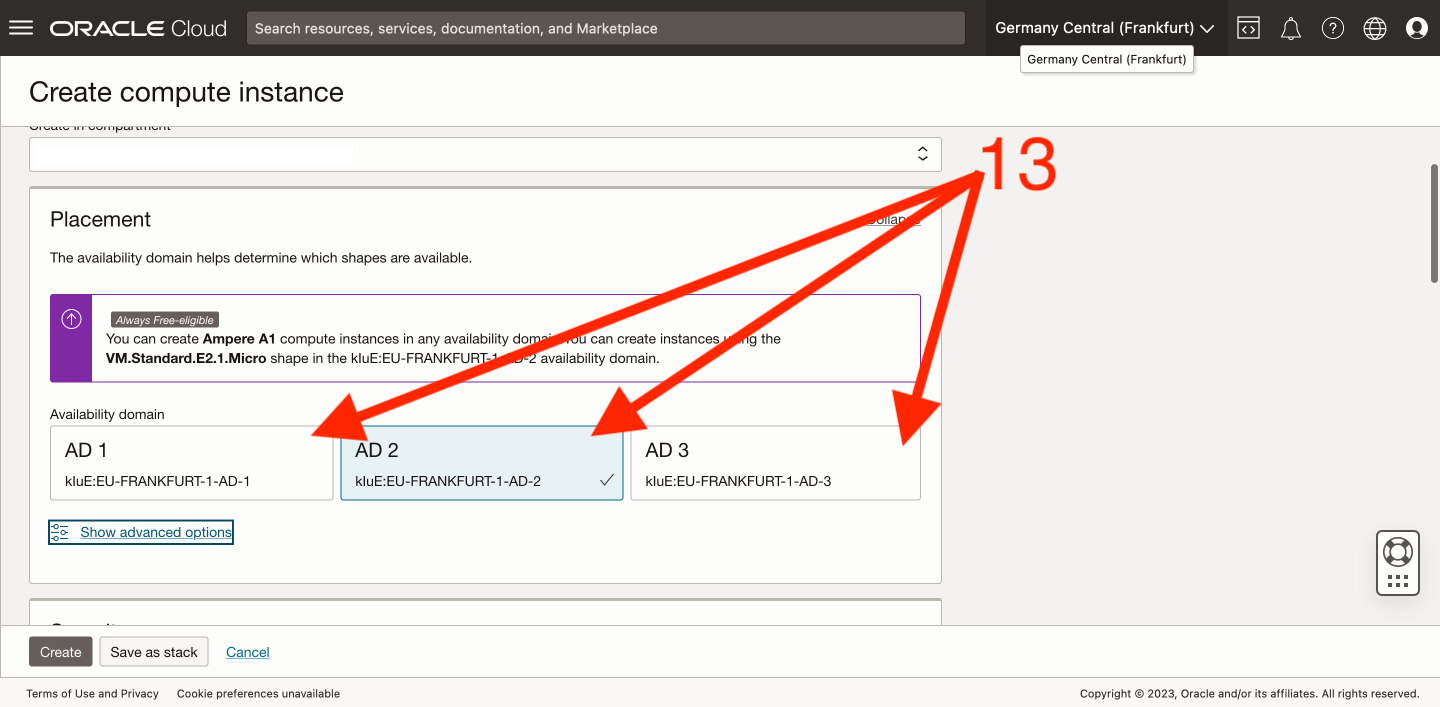
In the Placement section, we decide in which Domain we will create our machine [13]. If we previously chose Frankfurt as our region, we will have three domains to choose from here. It seems to me that it doesn’t matter which one we choose. However, there is a chance that we will have to come back to this place later and change the domain, because during the finalization of creating the instance, we may encounter an error that there are no available machines with the parameters we have selected in the one we just chose. Then we switch from, for example, AD-2 to AD-3 and try again.
-
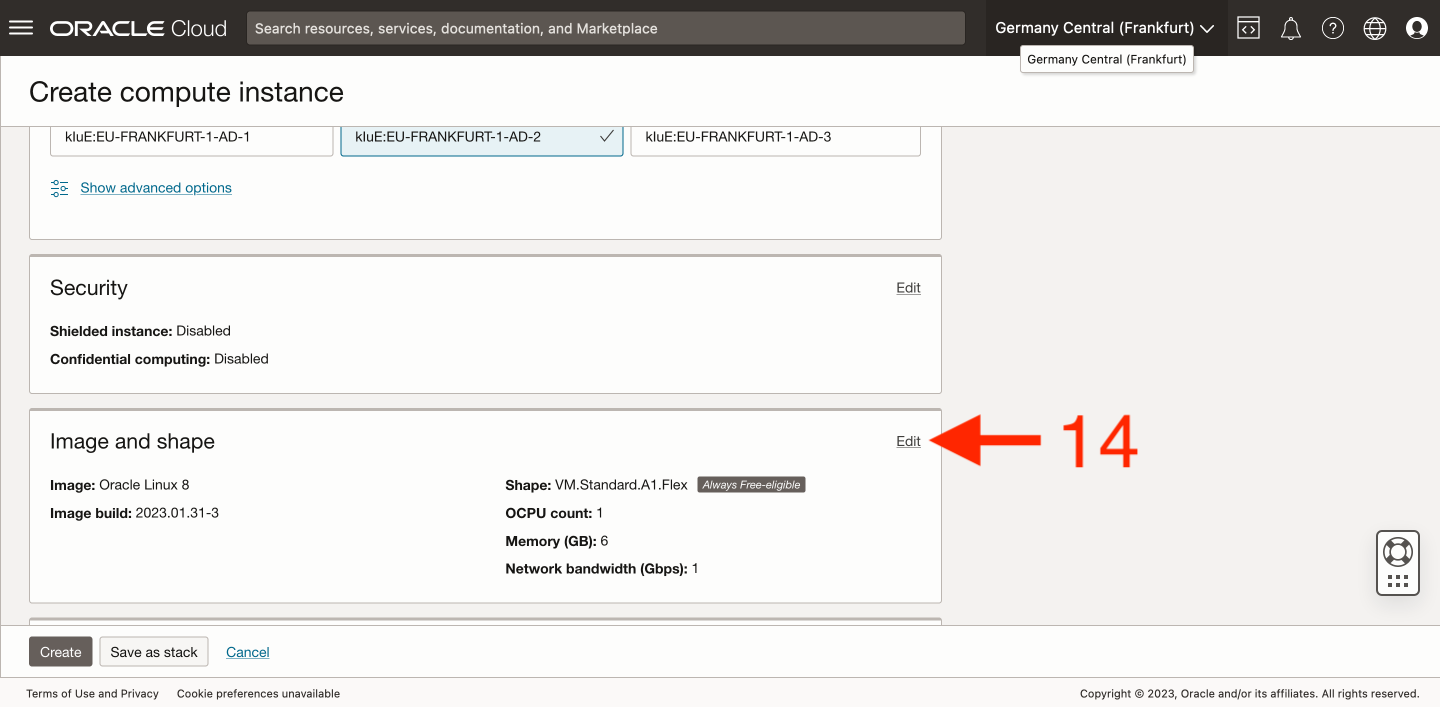
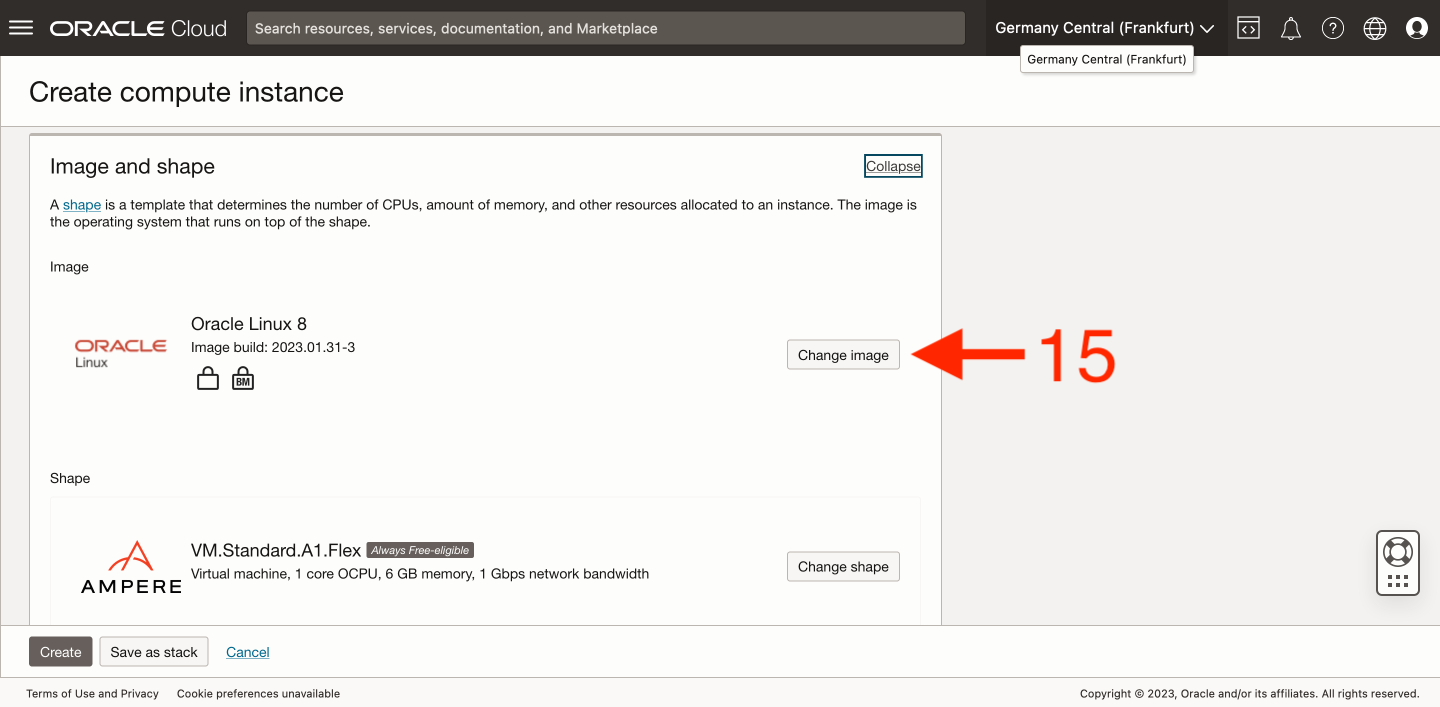
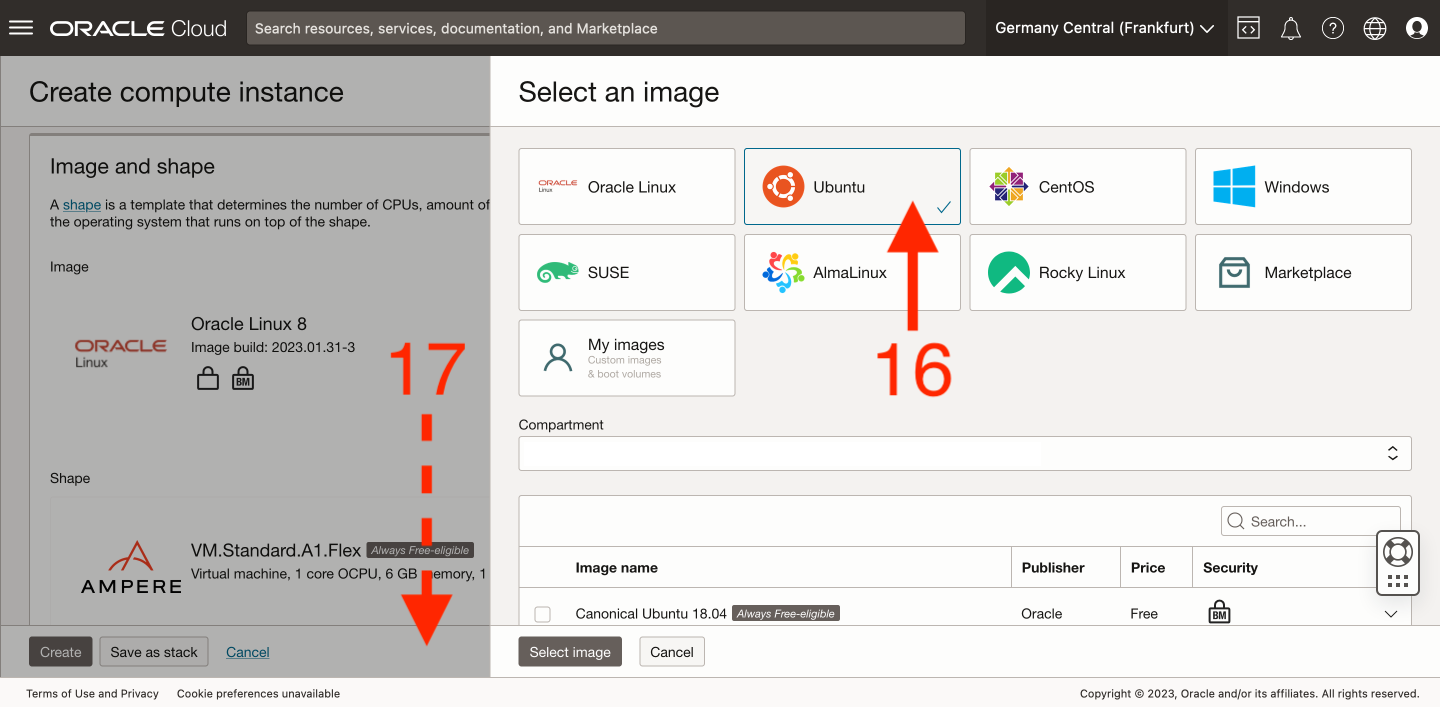
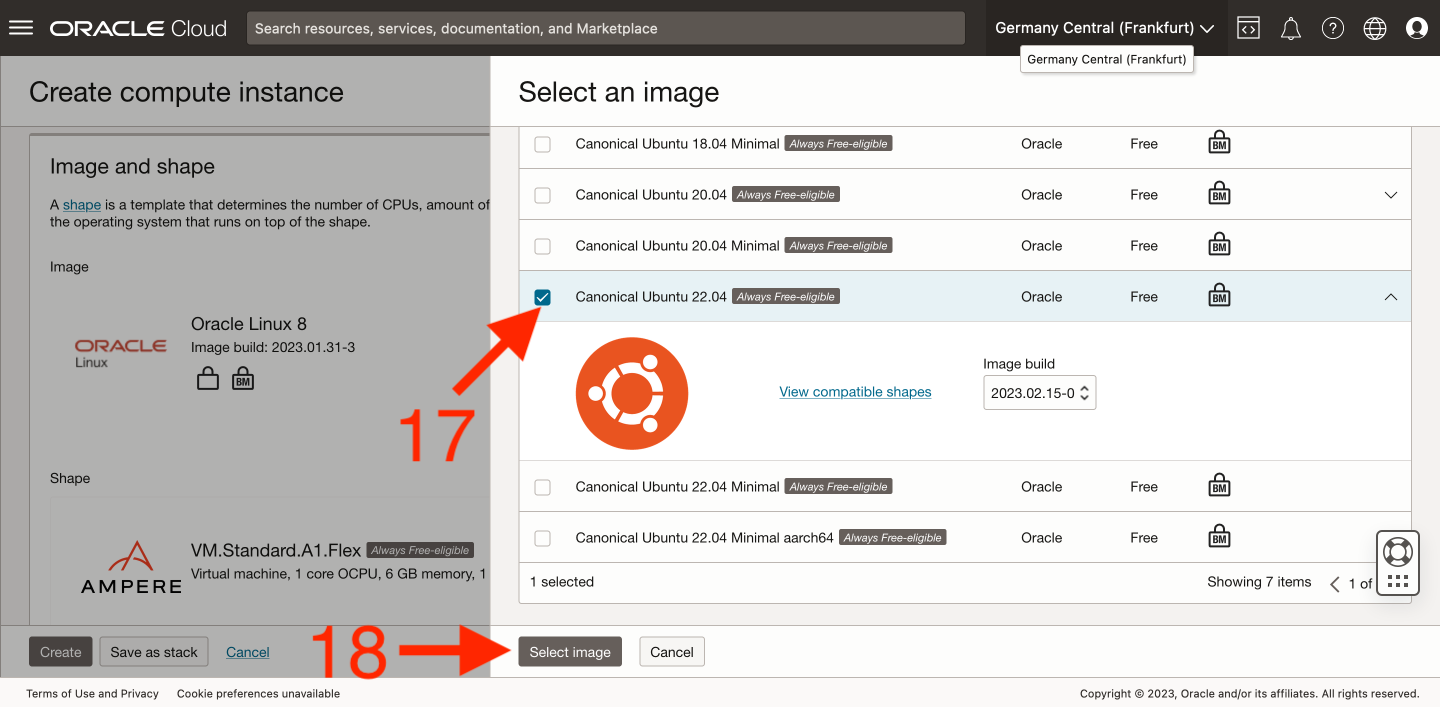
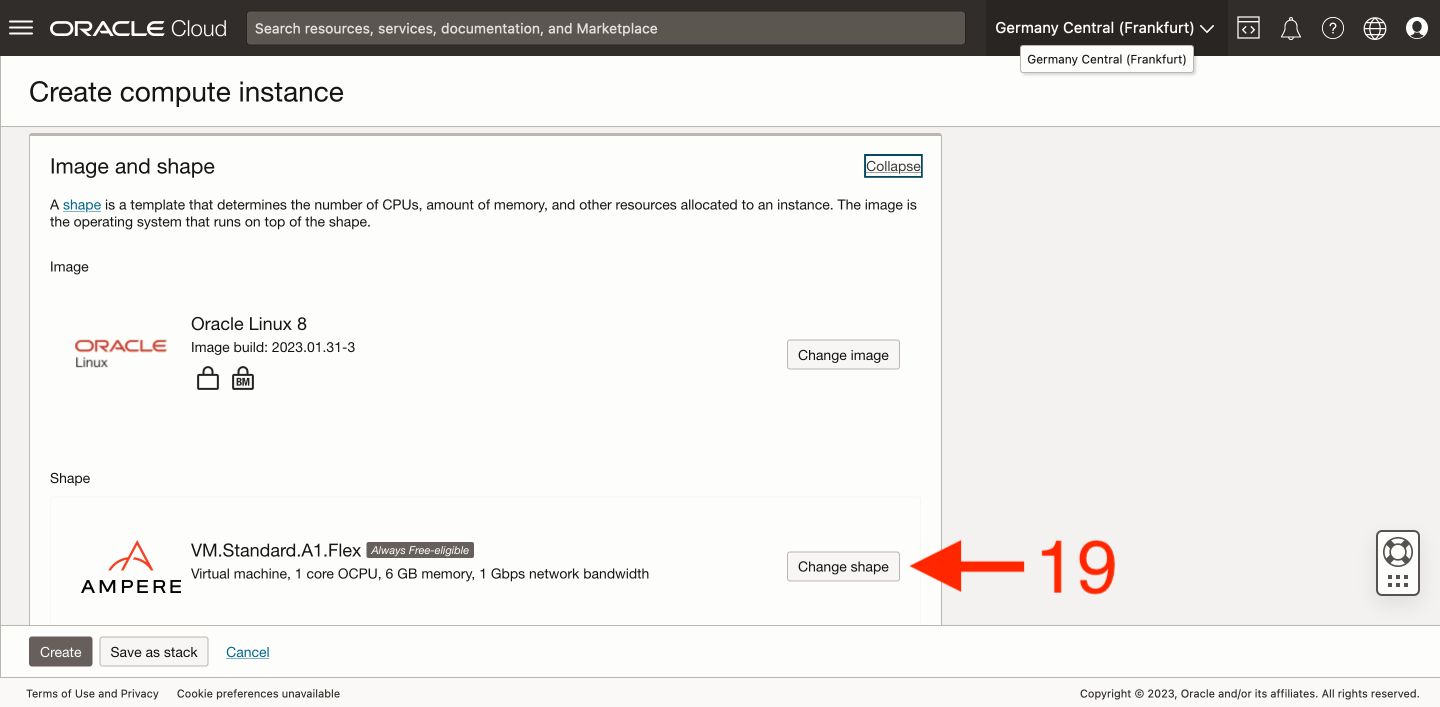
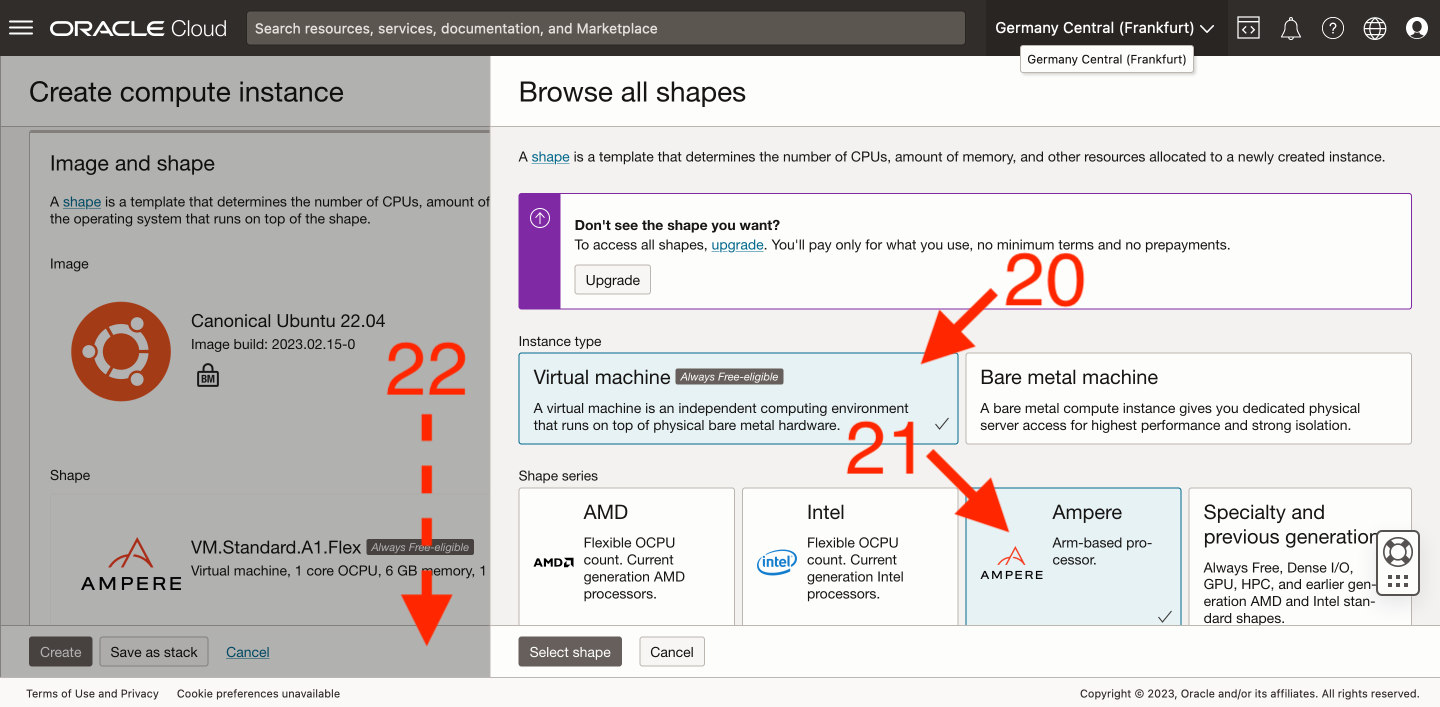
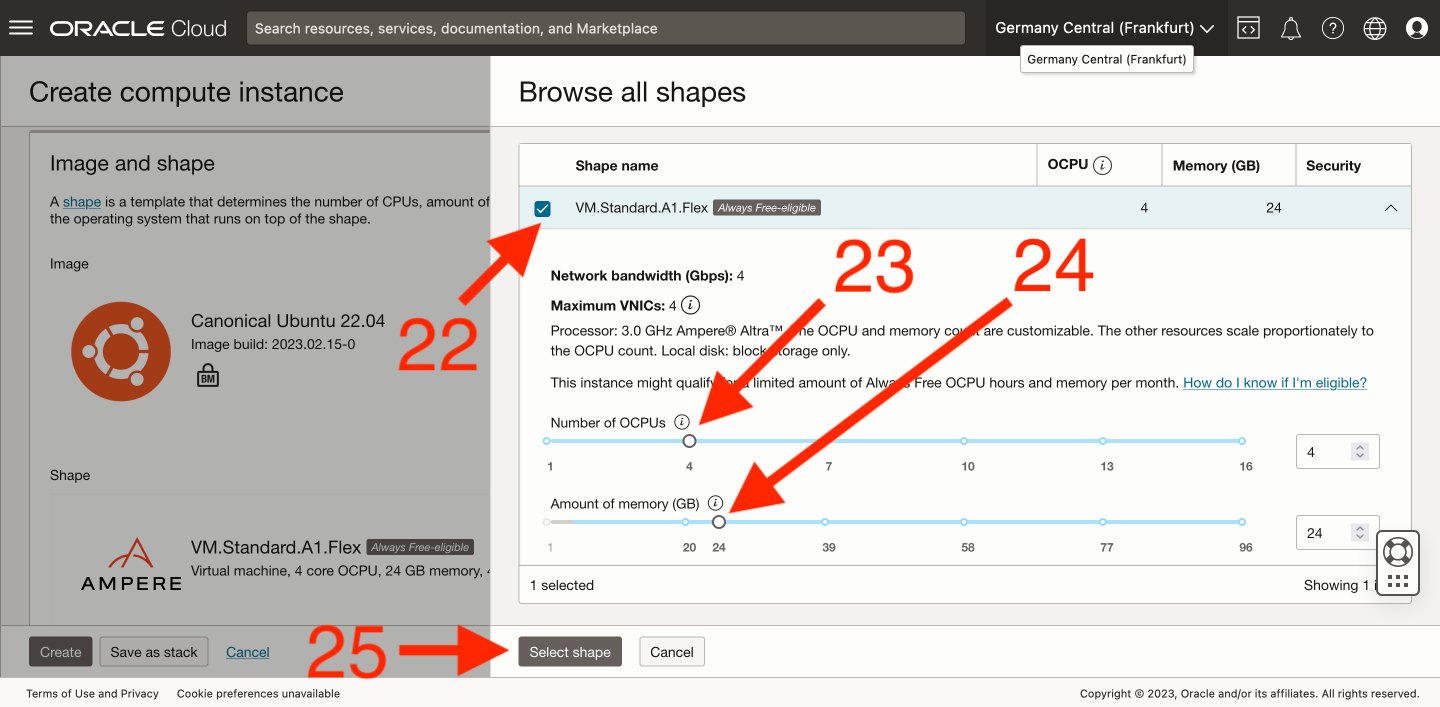
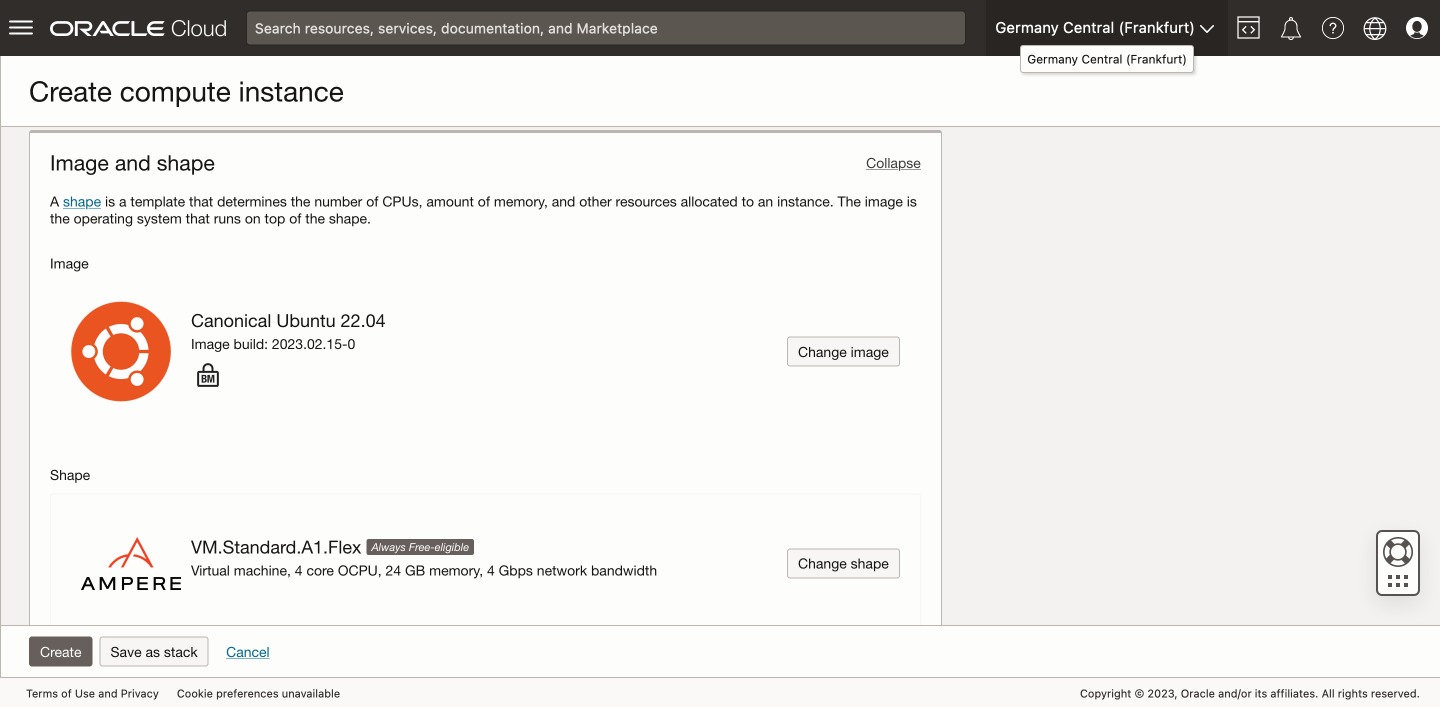
We proceed to the Image and shape section and expand it just like the previous one [14]. After expanding it, we are presented with the option to choose the operating system and the parameters of the instance. We start with the operating system by using the Change image button [15]. In the window that appears, I suggest selecting Ubuntu [16], scrolling down, selecting version 22.04 [17], and confirming with the Select image button [18]. Now we click the Change shape button [19], which opens the machine parameter configurator. We select Virtual machine [20], Ampere [21], check VM.Standard.A1.Flex [22], change the Number of OCPUs to 4 [23], check if the Amount of memory (GB) is set to 24GB [24], and confirm with the Select shape button [25].
-
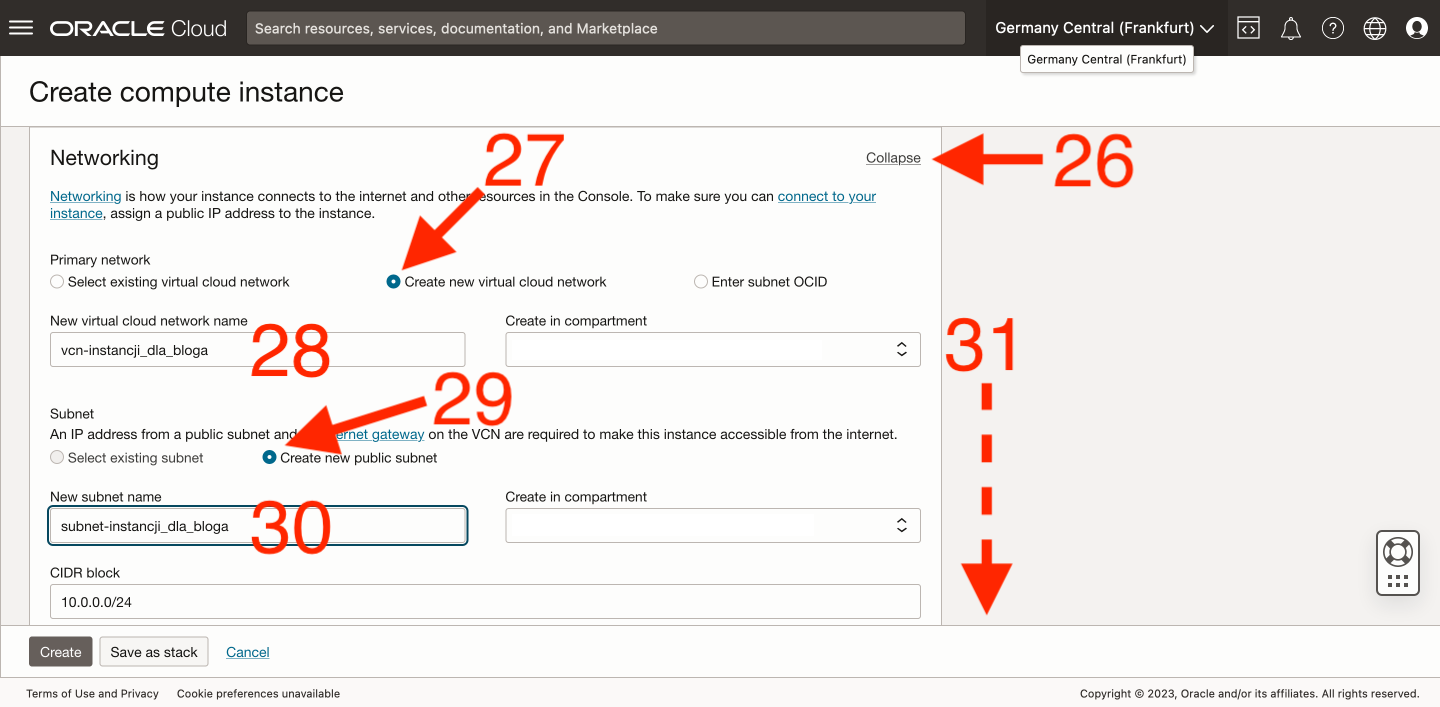
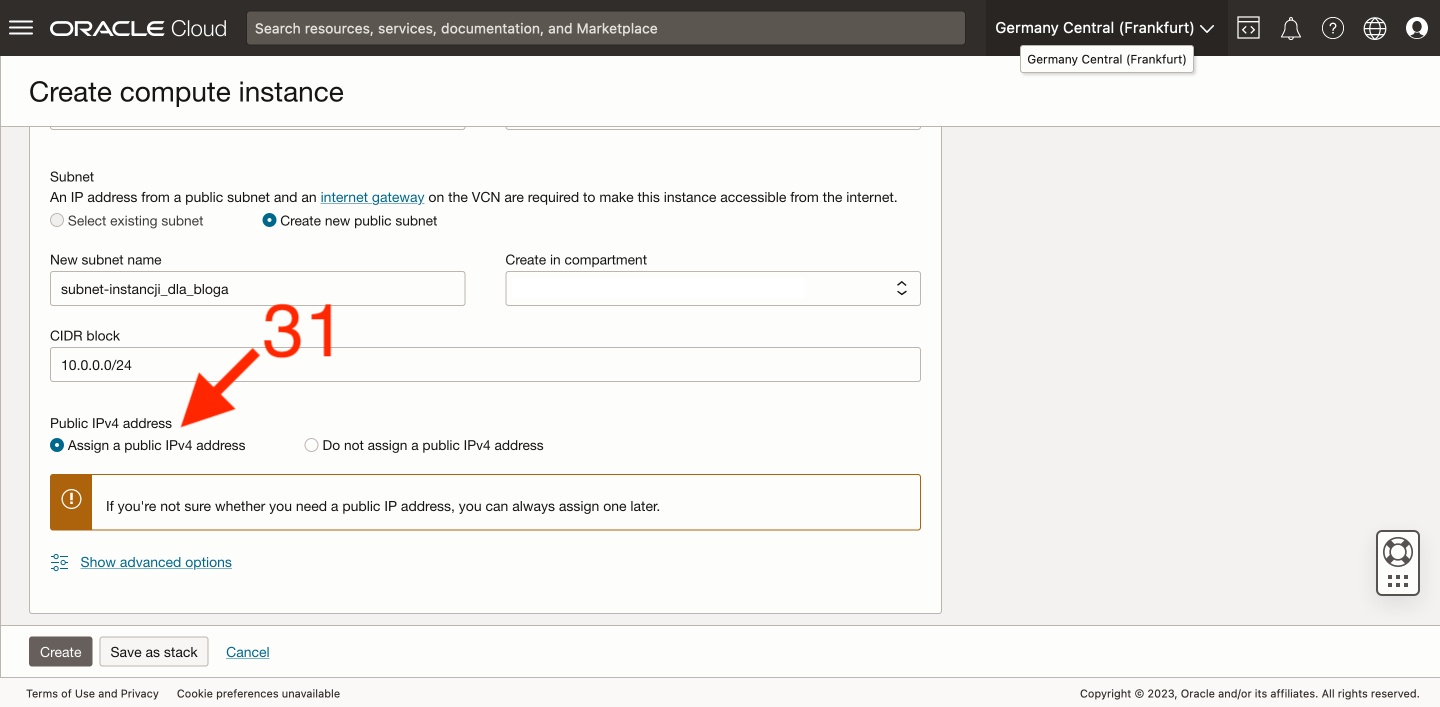
The next section we’re interested in is Networking, which we of course expand [26]. In this section, there are three things we need to set up. The first is the Primary network, which can be visualized as a home Wi-Fi network that includes all our devices. We’re just starting out, so let’s create a new virtual cloud network by selecting Create new virtual cloud network [27] and giving it a name [28]. The second thing is the Subnet, which is a subset of our main network. It’s like setting up subnets on a home router with addresses ranging from 192.168.0.1 to 192.168.0.255. Here, we also create a new subnet by selecting Create new public subnet [29] and giving it a name [30]. The last thing we need to do in the network settings is make sure we have selected Assign a public IPv4 address [31], which means requesting a dedicated, public IPv4 address for our instance. I would like to emphasize again that this is a great option that is not available for many paid VPSs.
-
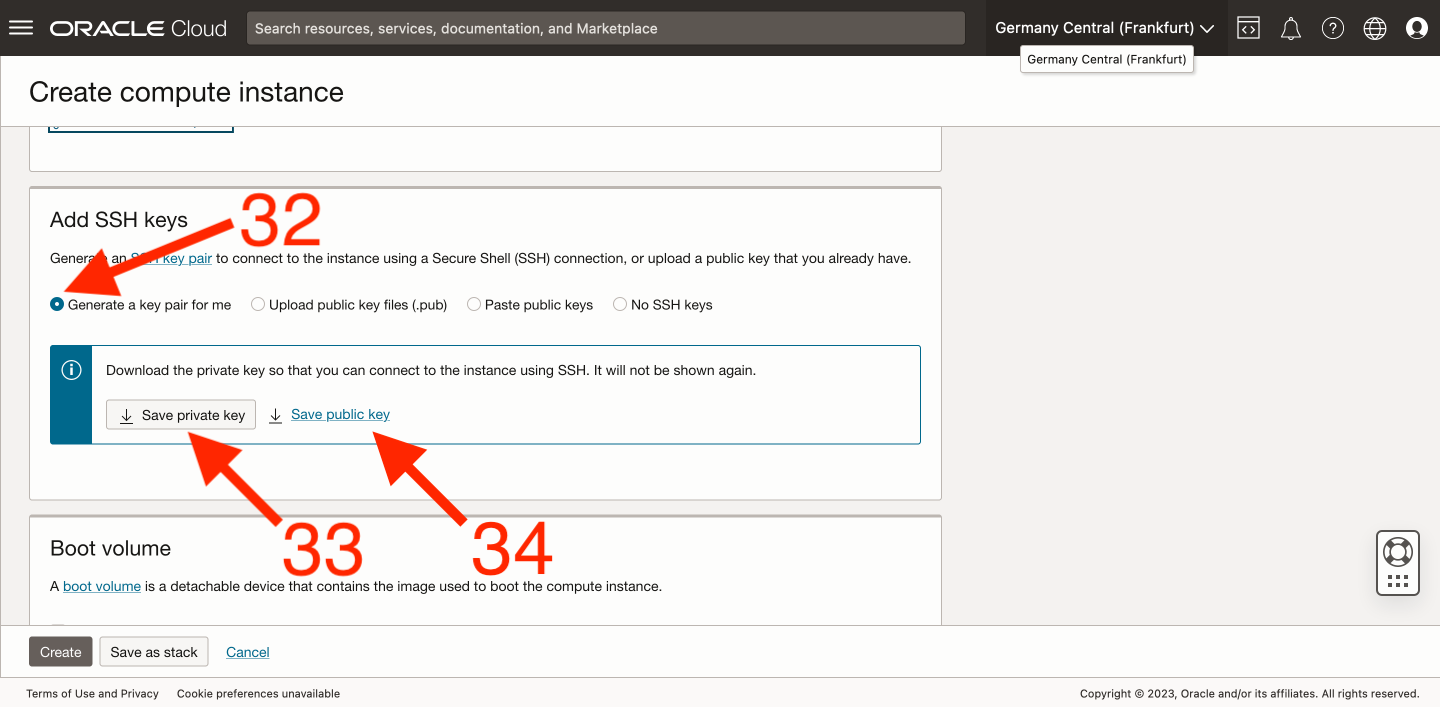
The next section is Add SSH keys, which, as you can guess, is about keys we will use to authenticate during SSH communication. Oracle (rightly) does not allow logging in to the server using only a username and password, but instead requires the use of SSH keys. When creating a new instance, I suggest simply selecting the option Generate a key pair for me, allowing Oracle to generate a pair of keys for us and downloading the keys - private [33] and public [34]. It is important not to lose these keys, as we will not be able to access our server without them.
-
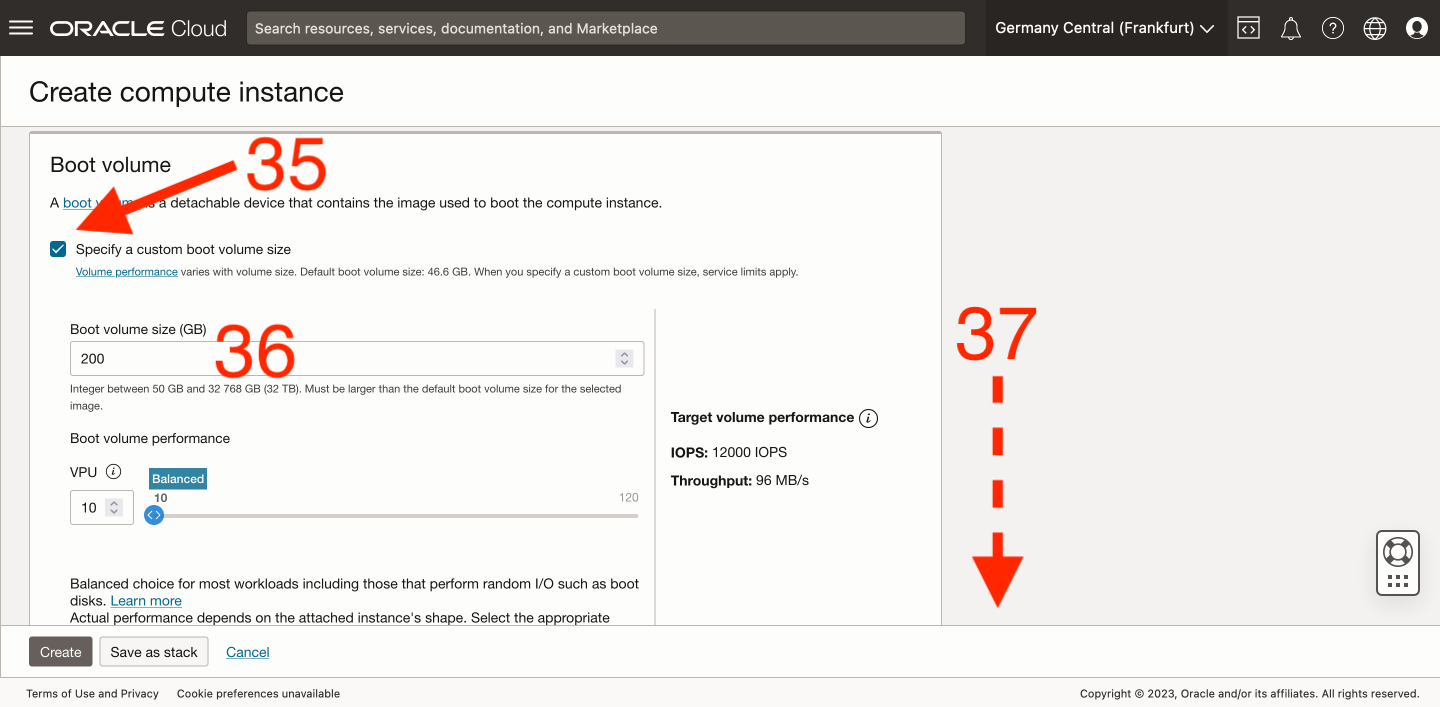
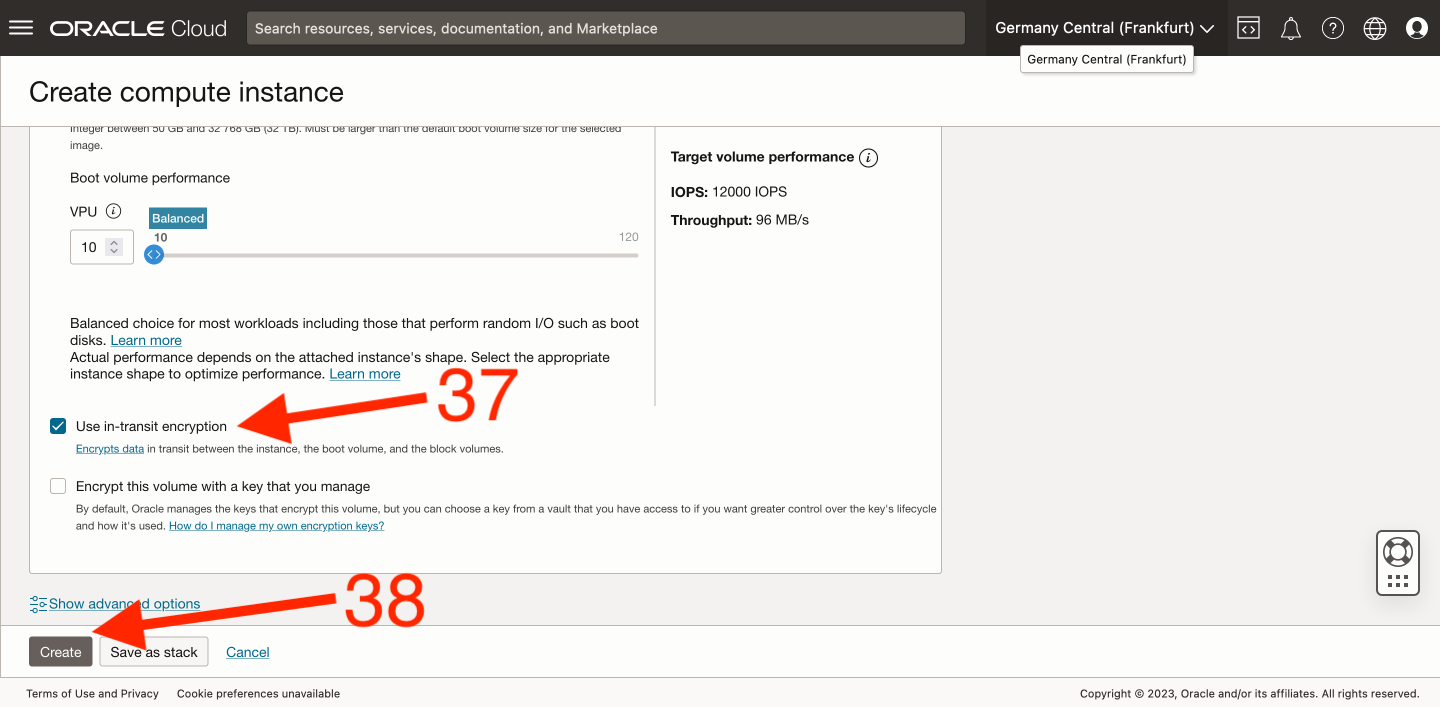
The last section is Boot volume, where we can increase the disk space that will be allocated to this instance. This is done by selecting the option Specify a custom boot volume size [35] and entering a value from 50 to 200 in the Boot volume size (GB) field [36]. By default, it’s 50GB, but in the Free Tier range, we can use 200GB, and I recommend entering that value. I also suggest selecting the Use in-transit encryption option [37] in the lower part of this section, as encrypting data during transfer is always a good option.
-
That’s it. Now all you have to do is confirm the above settings by clicking the Create [38] button and thus create your first virtual machine in the Oracle cloud. At this point, we may still see the message I wrote about in point 7 above. In that case, simply choose a different domain and try again.
SSH connection to the instance
Looking at this post now, I can see that it has already become monstrous, and it will only get bigger because I would like to turn it into such a mega-guide about Oracle Free Tier. The form I have chosen, which is to write as explicitly as possible, also does not contribute to this being a concise post. I’m sorry!

Returning to the subject. In this post, I have already discussed how to create an account in Oracle Cloud and how to create the first virtual machine, making the most of the free plan’s capabilities. Now it’s time to describe how to connect to that machine.
I have described how to connect to servers via SSH in this post. Meanwhile, in this post, I explained how to use SSH keys. I won’t describe all of this again. We’ll focus only on what’s not obvious for a specific case. To connect via SSH, we basically need four things:
-
IP address of the server,
-
username we will log in as,
-
public SSH key,
-
private SSH key.
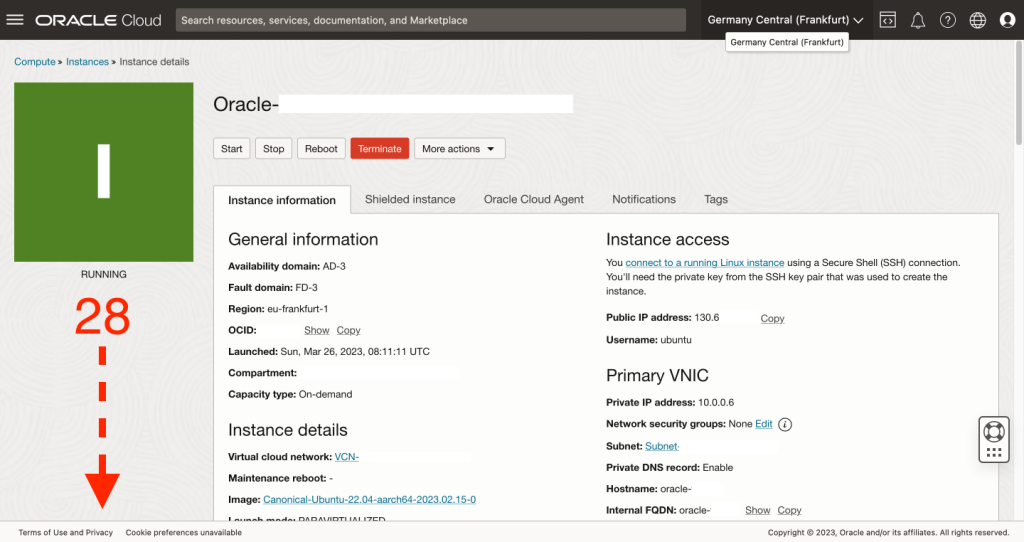
The first two steps can be achieved by accessing the instance management center (as we did in point 4 of the chapter about creating instances). After successfully creating the instance, we should see it on the list of our instances, so let’s go to its properties [1].
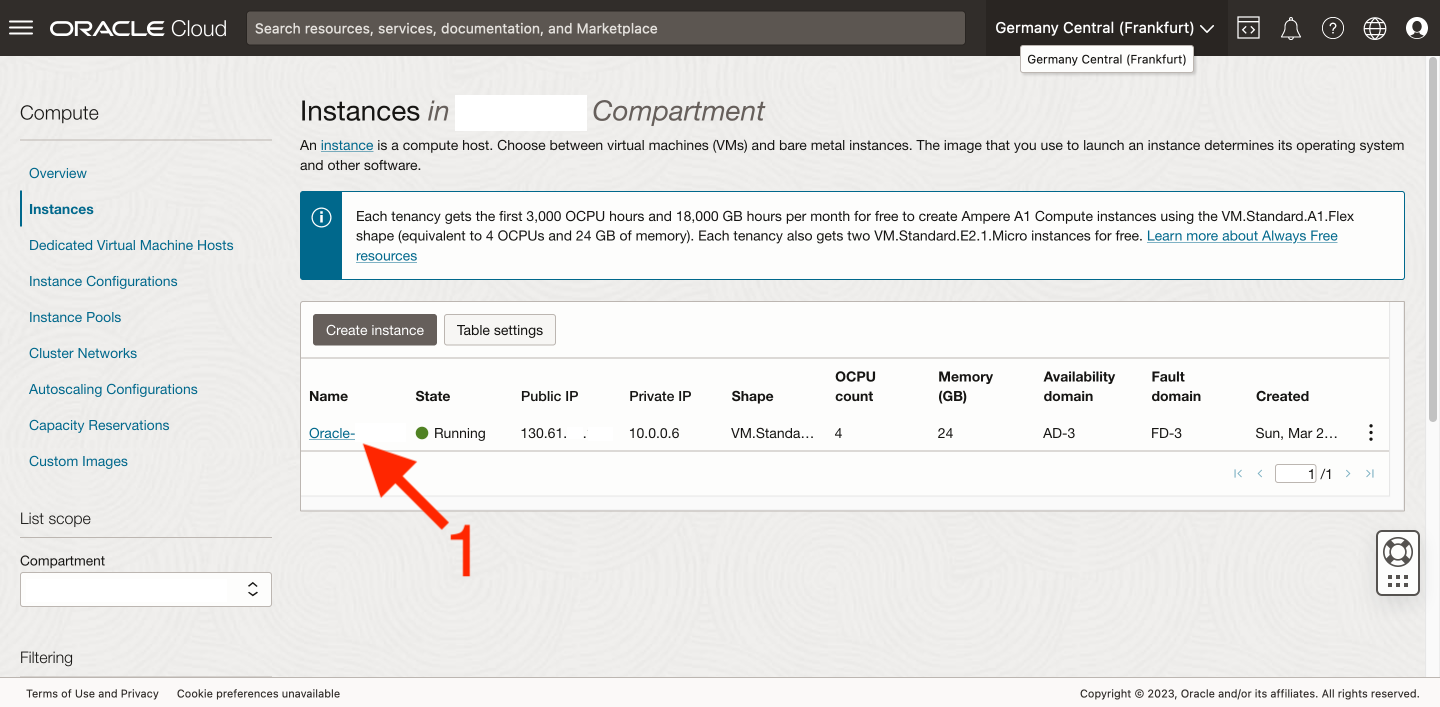
The information we are looking for (server IP address [2] and username [3]) can be found in the Instance information tab under the Instance access section on the right-hand side.

We have already downloaded the necessary SSH keys to our disk when creating the instance. We have everything we need, so now we just need to put it all into Termius (or use another method) and connect to our brand new VPS. After connecting via SSH, I recommend to change (set) the passwords for the current root and ubuntu users.
sudo su
passwd
   [enter root password twice]
sudo passwd ubuntu
   [enter ubuntu user password twice]
exit
By the way, I also remind you of my post Home server - basic configuration.
Opening ports
It must be admitted that Oracle actively takes care of the basic security of its customers. In addition to the firewall (based on iptables) that we can configure on our virtual machines, there is also an additional firewall that is part of the parent infrastructure. Assuming that you already have plans for which services you will run on your server, dear Reader, to access them from the outside, you need to have open ports on your server. By default, Oracle opens only port 22 for each virtual machine, which is used for SSH communication. The remaining ports are closed. Therefore, the last thing I will try to convey in this post is how to open other ports of your virtual machine. I will show this on the example of ports 80 (HTTP) and 443 (HTTPS), which are necessary, for example, to run a website.
First of all, let’s open the ports in the aforementioned parent firewall. This is done through the web interface, which I previously colloquially referred to as the control center.

-
To access the firewall settings, first go to the instance management center (as we did in step 4 of the chapter on creating instances).
-
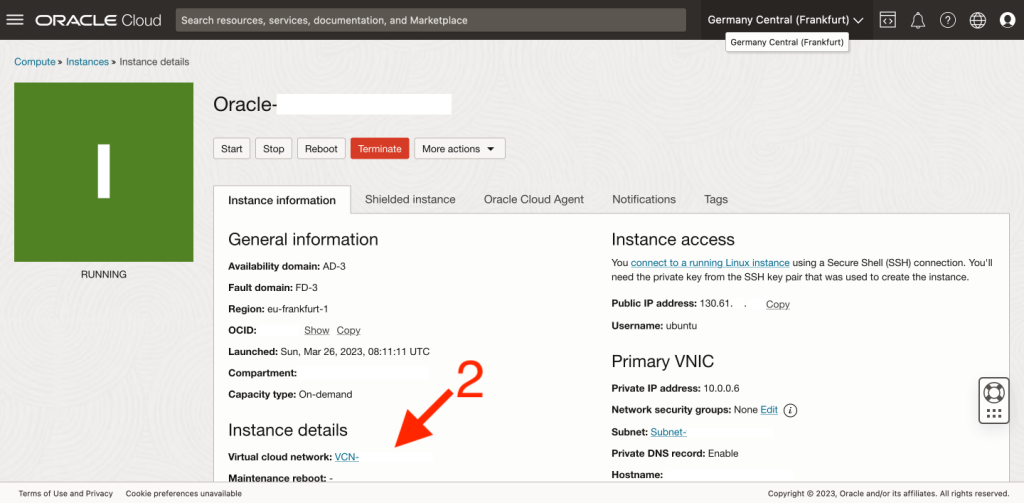
Next, enter the properties of our instance [1].
-
In the Instance details section, there is a link to the Virtual cloud network [2], which is a link to the virtual cloud network where our instance is located. It is in its settings that we will find what we are looking for, namely the network firewall rules.
-
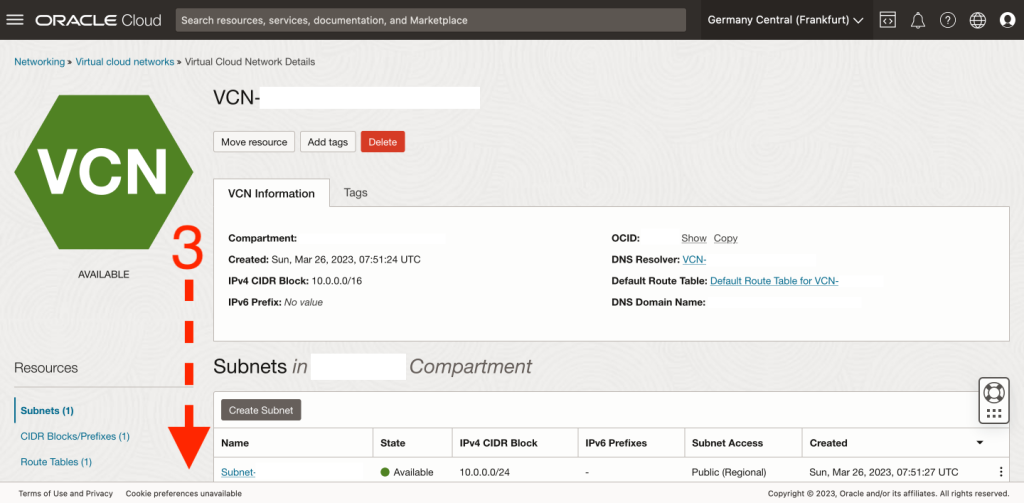
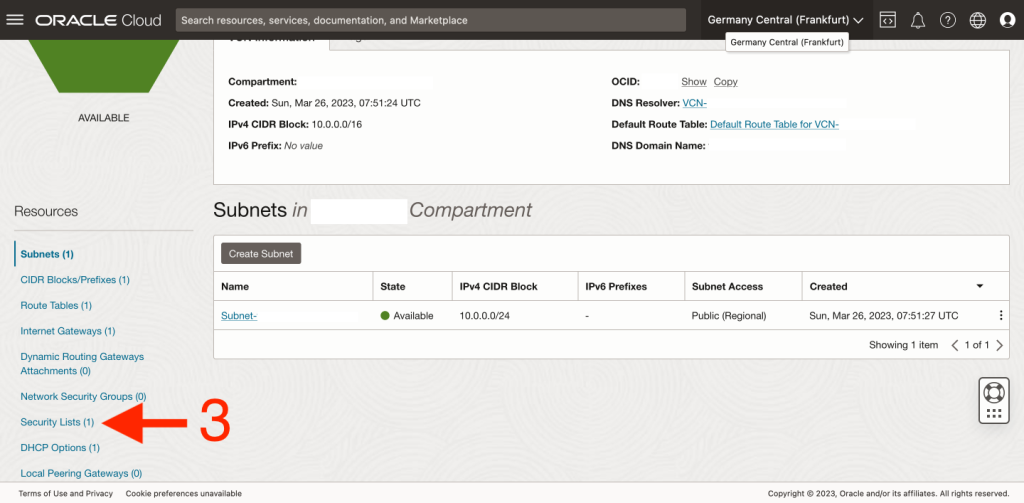
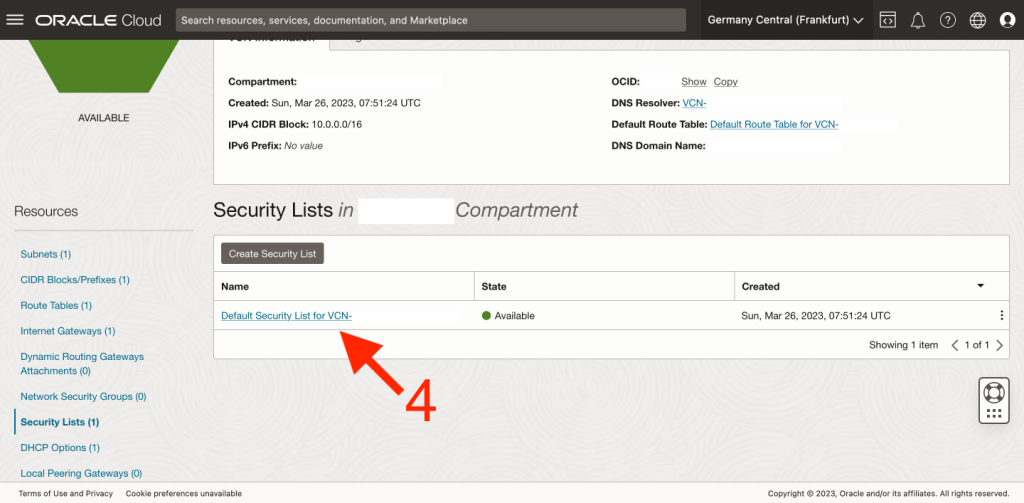
In the network settings on the left panel, select Security Lists [3].
-
On the list, there should be an item whose name starts with Default Security List for… [4]. Enter its properties, as this is the parent firewall’s settings.
-
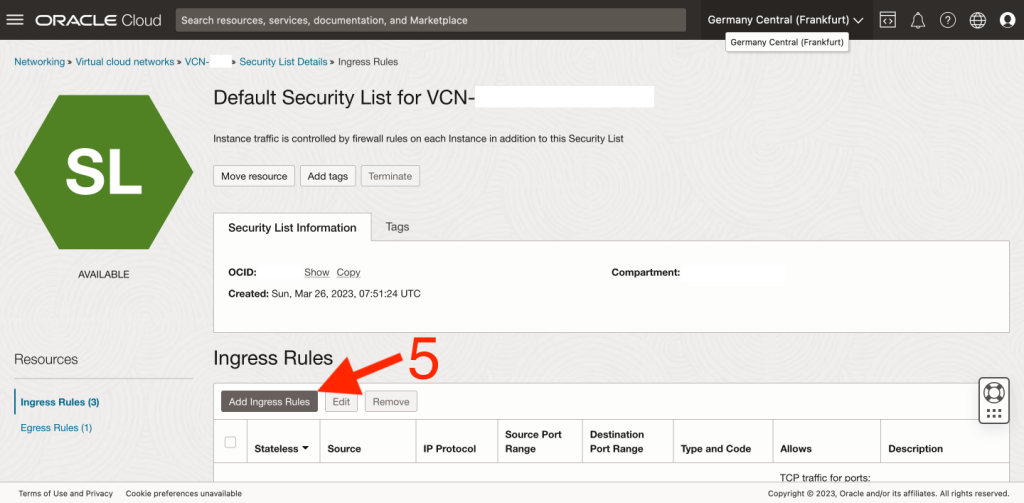
The firewall settings are divided into rules for incoming traffic Ingress Rules and outgoing traffic Egress Rules. Add a new rule using the Add Ingress Rules button [5].
-
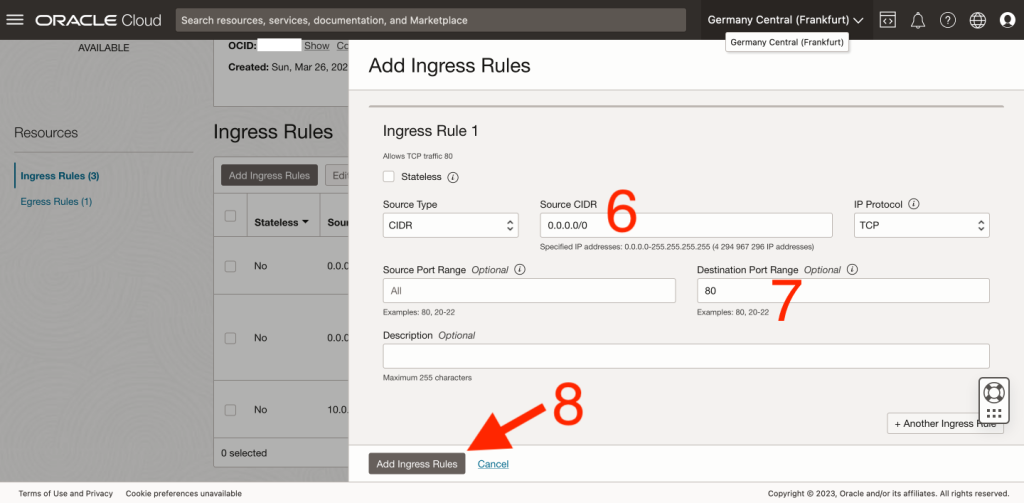
In the Source CIDR field [6], enter the value 0.0.0.0/0, which means that the connecting address does not matter. Then in the Destination Port Range field [7], enter the value 80, and confirm with the Add Ingress Rules button [8]. This rule opens port 80.
-
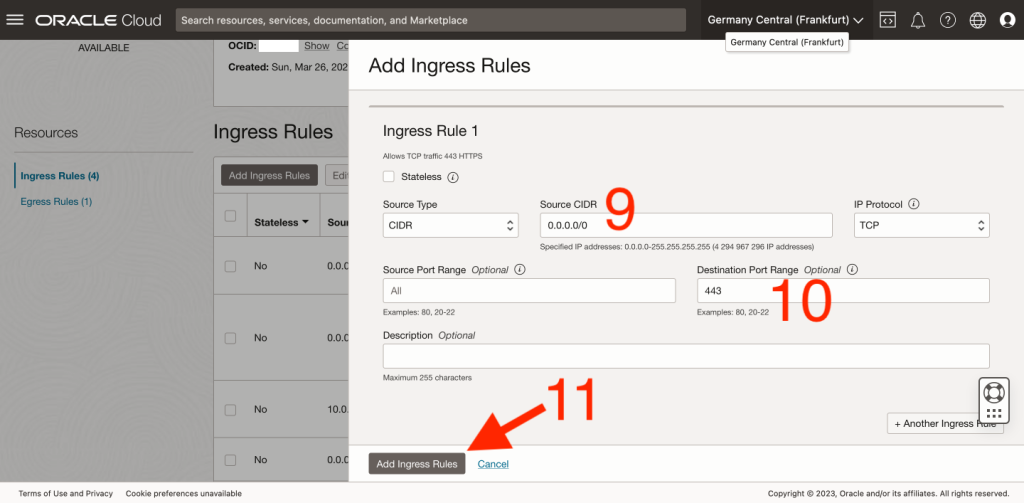
We do the same for port 443. In the Source CIDR field [9], enter the value 0.0.0.0/0, then in the Destination Port Range field [10], enter the value 443, and confirm with the Add Ingress Rules button [11].
From the level of the main firewall, ports 80 and 443 have been opened, so we still need to open the final doors, which is the firewall running on the server. This is done by modifying iptables, which is the built-in Ubuntu firewall. Let’s start with port 80:
sudo iptables -I INPUT 6 -m state --state NEW -p tcp --dport 80 -j ACCEPT
sudo netfilter-persistent save
We do the same for port 443 (HTTPS):
sudo iptables -I INPUT 6 -m state --state NEW -p tcp --dport 443 -j ACCEPT
sudo netfilter-persistent save
As you can see, to open any other port, you just need to change one number representing the port number in the first of the above commands.
Let’s now check if all the above actions were successful. When I did it myself, my first idea was to use an online port scanner (e.g. this one), but it turned out that all ports except 22 are still closed… I feel like laughing at myself because I wasted almost an hour before I figured out that the scanner shows that the port is closed because no service is running on it. I write this to save you time, dear Reader.
So how do we check if we have correctly opened port 80? We will run a simple HTTP server using Python. Below I have prepared a ready set of commands:
mkdir /tmp/port80
echo 'Port 80 is open!' > /tmp/port80/index.html
sudo python3 -m http.server 80 --directory /tmp/port80/
In short: we create a temporary folder, place an index.html file inside it, and run an HTTP server on port 80. Now we enter the IP address of our VPS in the browser’s address bar and confirm with ENTER. If we see the message Port 80 is open!, it means that everything has gone as it should. We go back to the terminal and stop the HTTP server with the CTRL+C key combination and clean up its files so as not to leave any garbage on our fresh virtual machine.
rm -rf /tmp/port80
IPv6 Support
After publishing this post, I remembered that I should also discuss another topic, which is enabling IPv6 support. Without it, the machine will function correctly, but for some services that we may want to run on it, IPv6 support is recommended. An example of such a service is the Mastodon instance, which will only work on IPv4, but without IPv6, it won’t be able to communicate with other instances that operate based on this addressing. Oracle provides us with the ability to enable IPv6 and assign an address to our instance, so that’s what we’ll do.

-
We go to the settings of the virtual cloud network of our instance as we did in points 1-3 of the chapter on opening ports.
-
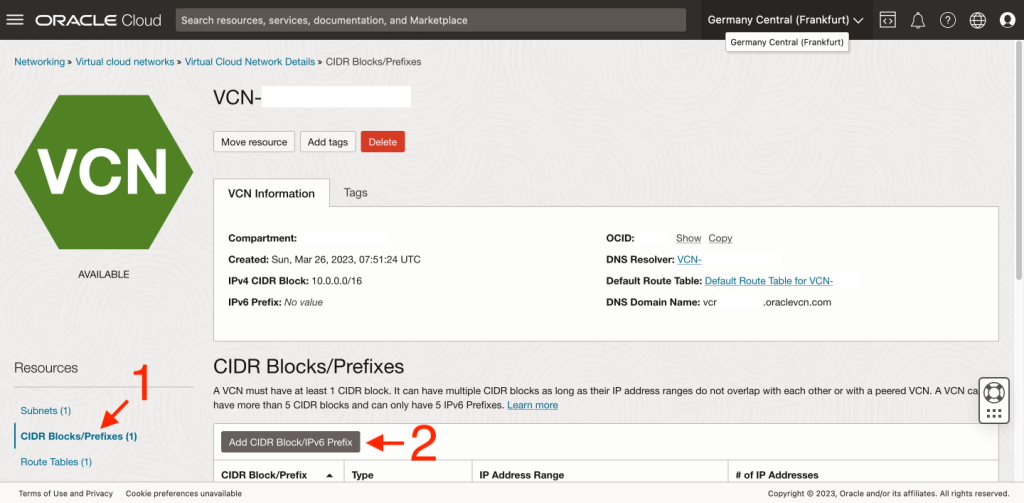
In the section on the left-hand side, we find CIDR Blocks/Prefixes [1] on the list.
-
We click on the Add CIDR Block/IPv6 Prefix button [2].
-
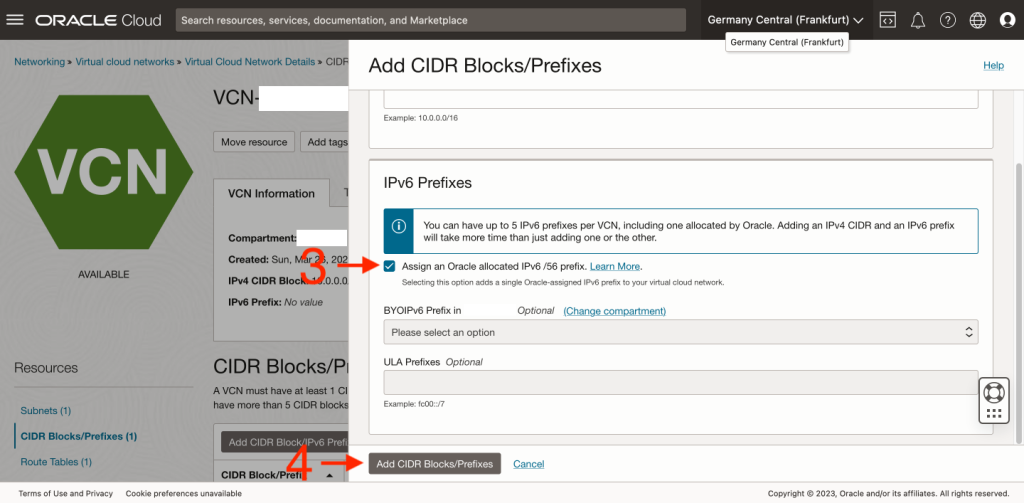
In the window that slides out on the right-hand side, we scroll down where we select the Assign an Oracle allocated IPv6 /56 prefix option [3] and confirm it with the Add CIDR Blocks/Prefixes button [4].
-
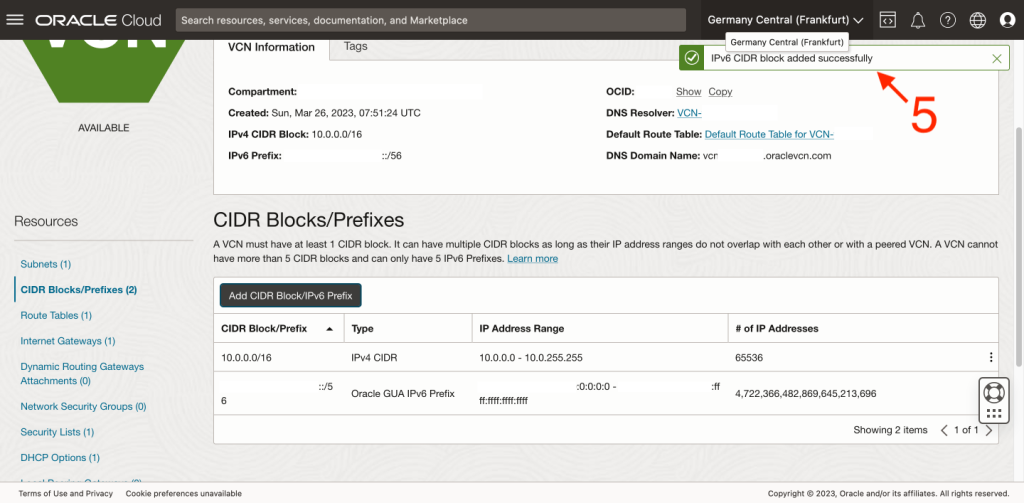
After a while, in the upper right corner, we will see a tooltip confirming the assignment of an IPv6 address to our instance [5].
-
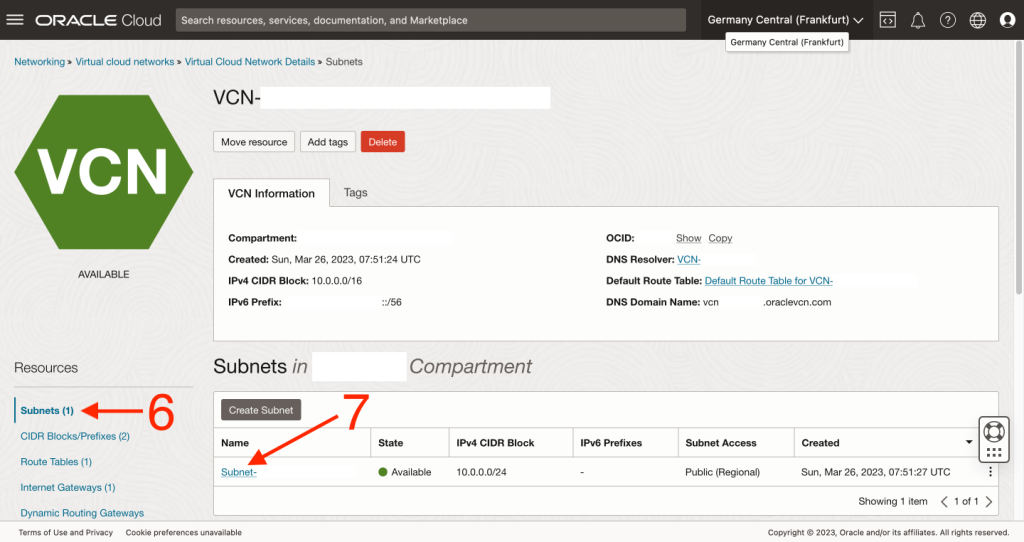
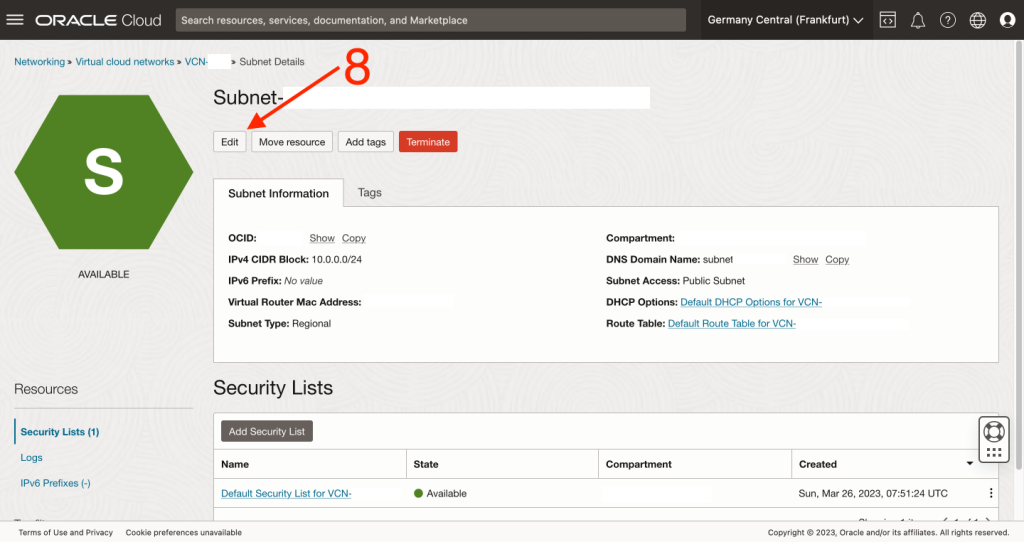
Now we need to assign the created IPv6 address to the subnet where our instance is located. In the section on the left, we go to Subnets [6]. We find the appropriate subnet [7] on the list and go into its properties.
-
We click on the Edit button [8].
-
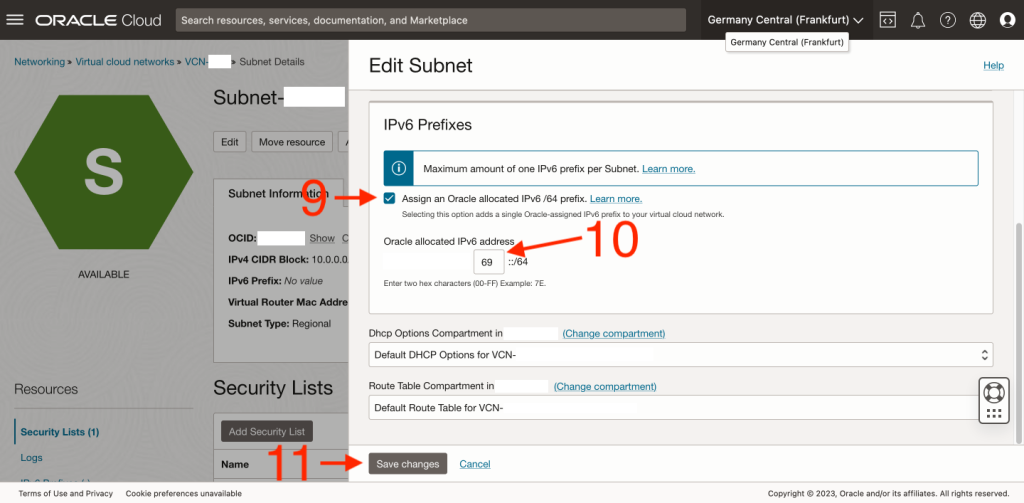
In the window that slides out on the right-hand side, in the IPv6 Prefixes section, we select the Assign an Oracle allocated IPv6 /64 prefix option [9], and when we do, an additional text field [10] will appear, in which we must enter any two-digit hexadecimal value between 00 and FF. It does not matter what we enter here, so let’s assume it is 69 (😎). We only need to confirm it with the Save changes button [11].
-
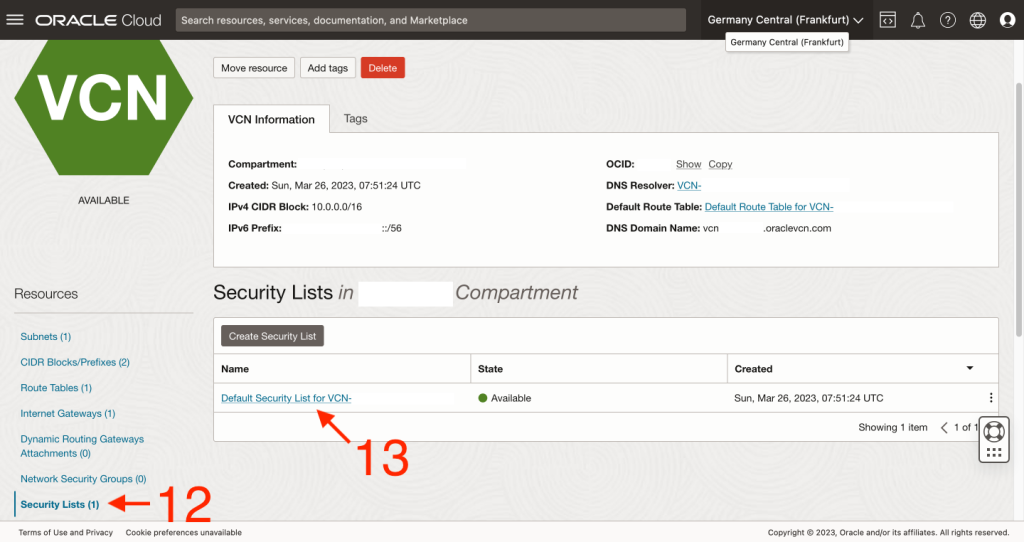
Now we need to properly configure the firewall. To do this, we go back to the virtual cloud network settings, and on the left-hand side, we find Security Lists [12] on the list. On the displayed list, we find the entry that interests us and go into its properties [13].
-
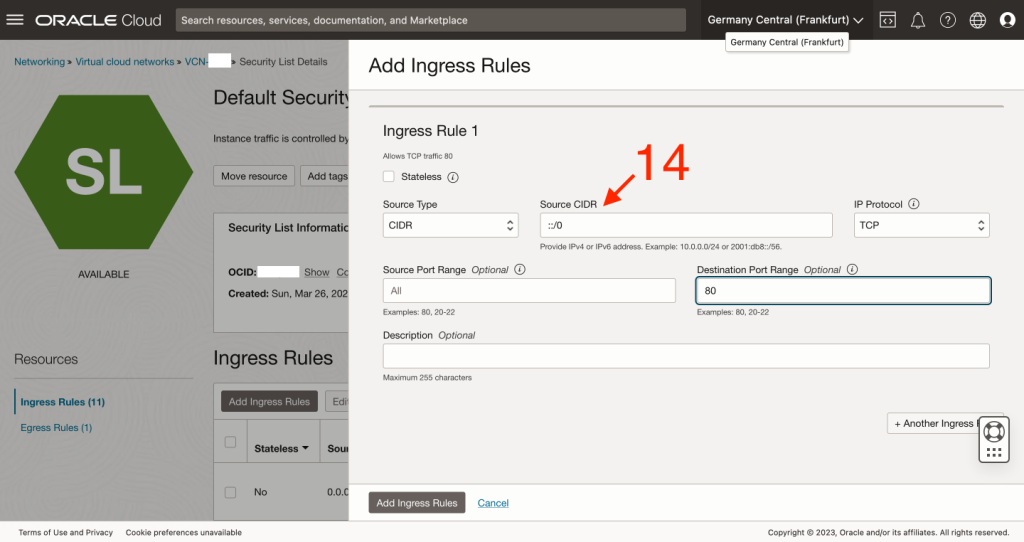
At this point, the task is to open the appropriate ports for incoming traffic in Ingress Rules (as we did in the chapter on opening ports), but this time we do it for IPv6 instead of IPv4, so we enter ::/0 instead of 0.0.0.0/0 as the Source CIDR [14]. Just like with rules related to IPv4, we add them for all ports we want to open (80 and 443).
-
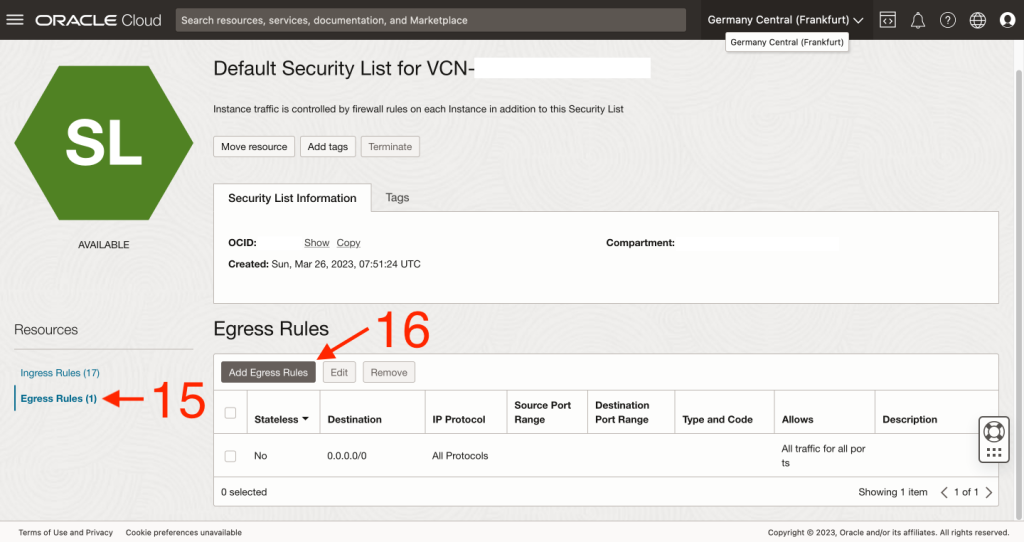
In the firewall settings, we still need to go to Engress Rules [15] and use the Add Egress Rules [16] button to add a rule that will open all outgoing traffic through IPv6, just like we have it done for IPv4.
-
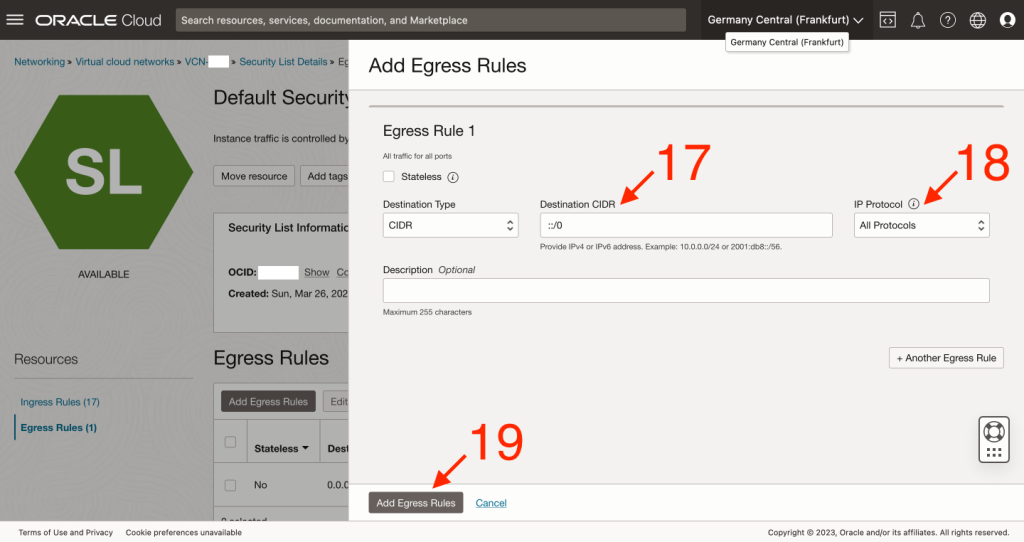
As the Destination CIDR [17], we enter ::/0, from the IP Protocol drop-down list, we select All Protocols [18] and confirm with the Add Egress Rules [19] button.
-
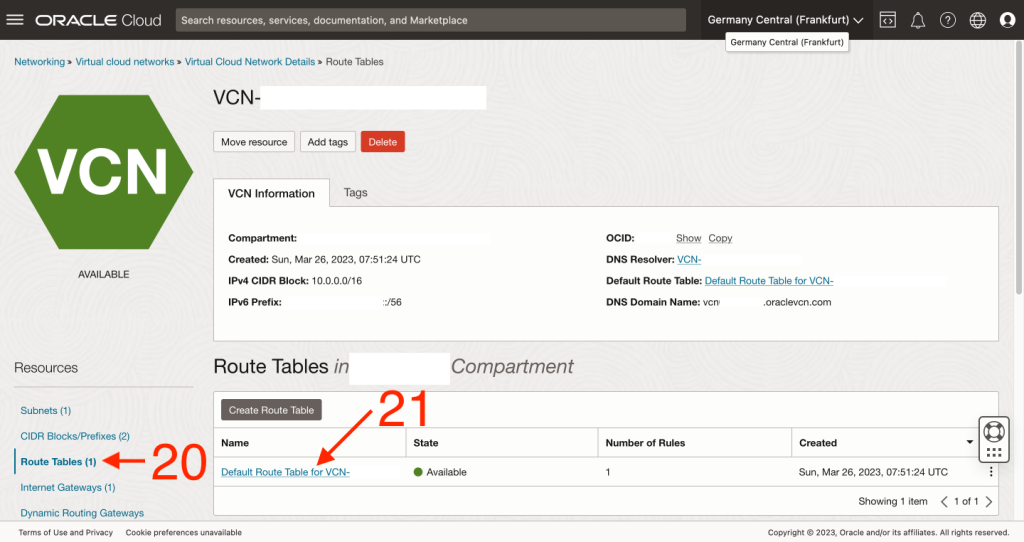
After configuring the firewall, we still need to set up the routing. We go back to the cloud network settings and find the Route Tables [20] section on the left-hand list. From the displayed list, we find the entry that starts with Default Route Table for… [21] and go into its properties.
-
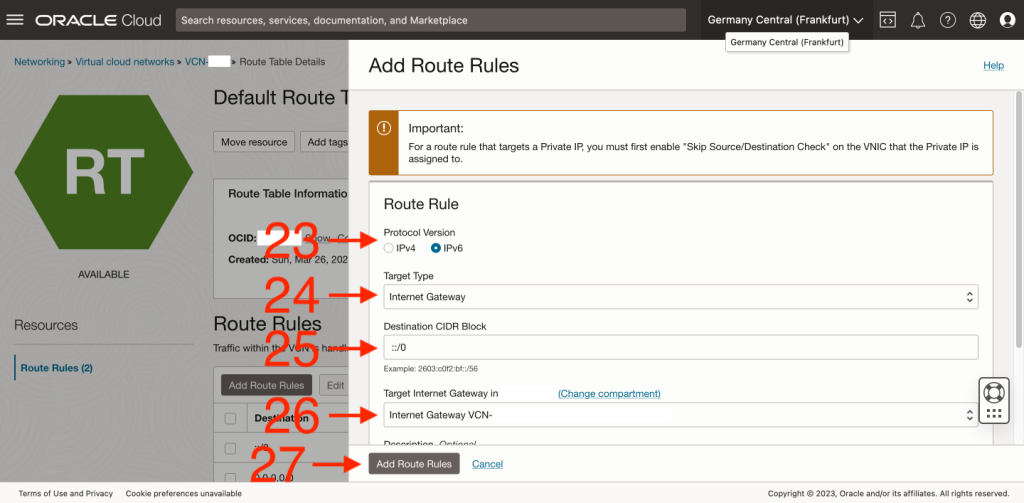
As we can see, we already have the correct routing for IPv4, but for IPv6 we need to create it. We click the Add Route Rules [22] button.
-
In the window that will slide out from the right side, in the Protocol Version [23], we select IPv6, from the Target Type drop-down list [24], we select Internet Gateway, in the Destination CIDR Block text field [25], we enter ::/0, from the Target Internet Gateway drop-down list [26], we select our cloud network and confirm everything with the Add Route Rules [27] button.
-
Finally, we need to assign an IPv6 address to our instance. To do this, we go to the instance settings (three horizontal bars in the upper left corner -> Compute -> Instances -> select our instance from the list).
-
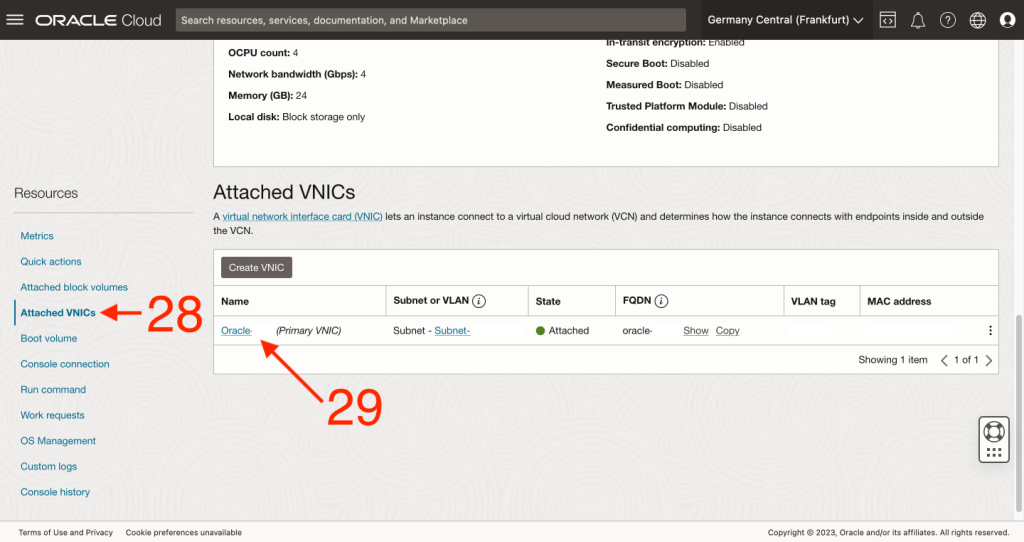
In the left-hand section, we find Attached VNICs [28], from the list that will be displayed, we select the only VNIC (Virtual Network Interface Card) [29] that will be displayed, and go into its properties.
-
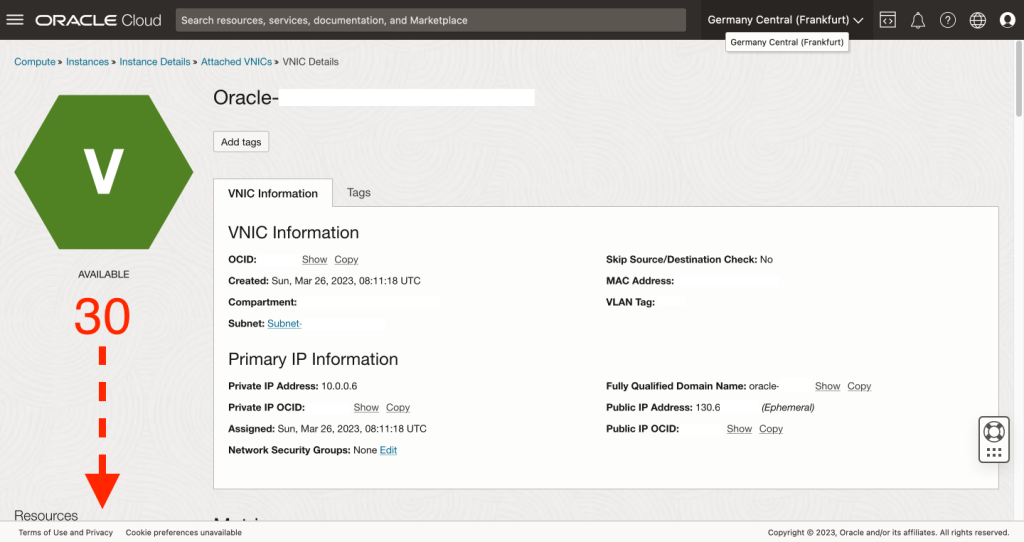
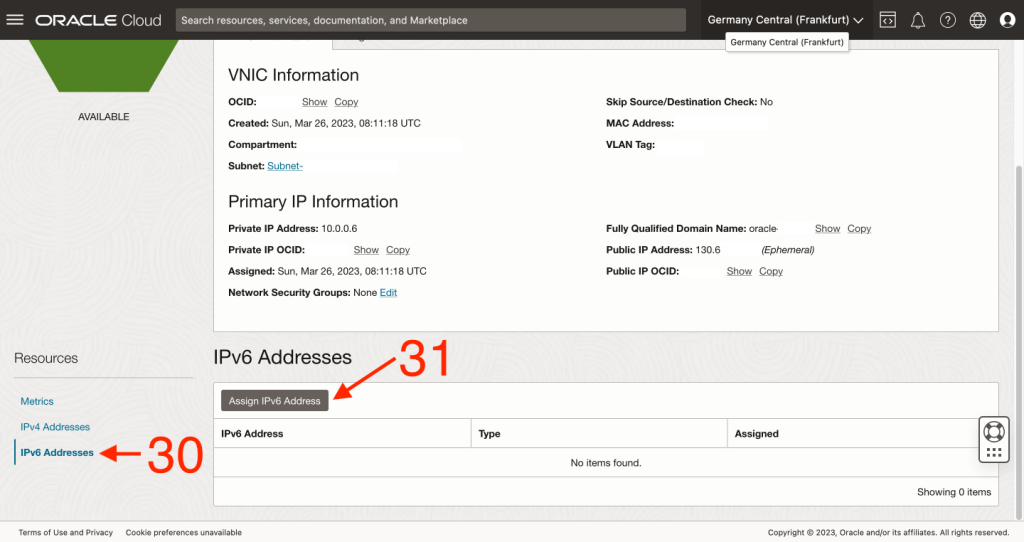
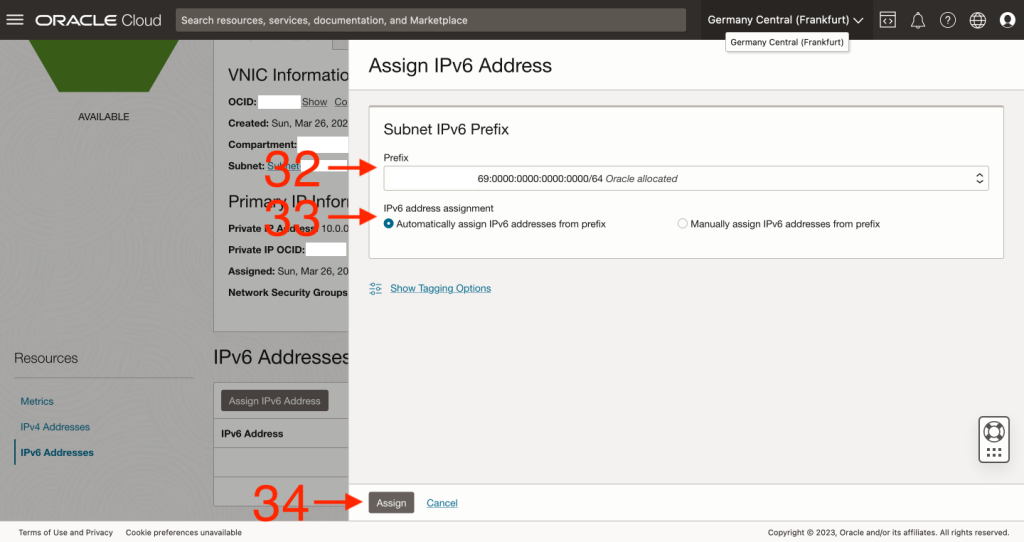
In the left-hand section, we find IPv6 Addresses [30] and click the Assign IPv6 Address [31] button.
-
In the window that will appear on the right-hand side, from the Prefix [32] dropdown list, choose the prefix that was created earlier (there should be only one option available to choose from). Below, I suggest leaving the default selection for IPv6 address assignment [33], which is Automatically assign IPv6 addresses from prefix, meaning that the address for our instance will be selected automatically. Of course, if desired, we can always change this setting to manual and define a specific address ourselves. Confirm by clicking the Assign [34] button.
Summary
Phew, I must admit that writing this post wasn’t easy for me. It took me a lot of time just to prepare screenshots showing everything step by step. Nevertheless, I am very satisfied with the final result. I think that in this post, I managed to explain in a clear way how to use this undoubtedly interesting Oracle offer. Moreover, I guided you from the very beginning to the very end, without any ambiguities. I think that such a VPS is a great solution for learning and more, because its parameters are reasonable enough to run many services on it.


