![Home server - basic configuration [ENG 🇬🇧]](/images/linuxtodolist.png)
🇵🇱 Przejdź do polskiej wersji tego wpisu / Go to polish version of this post
Table of contents:
We continue the topic from the previous post, in which I described what is needed to create your own home server for reasonable money, how to install the system on it, and how to connect to it via SSH. In this post, I will go through all the fundamental actions that need to be performed on a freshly launched server. For people familiar with the topic, these will probably be obvious, but if you are reading this post, you are most likely not such a person, so grab your iPad (or any other device that you have) and let’s configure it together 😉
Changing the default password
Firstly, we get rid of (change) the default password for the user managing our server. This is done with the following command:
passwd
We will be asked to provide the current password, and then enter the new one twice. This doesn’t have to be anything fancy, as we won’t need this password to access the server soon (spoiler - we’ll configure access based on SSH keys), and we’ll only use it for authentication when performing actions that require administrator privileges (like e.g. updates). We change the password only to secure the server to some extent until the configuration is complete, which is sufficient as it won’t take long.
It’s important to change passwords for all users. I mention this because while some distributions have only the root user right after installation, for example, the Ubuntu Mate system dedicated to ODROID boards immediately creates two users for us - root and odroid. To switch between users, we use the command:
su [username]
To switch to the root account from a regular user, use the command:
sudo su
Update is crucial!
Always update a freshly installed system. Firstly, because it may be necessary to download additional components from the Internet that were not included in the base system (installer), but are necessary for later use. Secondly, because some components may have been updated between the compilation (creation) of the system image we downloaded and its installation on our server.
The two basic commands for updating are:
sudo apt update
sudo apt upgrade -y
Typing this manually can be enjoyable the first time, but believe me, it won’t be in the long run. So, like any lazy competent administrator, let’s write a script for it! We create the file update.sh and open it in a text editor such as nano (or other depending on your preferences).
sudo nano /usr/local/sbin/update.sh
We copy the contents of the script inside:
#!/bin/bash
#Script for updating the system and packages from blog.tomaszdunia.pl
echo 'Step 1 - update'
sudo apt update
echo 'Step 2 - upgrade'
sudo apt upgrade -y
echo 'Step 3 - autoremove'
sudo apt autoremove -y
echo 'Step 4 - clean'
sudo apt clean
To exit the nano editor, use the control + x key combination, then confirm the desire to save with the y or t keys, and finally confirm with ENTER the name under which the file should be saved. We still need to make the created script executable (give permission to run).
sudo chmod +x /usr/local/sbin/update.sh
You can run such a script by typing /usr/local/sbin/update.sh in the terminal. You can also attach this path as an alias or add it as a cron job to run at a specified time (e.g., every day at 3 AM). Someday I may delve into this, but for now, this is enough for us.
Firewall
An important thing is to define specific rules that will determine what traffic can be sent to the server and what traffic can leave it. Although we don’t plan to expose our server to the world other than through a VPN, it’s still worth securing it, for example, from other devices on the local network that we may not have full control over. A quick example - Chinese IoT devices, a.k.a. smart home devices. The recommended approach here is to allow all outgoing traffic from the server, while we comprehensively close incoming traffic to the server, but only open some necessary gates to specific services. The basic gate of this type is port 22, i.e. the port through which we establish an SSH connection with the server.
We will use the ufw tool, which is implemented by default in most Linux distributions. The expansion of the acronym is Uncomplicated FireWall, which as the name suggests, is a very user-friendly interface for modifying firewall settings. If for some reason the ufw tool is not installed on your server, you can install it with the command:
sudo apt install ufw
I won’t delve too deeply into its operation, but I will only list the commands that should be used one after the other to perform basic configuration.
sudo ufw disable
sudo ufw reset
sudo ufw default deny incoming
sudo ufw default allow outgoing
sudo ufw allow 22
sudo ufw enable
Now let’s make sure that the ufw service will start with the system (e.g. after a restart). This option should be enabled by default, but it’s always good to check it yourself. We go to the ufw configuration file:
sudo nano /etc/ufw/ufw.conf
We’re interested in making sure that the ENABLED variable is set to yes:
# Set to yes to start on boot. If setting this remotely, be sure to add a rule
# to allow your remote connection before starting ufw. Eg: 'ufw allow 22/tcp'
ENABLED=yes
Finally, let’s check the firewall status:
sudo ufw status verbose
The server’s response should look like this:
Status: active
Logging: on (low)
Default: deny (incoming), allow (outgoing), disabled (routed)
New profiles: skip
To Action From
22 ALLOW IN Anywhere
22 (v6) ALLOW IN Anywhere (v6)
SSH Keys
Using SSH keys instead of passwords is first and foremost a significant increase in security, and secondly a significant ease of the login process. By having the correct public key exchanged for logging in to the server, we don’t need a password, as we authenticate with the private key stored securely in our host. I have described what SSH keys are in simple terms in this post on odroid.pl. There is also a manual on how to generate a key pair and exchange them between the server and the host. However, in this post, we are more focused on #iPadOnly, so I’ll show you how to do the same thing conveniently using the Termius app, which is my main terminal on the iPad. We open the application, go to the Keychain tab, press + in the upper right corner, and select the Generate Key option.
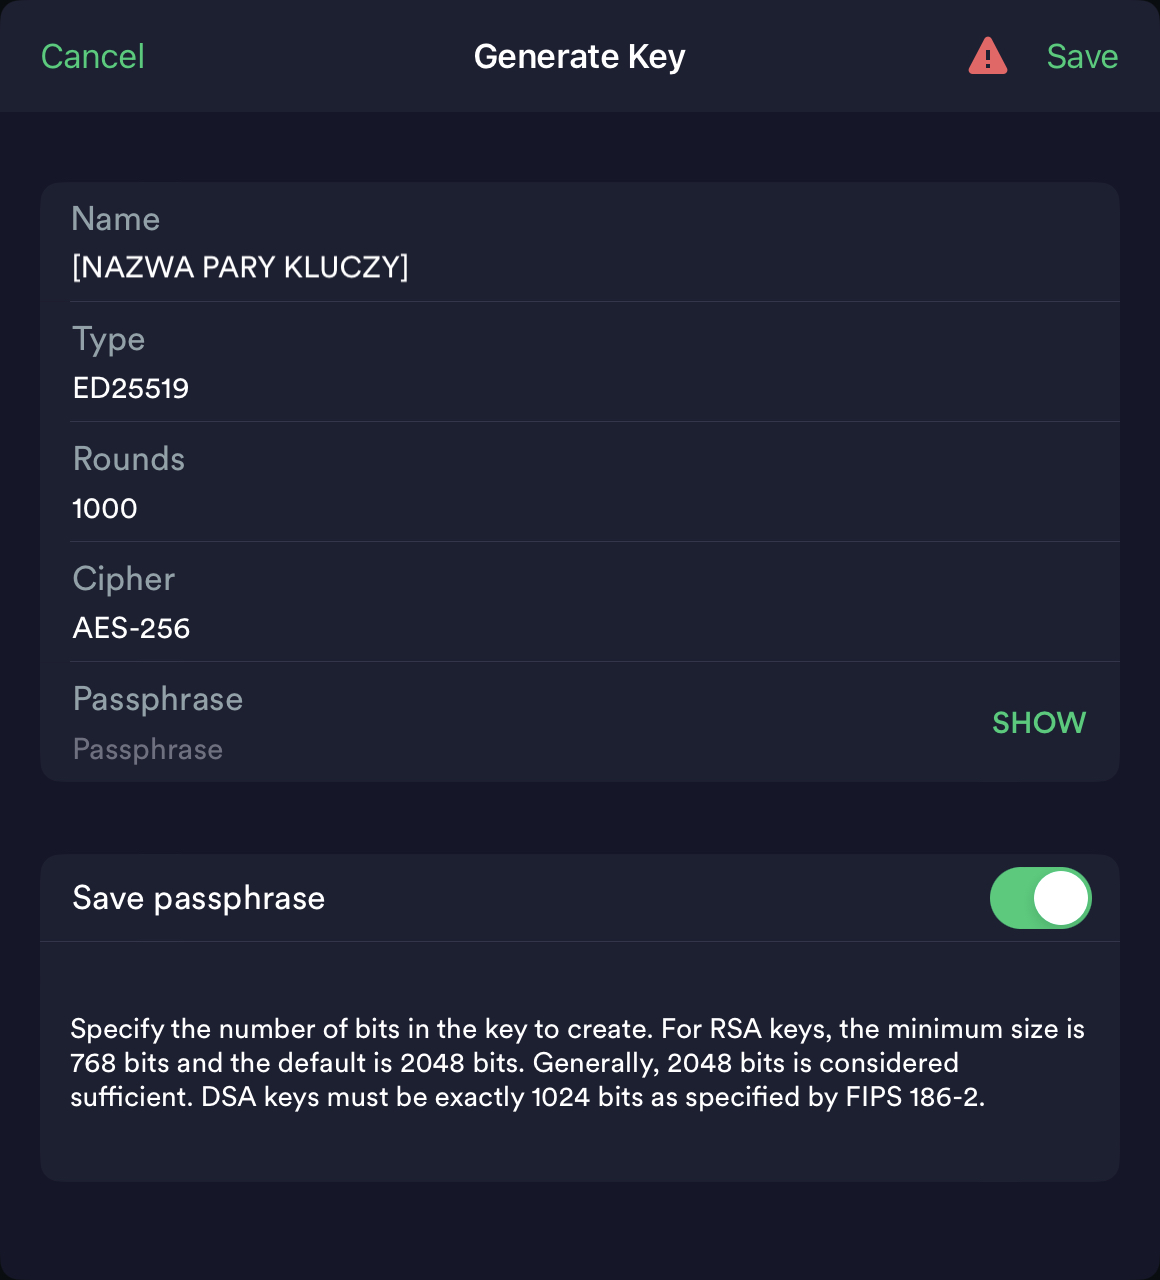
A key pair generator will appear, in which we give the key pair a name (it can be any name), change the Rounds option to 1000 (it won’t hurt), and leave the Type and Cipher options as default. There is still a text field called Passphrase. This is a field where you can enter an additional password that will protect the private key and without which its use will be impossible, i.e., even if someone gains access to our private key, it will be useless to them without the Passphrase. Using a Passphrase is optional and is a double-edged sword, as if we don’t remember this password, we will also cut ourselves off from access to the server. We complete the process of generating keys by confirming with the Save button.
To create the key, hold down your finger (equivalent to right-clicking) on the key for a longer time and select the Share option, then Export to Host, and then choose the server you previously defined, to which Termius will send the necessary components through the SSH tunnel. Now we can connect to our home server using the new authentication method, but there are still further steps related to its implementation. We also need to change the ssh settings of our server, specifically disabling the ability to log in using a password, because what would be the point of introducing a more secure form of authentication if the less secure one was still available? We do this by editing the file:
sudo nano /etc/ssh/sshd_config
We need to find the following parameters and set their values as shown below. They may be scattered throughout the file, so the search function implemented in the nano editor, which is called by the combination of buttons control + W, may come in handy. Parameters may also be in a different order. If any of the parameters are “commented out” you should remove the “#” sign in front of them and thus “uncomment” them. Similarly, if any of the parameters are not in the file, you should add them.
PubkeyAuthentication yes
AuthorizedKeysFile .ssh/authorized_keys
PasswordAuthentication no
We save the file and exit the editor as usual. Now we still need to restart the ssh process to apply the changes:
sudo service ssh restart
EDIT: MiKlo correctly pointed out in the comment that disabling password login without checking if SSH keys have been properly configured can result in a problem accessing the server. If you are doing it like me, via Termius and automated key export, the chances of something going wrong are small. Additionally, in the case of a local server, it is not a disaster because we can always physically connect to it and fix our mistake. However, with remote servers, it is practically game over. Therefore, it is good practice to open a second terminal after implementing the above changes and try to connect to the server using only SSH key, without entering a password.
Summary
The four issues presented above are only basic fundamentals, which in my opinion are essential to perform on a freshly installed server. These actions are sufficient for basic server security, which we do not plan to release to the world, i.e., to keep it hidden within our home local network. If you want to go into details, there is much more to it, but that’s not the topic of this post. For the curious, I can recommend researching the term linux hardening for more information on securing a Linux system, which can be done by searching on Google.


