![Vaultwarden - self-hosted password manager [ENG 🇬🇧]](/images/vaultwarden.png)
🇵🇱 Przejdź do polskiej wersji tego wpisu / Go to polish version of this post
Table of contents:
- Running on YunoHost
- Running as a Docker container
- Applications and browser extensions
- Backup
- Bitwarden - basic configuration
Strong passwords are incredibly important! It is one of the foundations of internet security. The best solution is to have passwords consisting of at least 16 characters, including lowercase and uppercase letters, as well as numbers and special characters. It is also crucial not to have the same password for each service, because if it leaks from one of them, scammers/thieves/burglars will first check it on other popular portals. Looking at all of this raises the question - How to remember all these complex character strings in your head?! Saving them in a notepad on your computer is not a very secure solution, and typing them from a physical notebook kept in a safe is a hassle. In such a situation, the password manager rides in on a white horse, and not just any, but specifically Bitwarden, which can be self-hosted on your own server, which is what we will do because we don’t like to entrust our data to third parties, especially when it comes to our passwords.
In this post, I will approach the matter similarly to the article about Nextcloud, that is, I will show two ways to run your own instance of Bitwarden (specifically, the implementation of Vaultwarden):
Running on YunoHost
The installation process will be similar to the one described in the WriteFreely post, but when running Vaultwarden, we don’t need a separate domain (just like in the Nextcloud post). In fact, when running it only for ourselves, it’s not even recommended to create a special domain. Firstly, it’s an additional cost, and secondly, it’s better not to reveal all our cards and expose our data by using a subdomain like bitwarden.tomaszdunia.pl, which would clearly indicate that all our passwords are located at that address. In general, I advocate for keeping such services in a local network accessible only through a VPN like WireGuard. However, I will discuss this in a completely different post at another time.
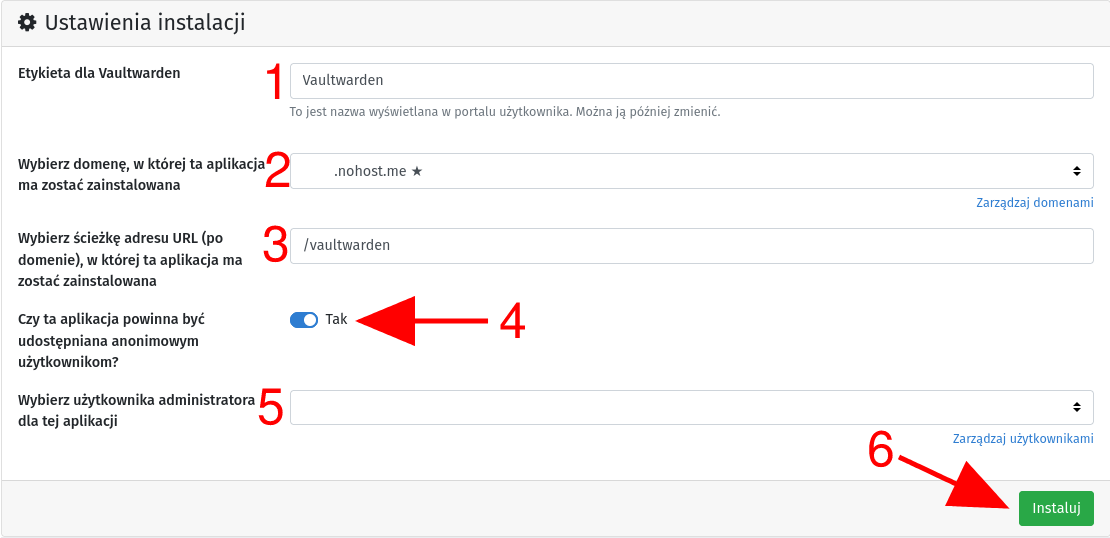
We start by logging into our YunoHost admin panel and immediately go to Applications. Then, in the top right corner, click the green + Install button, search for the Vaultwarden application, and select it from the list. Scroll down to the Installation settings section and begin the configuration:
-
In the text field Label for Vaultwarden [1], enter the name under which you want to see this application on the list of applications in your YunoHost.
-
From the drop-down list below [2], select the domain on which Vaultwarden should be installed. As you can see, I chose the main domain on which my YunoHost is running. You can do the same or choose a different domain from the list.
-
In the next text field [3], define the exact path under which Vaultwarden should be installed. By default, entering the value /vaultwarden will install it at example.domain.com/vaultwarden, where example.domain.com is the domain you selected above. If you have decided to use a dedicated domain only for Vaultwarden, you can enter / here, which will mean installation in the parent directory of the domain.
-
Next, we have a decision field [4] Should this application be accessible to anonymous users? Here, I suggest selecting Yes because otherwise, Vaultwarden clients (referring to the official Bitwarden application) will not work, as an additional authentication step will appear, requiring login to YunoHost, which is not supported.
-
Another drop-down list [5] is used to indicate which YunoHost user should be an administrator for this application.
-
Confirm the above settings by clicking the Install button [6], which will start the installation process, which unfortunately is not the shortest, so patience is required.
After the installation process is completed, connect to the server where YunoHost is running via SSH. Then, log in as the root user:
sudo su
We open the application settings file for Vaultwarden:
nano /etc/yunohost/apps/vaultwarden/settings.yml
In this file, we need to locate the following line:
admin_token: [token]
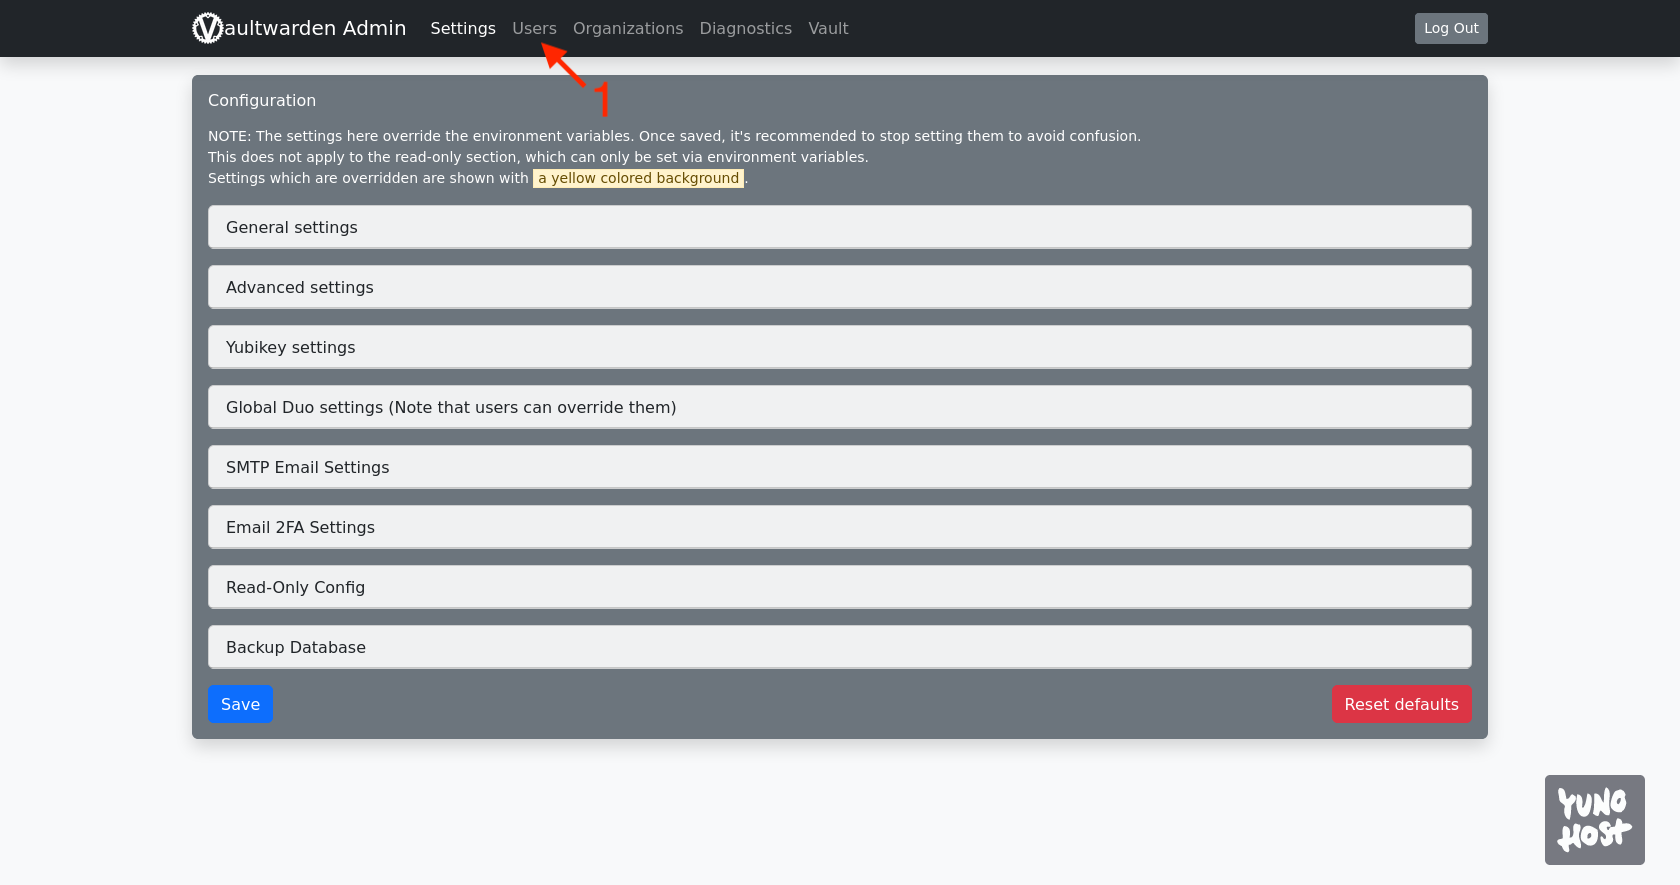
We copy the value [token], which we will need to log in to the admin panel of Vaultwarden. At this stage, we no longer need the SSH connection to the server. The admin panel is accessible at the address, beginning with the address we selected for the Vaultwarden application during installation, and ending with /admin. We enter the copied token there, which will allow us to access the admin panel, where we immediately go to the Users tab [1].
At the bottom, there is an Invite User section. In the text field [2], enter your email address and confirm with the Invite button [3].
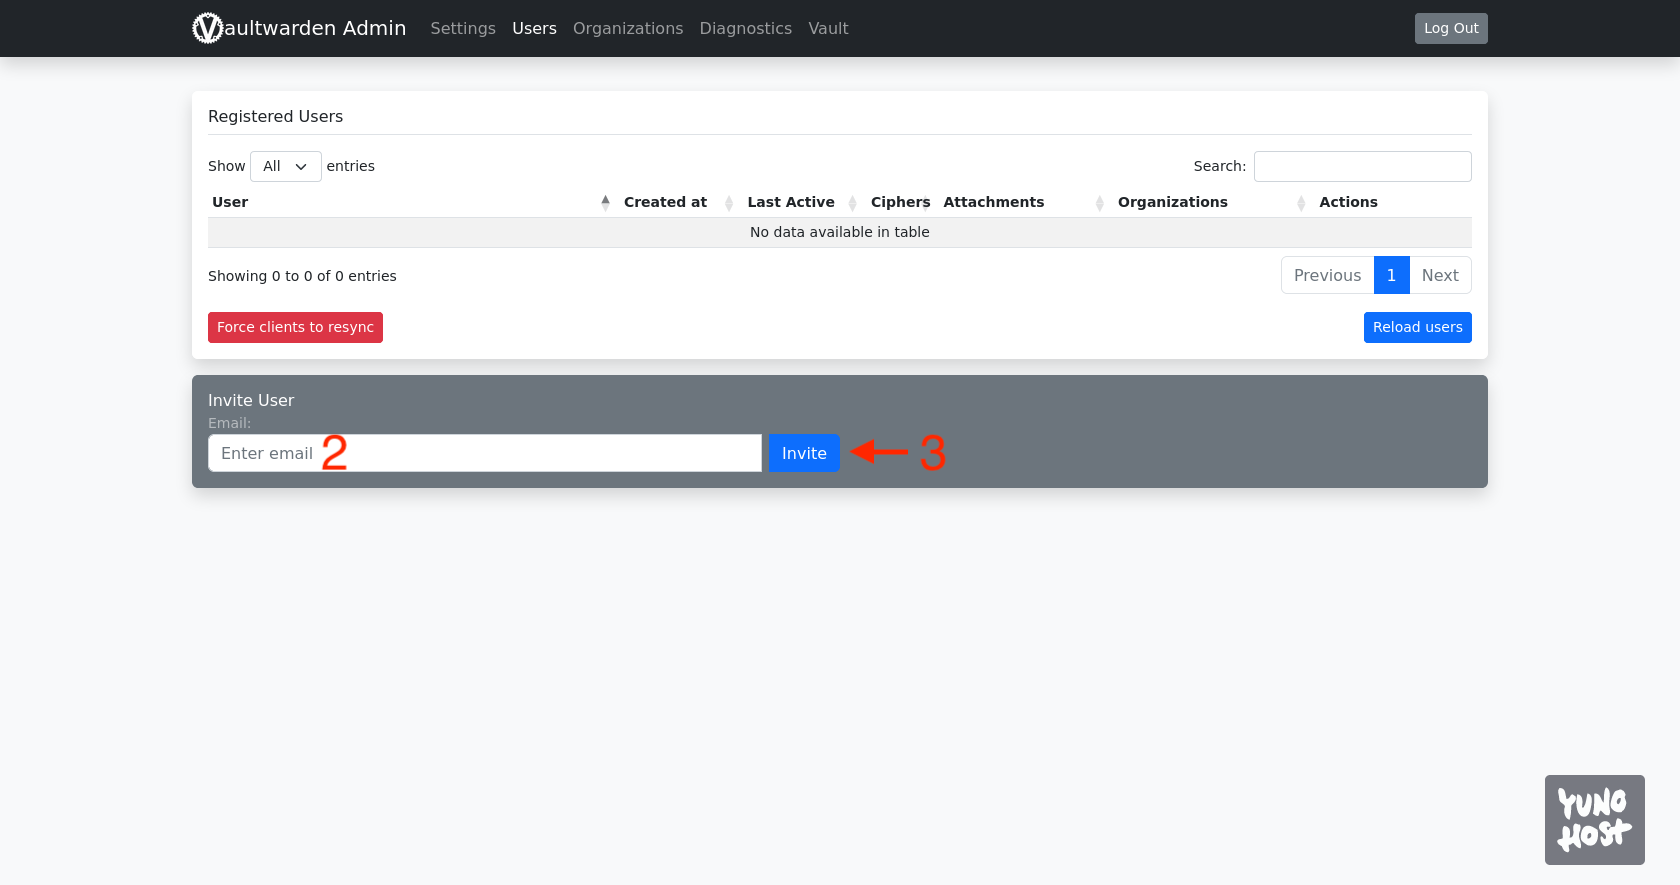
The above action will result in a new user appearing on the list [4].
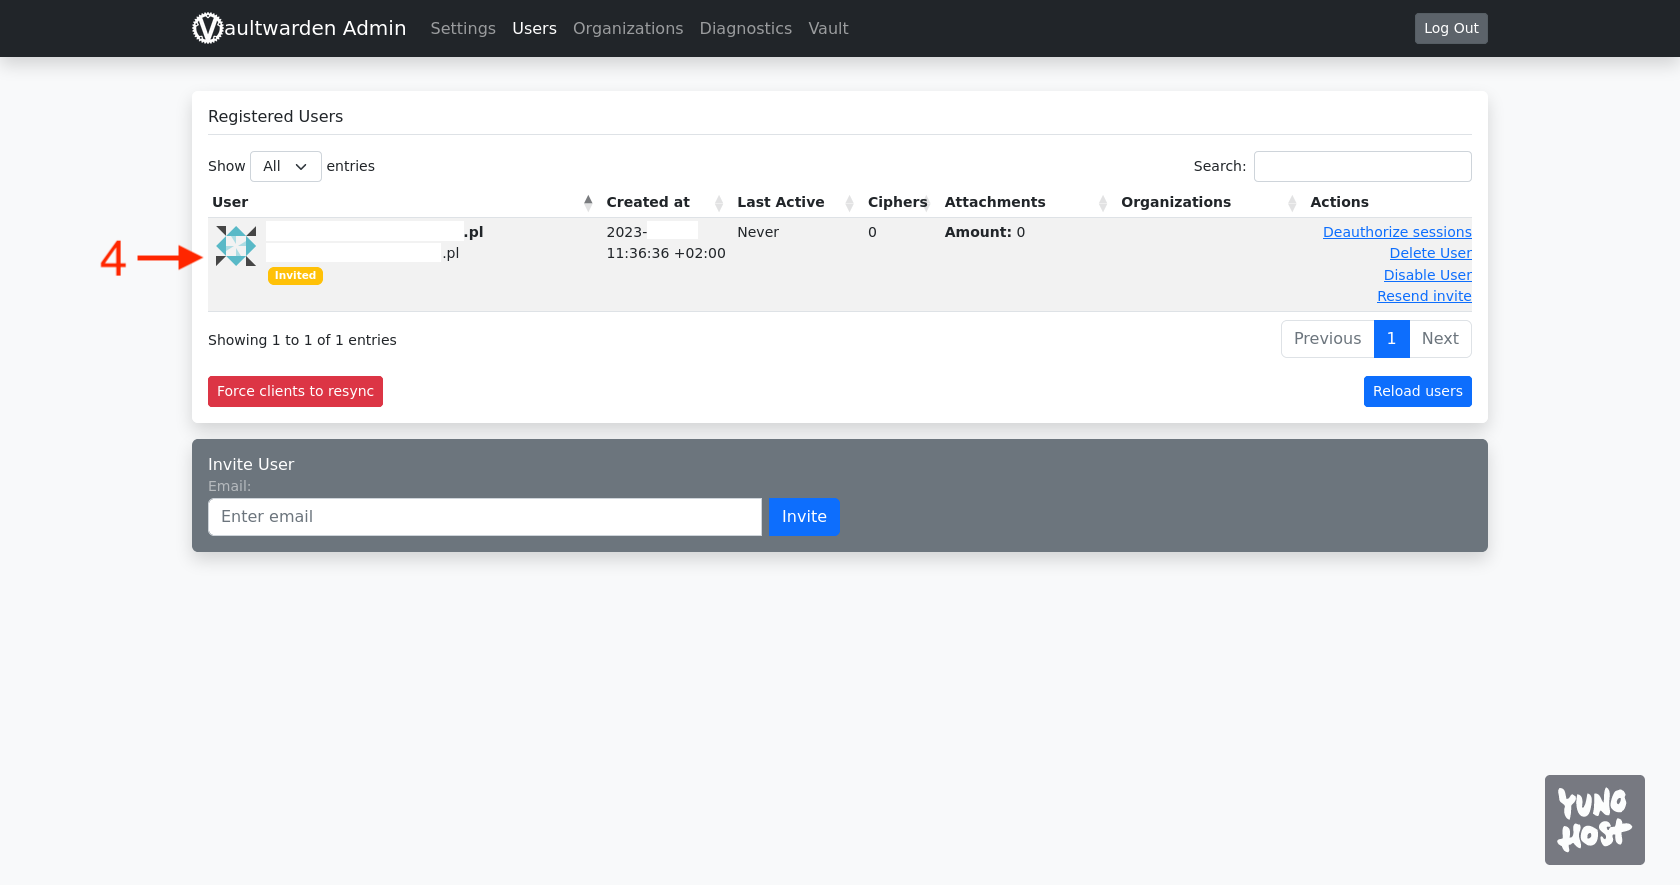
In the meantime, an invitation with an activation link will be sent to the provided email address. Click the Join Organization Now button [5].
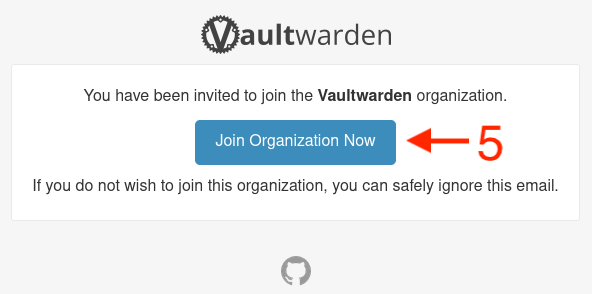
You will be redirected back to the browser, where you will see a message saying that you have been invited to the organization and can now proceed. Click the Create an Account button [6].
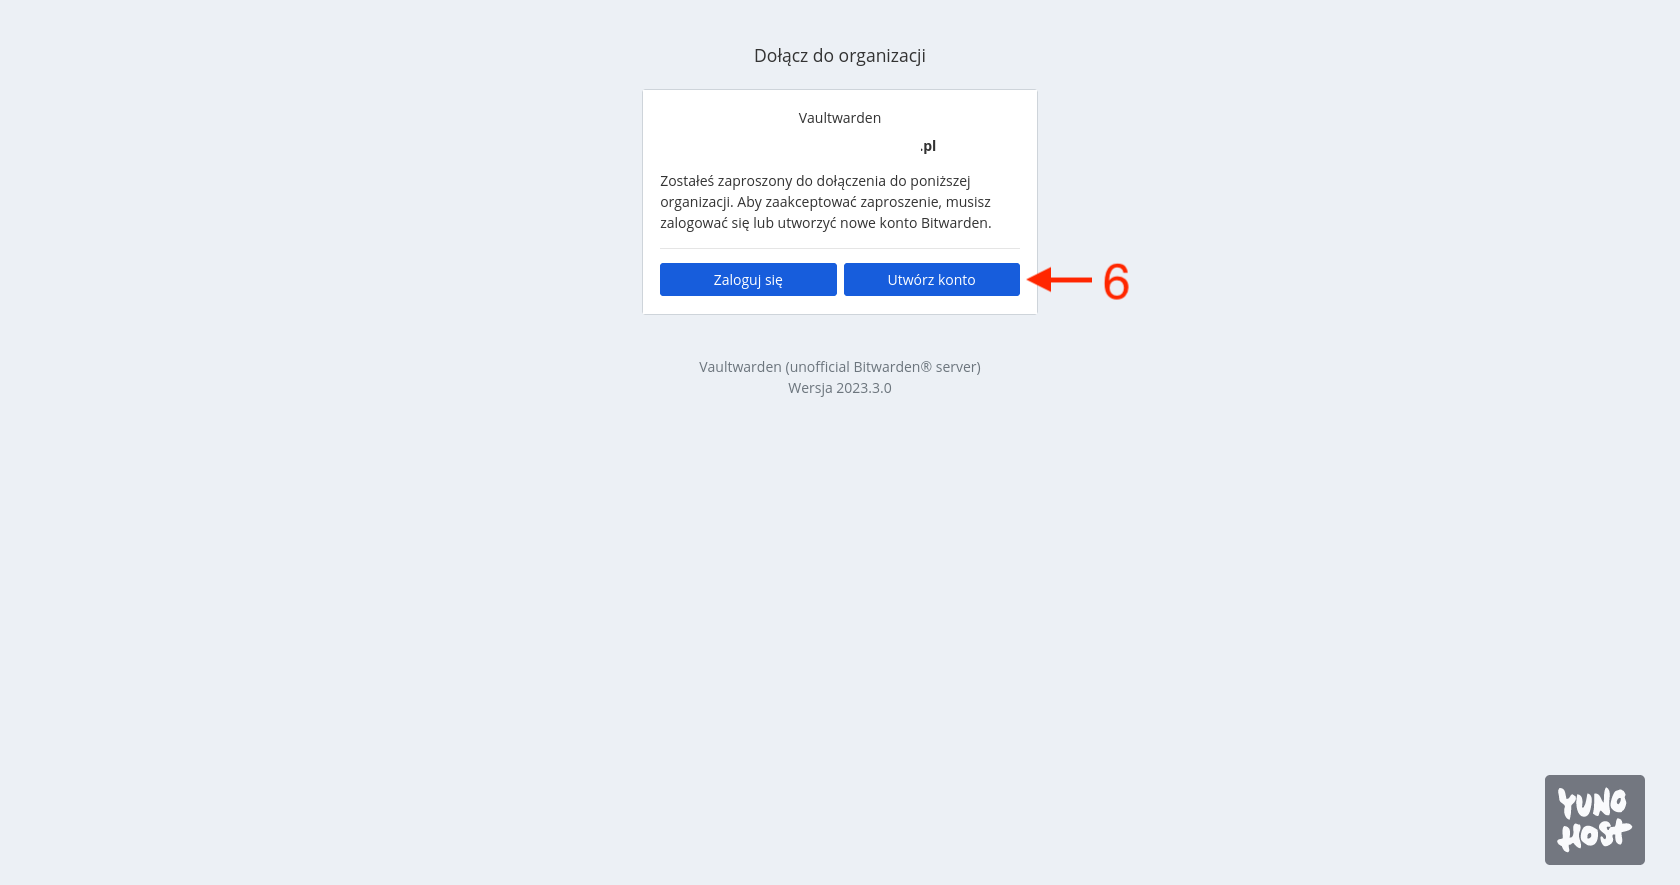
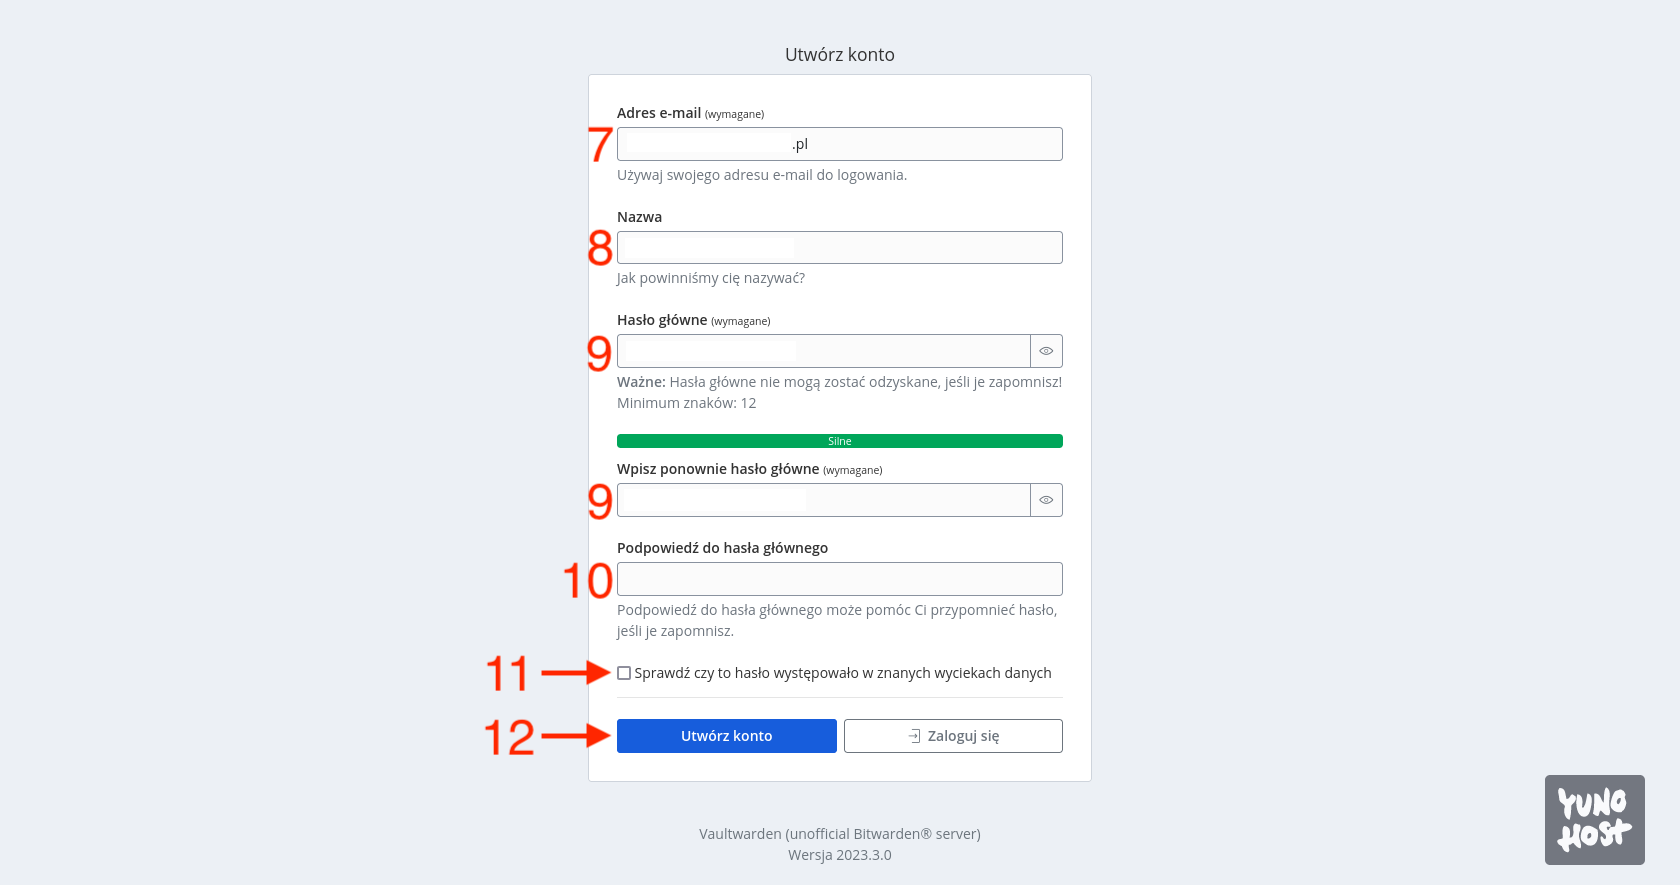
We will be redirected to the standard registration form, where we provide an email address [7], username [8], password (twice) [9], and optionally a password hint [10]. In the end, we can also decide [11] whether we want our password to be checked against known password breaches. However, I use the website HaveIBeenPwned.com for this purpose, so I always uncheck this option. Confirm the filled form by clicking the Create Account button [12].
Running as a Docker container
Don’t have a YunoHost server? No worries! You can do the same using Docker! I recommend first reading my post on Docker - one server, multiple services. We will use a fork called Vaultwarden available on Docker Hub as the image.
We start by creating a folder for this container:
mkdir -p /home/$USER/docker/vaultwarden
Next, we create a configuration file for this container:
nano /home/$USER/docker/vaultwarden/docker-compose.yml
The configuration process for Vaultwarden as a container is relatively simple:
version: "3"

services:
  vaultwarden:
    container_name: vaultwarden
    image: vaultwarden/server:latest
    ports:
      - "80:80"
    environment:
      PUID: '1000'
      PGID: '1000'
      TZ: 'Europe/Warsaw'
    volumes:
      - '/home/$USER/docker/vaultwarden/volumes/data:/data'
    restart: unless-stopped
In the above configuration, you need to check and adjust the following according to your needs:
-
the port on which this container should run, for example, I entered port 80,
-
PUID and PGID, as described in the Nextcloud container post.
At this stage, we still need to create the appropriate volume that we declared as the location for storing container data:
mkdir -p /home/$USER/docker/vaultwarden/volumes/data
Let’s also check if the port for accessing this container is open in our firewall:
sudo ufw allow 80
Finally, all that’s left is to build and run the Vaultwarden container:
docker-compose -f /home/$USER/docker/vaultwarden/docker-compose.yml up -d
To access the website, open your browser and enter the address consisting of the server’s IP and the port on which the container is running (if it’s port 80, there’s no need to specify it since it’s the default port). Check if the Vaultwarden page loads correctly. Unfortunately, it will display properly, but it won’t function correctly, as you can see when trying to create a new user account. You will receive a message stating that an HTTPS certificate is required to use our vault. So, for now, let’s stop the container:
docker stop vaultwarden
Next, let’s remove it:
docker rm vaultwarden
We need to create a so-called self-signed certificate, which is sufficient when using Vaultwarden on a local network. If you want to share it with third parties (outside the local network), you can use Let’s Encrypt and associate it with a domain. However, for the purpose of this post, I have chosen a much safer solution and deployed the vault in a local network accessible via VPN - Wireguard. Therefore, an external certificate is not needed.
First, we need to create a Root Certificate Authority, abbreviated as CA, which will be our private certificate authority that will sign certificates for specific domains.
We start by generating the CA key:
openssl genpkey -algorithm RSA -aes128 -out private-ca.key -outform PEM -pkeyopt rsa_keygen_bits:2048
You need to provide a passphrase that is 4 to 1024 characters long. Remember it! In this case, the risk is minimal, so I suggest following the KISS rule - Keep It Simple Stupid. I strive for the passphrase not to be complicated because if someone gains access to our local network and thus to the password manager, the possibility of them knowing the passphrase will be our least concern. The result of the above command will be the creation of the private-ca.key file.
Based on the generated key, we generate the CA certificate:
openssl req -x509 -new -nodes -sha256 -days 3650 -key private-ca.key -out self-signed-ca-cert.crt
During the execution of this process, we need to enter the previously provided passphrase and fill in a short survey where you can simply enter a dot (“.”) in each field and confirm with ENTER. The only thing worth filling in is the Common name field, where you should enter the name of our certificate. I entered vaultwarden. As you can see in the command, we provided -days 3650, which means our CA will have a validity period of 10 years.
Enter pass phrase for private-ca.key: [podaj passphrase]
You are about to be asked to enter information that will be incorporated
into your certificate request.
What you are about to enter is what is called a Distinguished Name or a DN.
There are quite a few fields but you can leave some blank
For some fields there will be a default value,
If you enter '.', the field will be left blank.
Country Name (2 letter code) [AU]:.
State or Province Name (full name) [Some-State]:.
Locality Name (eg, city) []:.
Organization Name (eg, company) [Internet Widgits Pty Ltd]:.
Organizational Unit Name (eg, section) []:.
Common Name (e.g. server FQDN or YOUR name) []:vaultwarden
Email Address []:.
The result of this command will be the creation of the file self-signed-ca-cert.crt.
Now we need to generate a key for the Vaultwarden certificate:
openssl genpkey -algorithm RSA -out vaultwarden.key -outform PEM -pkeyopt rsa_keygen_bits:2048
The file vaultwarden.key will be created. Next, we need to create a certificate request file:
openssl req -new -key vaultwarden.key -out vaultwarden.csr
Here’s another quick survey where we insert dots everywhere except for the Common name field, where we need to enter the address of our server, which can be an address on the local network (server’s IP address).
You are about to be asked to enter information that will be incorporated
into your certificate request.
What you are about to enter is what is called a Distinguished Name or a DN.
There are quite a few fields but you can leave some blank
For some fields there will be a default value,
If you enter '.', the field will be left blank.
Country Name (2 letter code) [AU]:.
State or Province Name (full name) [Some-State]:.
Locality Name (eg, city) []:.
Organization Name (eg, company) [Internet Widgits Pty Ltd]:.
Organizational Unit Name (eg, section) []:.
Common Name (e.g. server FQDN or YOUR name) []:[adres ip serwera]
Email Address []:.

Please enter the following 'extra' attributes
to be sent with your certificate request
A challenge password []:.
An optional company name []:.
A vaultwarden.csr file will be created. The last file we need to create is:
nano vaultwarden.ext
Into which we paste:
authorityKeyIdentifier=keyid,issuer
basicConstraints=CA:FALSE
keyUsage = digitalSignature, nonRepudiation, keyEncipherment, dataEncipherment
extendedKeyUsage = serverAuth
subjectAltName = @alt_names

[alt_names]
IP.1 = [adres ip serwera]
As the IP.1 parameter, we enter the same address as before, which is the server’s IP address. Save the file in this form and exit the editor.
Now we need to sign the created certificate with the previously created CA:
openssl x509 -req -in vaultwarden.csr -CA self-signed-ca-cert.crt -CAkey private-ca.key -CAcreateserial -out vaultwarden.crt -days 365 -sha256 -extfile vaultwarden.ext
The end result will be the creation of the vaultwarden.crt file. It is worth noting that we set the validity of the certificate to 365 days. Why didn’t we sign it for 10 years like we did for the CA? Unfortunately, some entities only consider certificates that are valid for a maximum of one year (plus or minus a few days) to be valid. In the case of Apple, for example, it is 398 days. Therefore, every year we will have to perform this last step and renew the Vaultwarden certificate for another period.
Next, move the created and signed Vaultwarden certificate along with its key to the certificates folder on our server:
sudo mv vaultwarden.crt vaultwarden.key /etc/ssl/certs
I suggest keeping the remaining files in the /etc/ssl folder for future reference:
sudo mkdir /etc/ssl/CA
sudo mv vaultwarden.csr vaultwarden.ext private-ca.key self-signed-ca-cert.crt self-signed-ca-cert.srl /etc/ssl/CA
Once we have resolved the issue with the certificates, we enter the configuration file of the Vaultwarden container:
nano /home/$USER/docker/vaultwarden/docker-compose.yml
and change its content analogously to the example below:
version: "3"

services:
  vaultwarden:
    container_name: vaultwarden
    image: vaultwarden/server:latest
    ports:
      - "80:80"
    environment:
      PUID: '1000'
      PGID: '1000'
      TZ: 'Europe/Warsaw'
      ROCKET_TLS: '{certs="/ssl/vaultwarden.crt",key="/ssl/vaultwarden.key"}'
    volumes:
      - '/home/$USER/docker/vaultwarden/volumes/data:/data'
      - '/etc/ssl/certs:/ssl'
    restart: unless-stopped
As you can see, one environment variable and a volume in which we saved the generated certificate have been added.
Unfortunately, this is not the end because creating your own certificate involves transferring it to all devices that will use the password manager. Without this, they will not be properly authenticated. To do this, we need to extract the self-signed-ca-cert.crt file from the server and upload it to the memory of all devices we intend to use Vaultwarden on.
Let’s discuss how to apply it to the most popular browsers and devices:
-
Firefox - Settings -> Privacy & Security -> Certificates -> View Certificates… -> Certificate Authorities tab -> Import… select the certificate from the disk, check the box Trust this CA to identify websites., and finally confirm with the OK button. It’s a good idea to restart the browser.
-
Chrome - Settings -> Privacy & Security -> Security -> Manage certificates -> a Certificates window will open -> Trusted Root Certification Authorities tab -> Import… -> Next -> Browse… -> select the certificate from the disk -> Next -> Finish. You will probably see a Security Warning, confirm with Yes. It’s a good idea to restart the browser.
-
iOS / iPadOS - here it is enough to transfer the certificate to the device in any way and run it. A window will appear Choose the device on which you want to install this profile, where you select iPhone, and then the certificate should appear in Settings. Simply enable it in Settings -> General -> VPN & Device Management -> Configuration Profile section -> our certificate should be available for selection with the name we gave it -> Install -> enter the device unlock code -> Install -> exit OK. It is also necessary to add the certificate to trusted in Settings -> General -> About -> This Device… -> at the very bottom Trusted Certificates Settings -> Enable Full Trust for Root Certificates section -> activate our certificate so that the switch next to it is green -> in the window that appears, press Next and it’s done.
-
Android - just like on iOS, you need to download the certificate to your phone in any way and open it. You will be asked if you want to open the Certificate Installer, confirm and you will be taken to a window where you enter the certificate name and select from the dropdown list that it should be used for VPN and apps.
Now that we have installed certificates for all devices, we can go to the address where Vaultwarden is running and log in to the vault.
Applications and browser extensions
When it comes to password managers, it’s useful to have mobile applications and/or browser extensions that can search the password database and fill in the appropriate passwords on the respective websites. Bitwarden provides applications for all popular operating systems and extensions for all browsers. They work with Vaultwarden. However, in our case, to use these applications/extensions, we need to specify our custom server. After installation, on the login screen, go to settings (click the gear icon) and enter the server address (preceded by https://) where Vaultwarden is running as the Server URL.
Backup
Creating backups is always a very important matter. However, having a backup of a password manager vault is a matter of life or death. It doesn’t matter whether we run Vaultwarden in the cloud or on a home server, on new or old hardware. It is always necessary to assume that something can go wrong and be prepared for it. Personally, I cannot imagine losing access to my password database because it would kill my digital life. That’s why I have multiple backups located in various places, on various types of media, and I recommend this practice to everyone.
Bitwarden - basic configuration
In my case, besides taking care of backups, the configuration right after setting up my vault consists of only two steps.
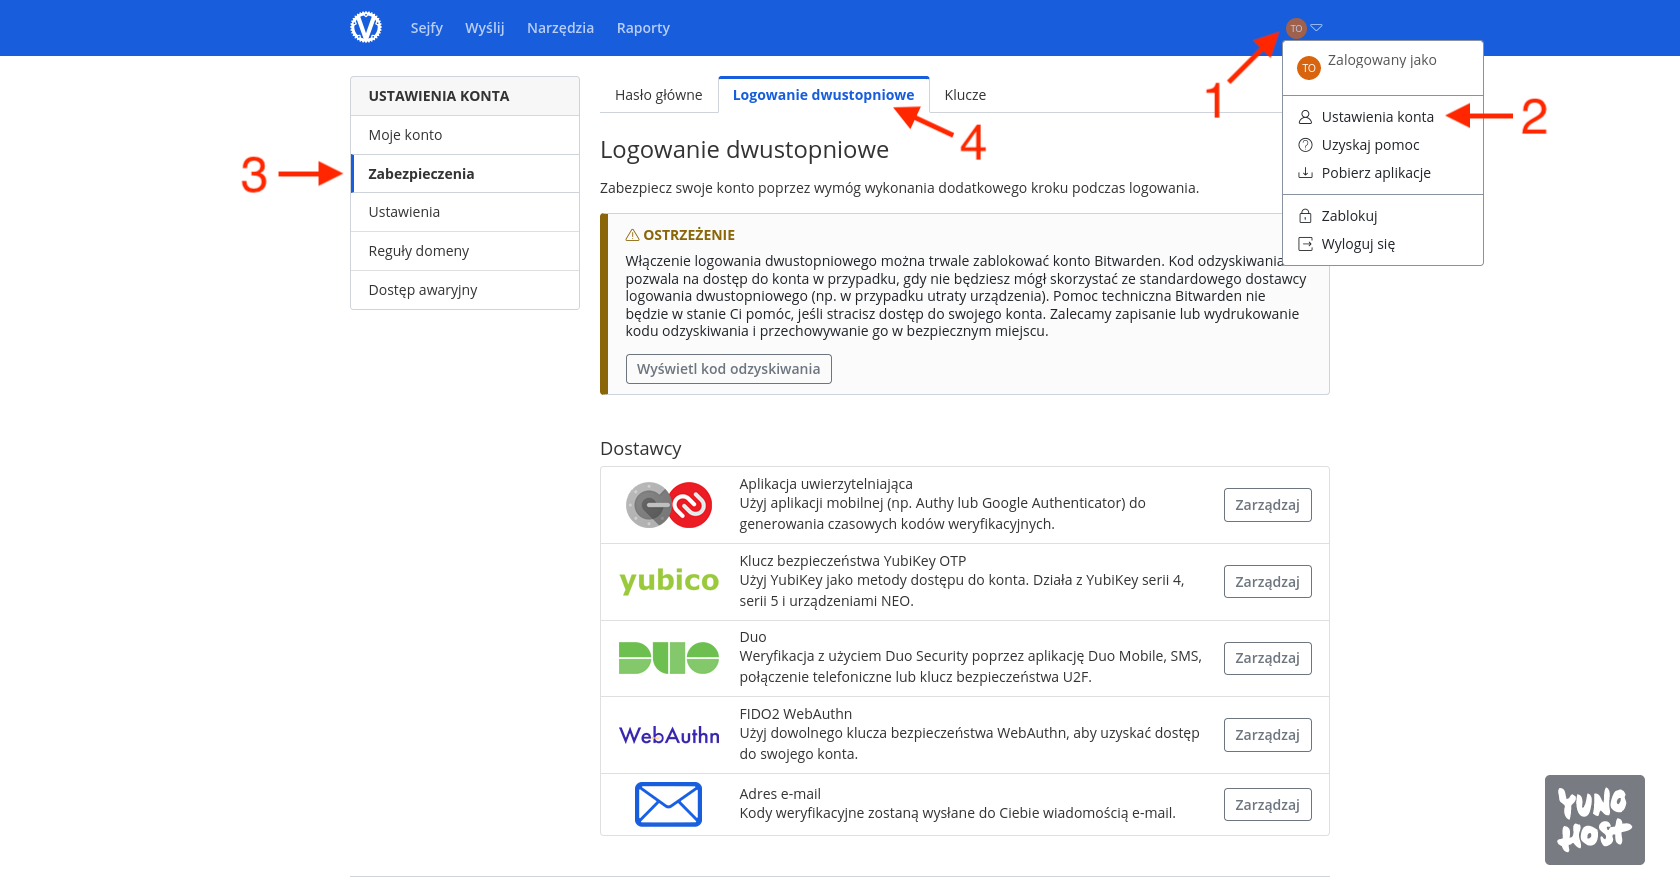
The first one is enabling two-factor authentication during login, because securing your passwords is essential. You can do this by expanding the user menu located in the upper right corner [1], entering Account Settings [2], then on the left, the Security tab [3], and Two-Factor Authentication [4]. Here, you can configure security measures such as TOTP (time-based one-time password apps), Yubico hardware keys (YubiKey), or as a last resort (because it’s the worst option) codes sent to your email inbox.
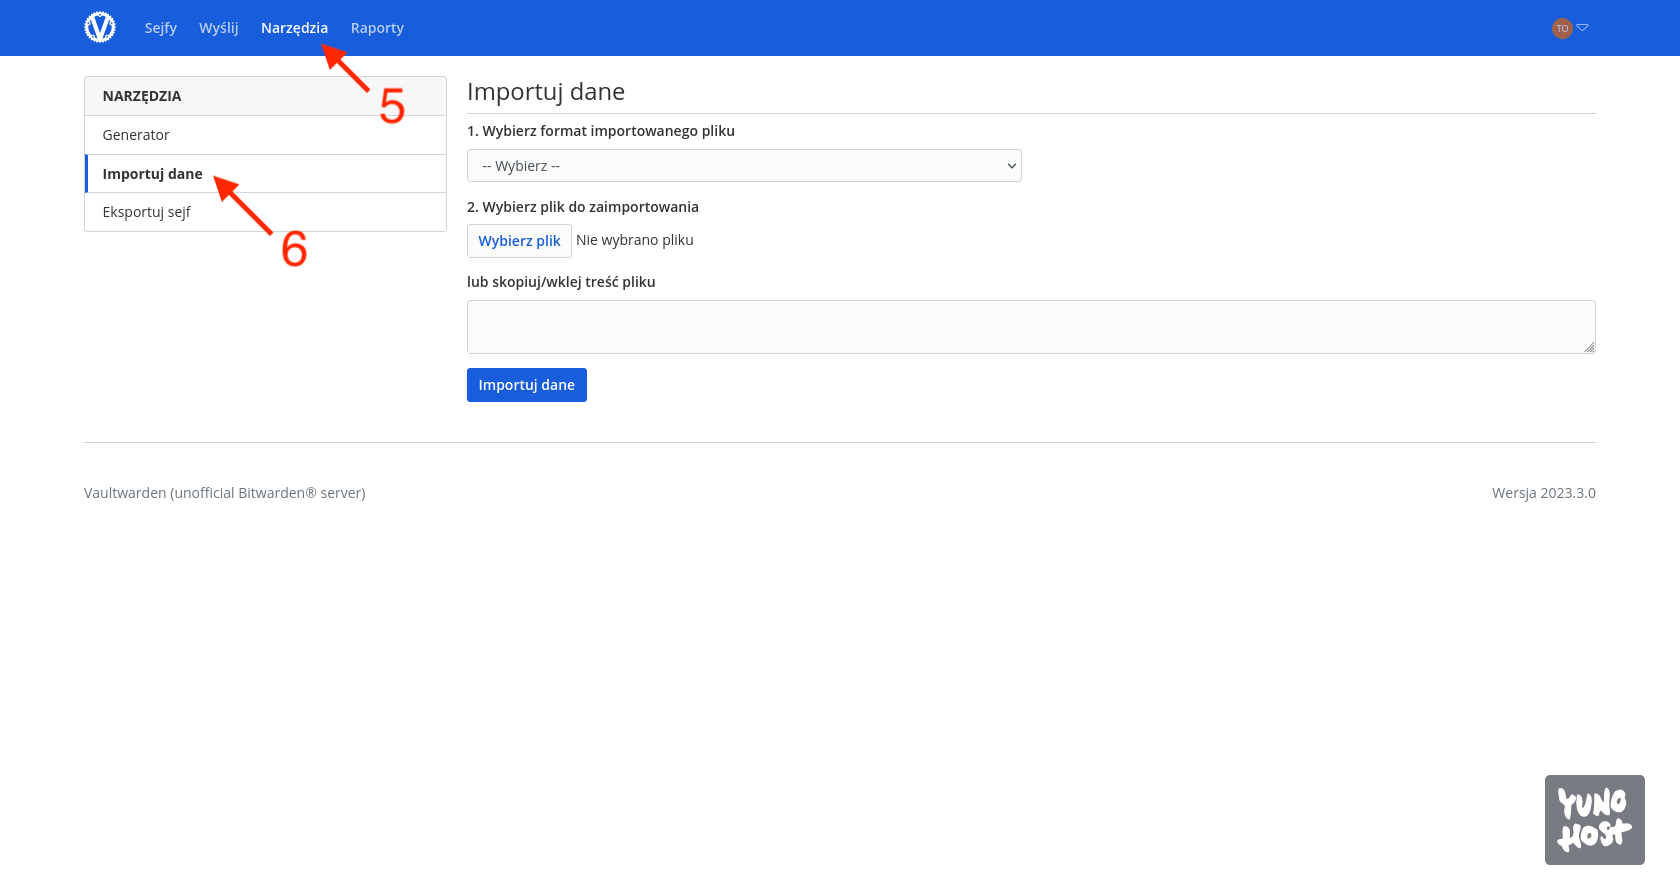
The second task is migrating my password database. The import tool can be found in the Tools tab [5] under Import Data [6].