![YunoHost - How to run WriteFreely instance [ENG 🇬🇧]](/images/writefreelycloudflareyunohost.png)
🇵🇱 Przejdź do polskiej wersji tego wpisu / Go to polish version of this post
Table of contents:
- Adding a domain and installing the application on YunoHost
- Adding and configuring a domain in Cloudflare
- Redirecting a domain to a YunoHost server
- SSL certificate (HTTPS)
- Ready!
It all started with me writing a particularly well-received post on how to get a pretty interesting cloud server for free with Oracle. Then I wrote a guide on how to install YunoHost, which makes it easier to run your own applications/services, on that server. Later, using all of this, I launched a Polish instance of WriteFreely (Polska), which is a blogging platform heavily embedded in Fediverse. And in this post, I’ll describe step by step how I did it, and therefore, how you, dear Reader, can launch such an instance yourself!
Adding a domain and installing the application on YunoHost
First and foremost, we need a domain on which the WriteFreely instance we’re about to launch will run. The domain provider can be any, and the only requirement is that we can set at least DNS records for it, i.e. point to the server that will tell it where we want people, who visit it, to be redirected. It’s also desirable to be able to set A, AAAA, MX, TXT, and CAA records, but if your domain provider doesn’t offer this option, we’ll manage without it. Once we have the domain, we can get started.
-
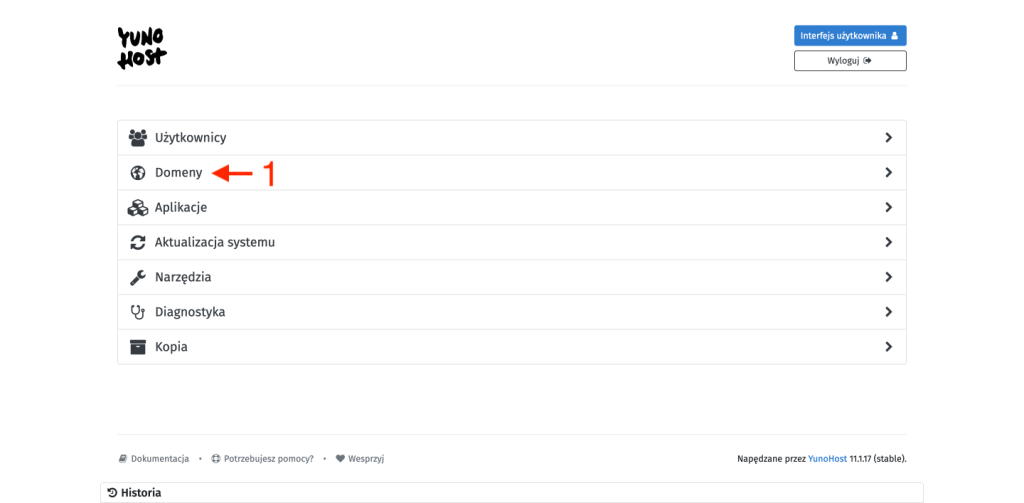
Login to the administration panel of your YunoHost.
-
From the main menu, select the Domains [1] tab.
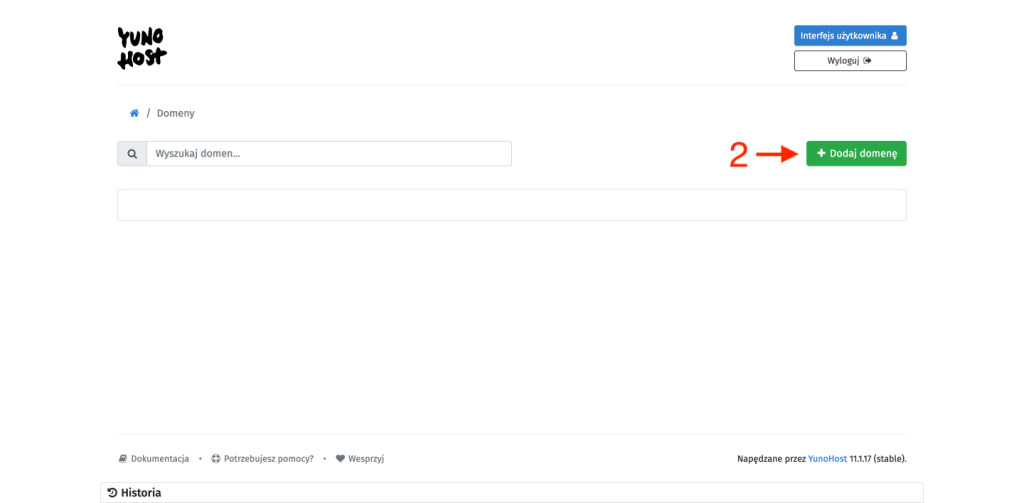
-
In the upper right corner, find the + Add domain [2] button and click it.
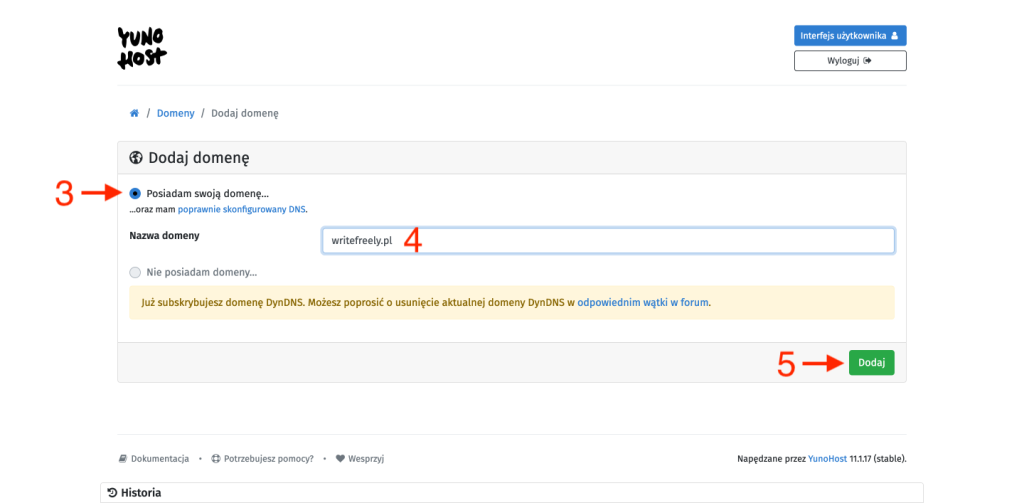
-
Select the option I have my own domain… [3] and in the text field Domain name [4], enter the address of your domain, then confirm by clicking the Add [5] button.
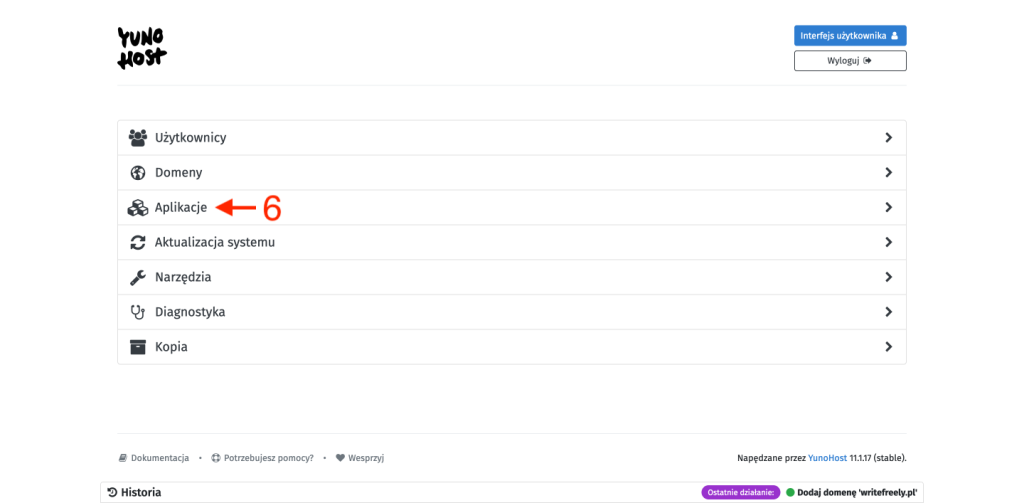
-
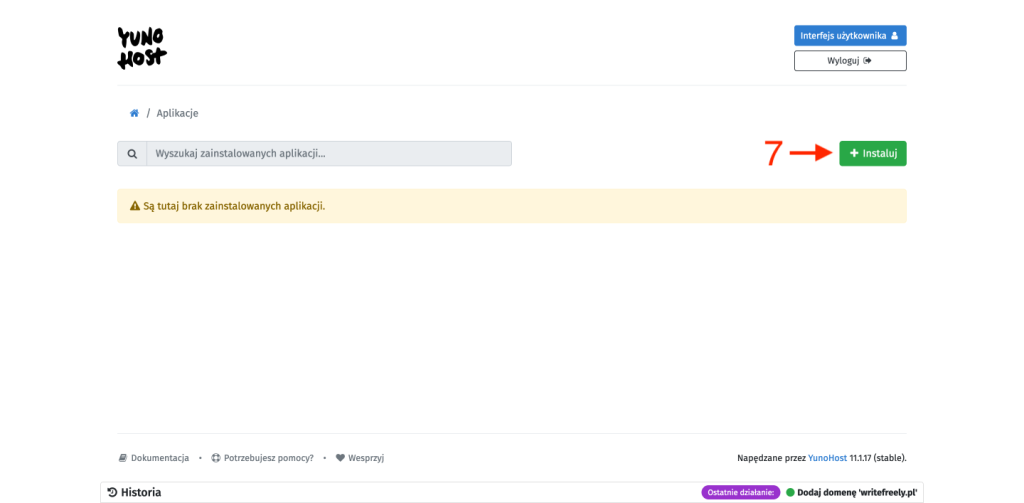
Go back to the main menu and this time select the Applications [6] tab.
-
In the upper right corner, find the + Install [7] button and click it.
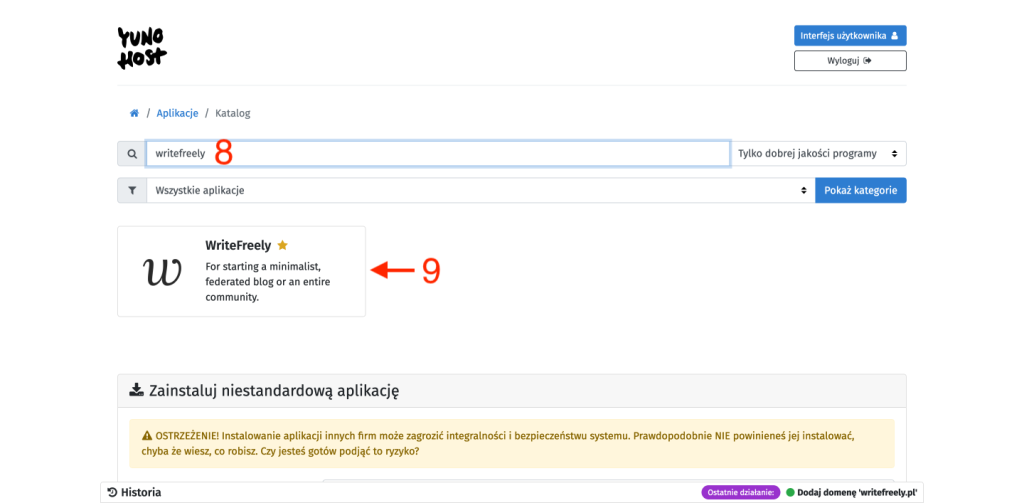
-
In the search text field [8], enter writefreely. The available applications will be filtered and limited to one item whose name matches the phrase we are looking for. Of course, click on it [9].
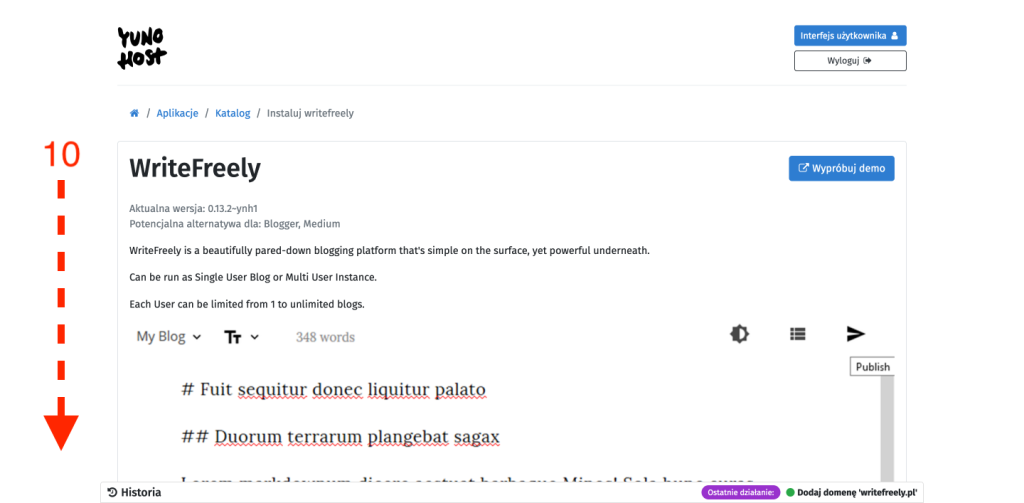
-
A page briefly describing what WriteFreely is will appear. We can even use the Try demo button to try out a demo version of this platform. However, we scroll down where we have a few things to set up.
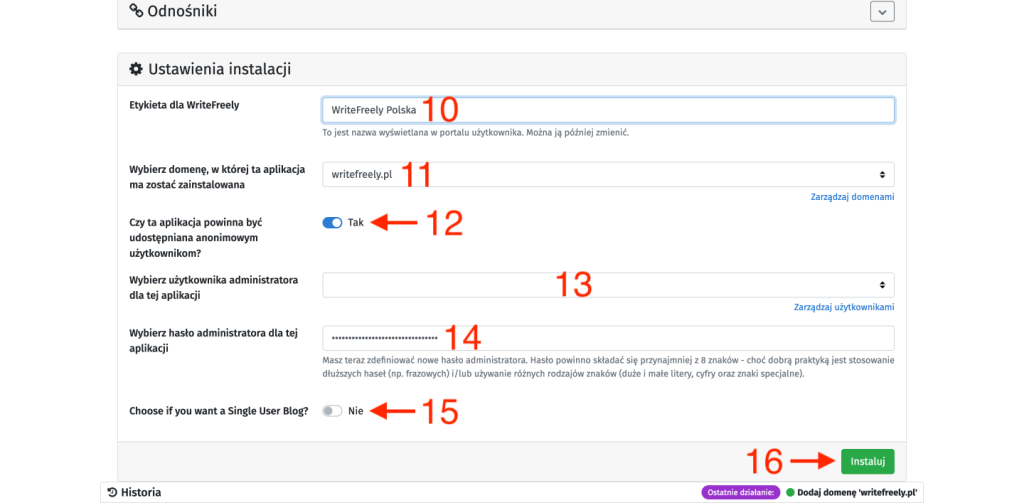
-
In the text field Label for WriteFreely [10], enter the name under which we want to see this application in the list of applications in our YunoHost. We can change this later, so no stress.
-
From the drop-down list below [11], select the previously configured domain.
-
Next, we have a choice field with the options Yes/No [12], where selecting Yes means that access to the site will not require an account on our YunoHost server. What we choose here depends on the type of service we are launching. If we want our instance of WriteFreely to be publicly available, we select Yes, but if we are creating an instance for use only by, for example, our friends, the No option is appropriate.
-
The next drop-down list [13] is used to indicate which YunoHost user should be the administrator of this application, and the text field [14] below it is used to set the access password to this application for that user (its administrator).
-
Finally, we have to answer the question [15] whether we want to create an instance only for ourselves (Single User Blog) or if we intend to allow others to register. Yes means an instance only for us, and No means an instance open to others.
-
We confirm everything by clicking on the Install button [16].
Adding and configuring a domain in Cloudflare
I know that there will be those who strongly criticize my recommendation to use Cloudflare, seeing it as another corporate solution that offers seemingly free services but in reality has almost a monopoly in what it offers. Maybe that’s true, but I’m not imposing anything here. I’m just going to show you a universal way to set up DNS records correctly because, first of all, not all domain providers offer the possibility of applying such specific settings for the domain, and secondly, it would be impossible to write instructions for each of these providers because there are so many of them. In short, below I’ll show you how to do it using Cloudflare, and you, dear Reader, will decide whether you want to do it the same way or try your own skills and set it up without using Cloudflare.

-
We start by registering a new account on Cloudflare or logging into an existing one.
-
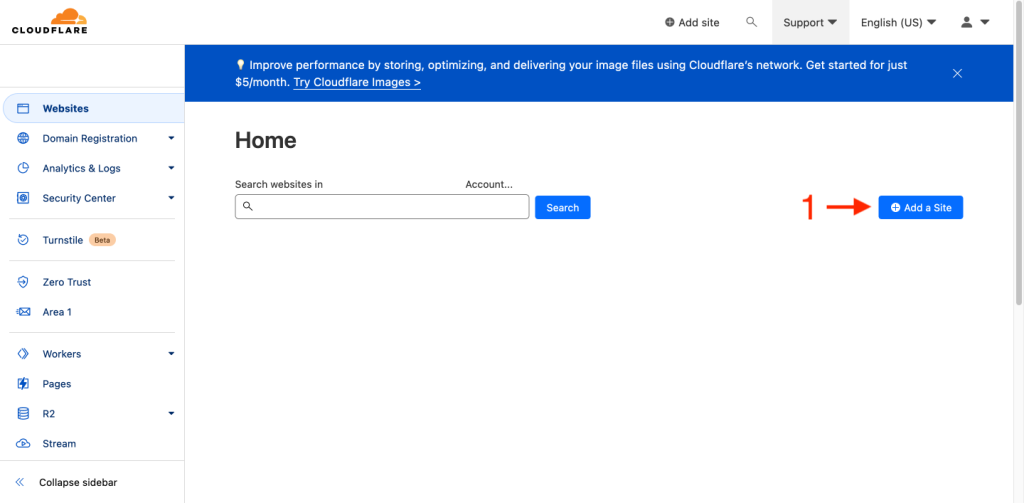
In the Websites tab, we find the + Add a Site [1] button in the upper right corner.
-
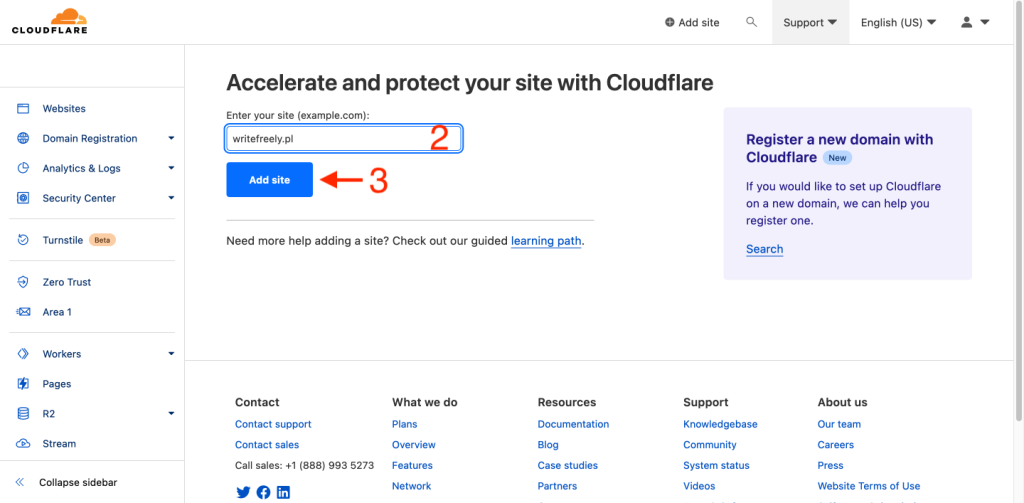
In the text field [2], we enter the domain we want to add and confirm it with the Add site [3] button.
-
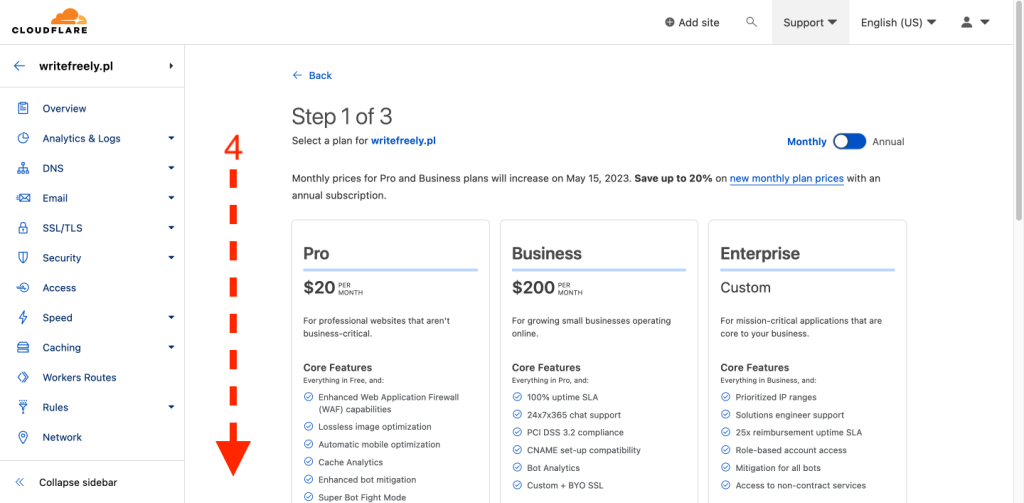
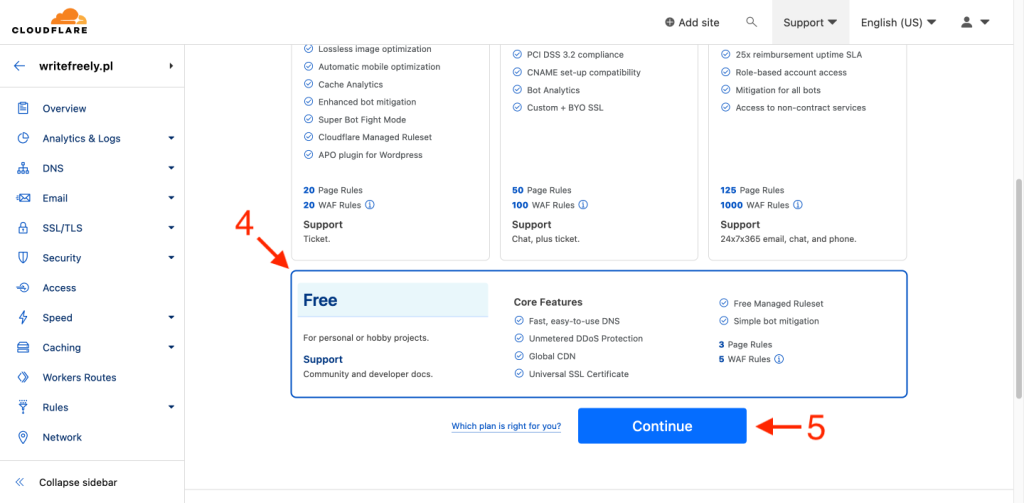
On the next page, we need to choose which plan we want to use. At the bottom, there is a free plan [4]. We choose it and confirm with the Continue [5] button.
-
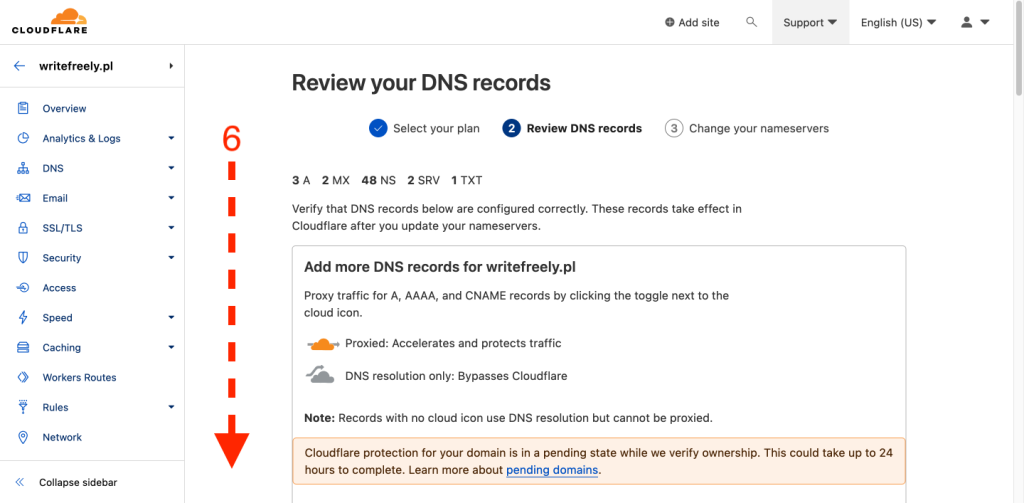
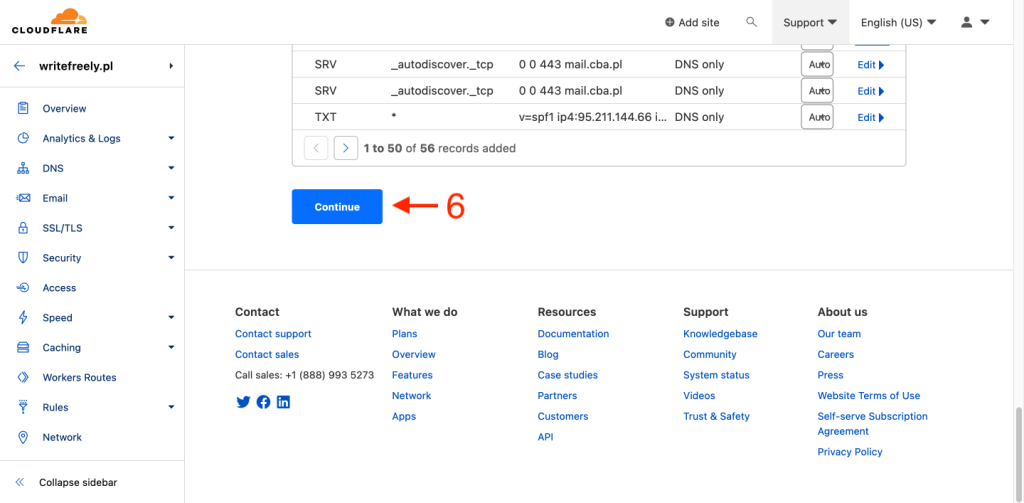
We will be taken to a page where the current (detected) DNS record settings of this domain will be presented. I suggest deleting all items at this stage because we will add later new ones, and proceed using the Continue [6] button.
-
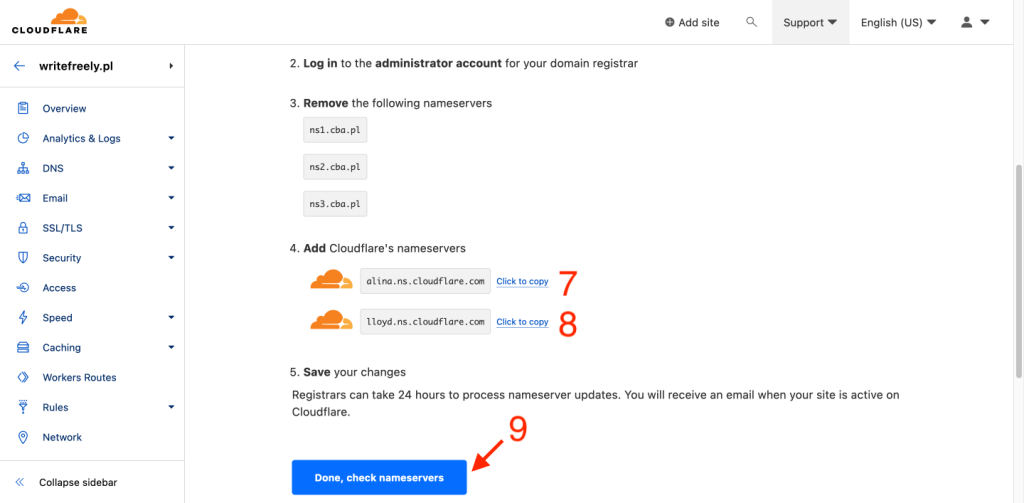
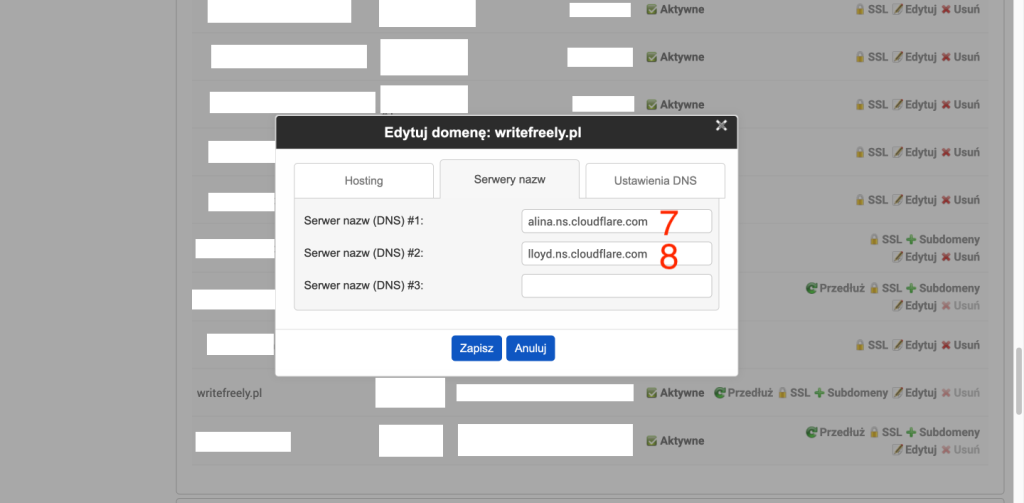
The last of the three most important steps is to change the DNS records of the domain to those of Cloudflare. Here, we come to the core of how Cloudflare works, which is a kind of proxy between the domain and the server that handles it. Everything depends on redirecting traffic from the domain to Cloudflare, which filters it appropriately (if necessary) and forwards it according to the settings we have specified. Cloudflare provides a wide range of options, and managing top-level domains (not subdomains of another domain) is free for basic functions. Returning to the topic, on this page, Cloudflare informs us of the detected settings (in my case, it was pointing the domain to ns1.cba.pl, ns2.cba.pl, and ns3.cba.pl) and proposes what they should be changed to include the Cloudflare mechanism. To do this, we take the two provided NSs (short for Name Servers) [7][8] and put them into the domain settings in the management panel of our domain provider (on the screenshot, I showed how it looks in my case). In the case of Cloudflare, it is always a pair, but it may appear in configurations with different first elements.
-
After making changes, we confirm with the Done, check nameservers [9] button.
-
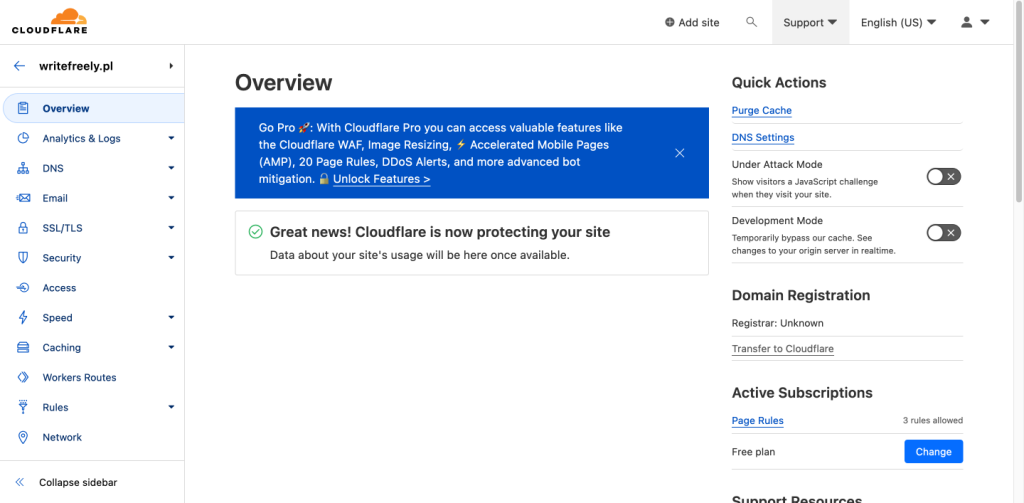
Now we just have to wait for the DNS record changes of our domain to propagate. Cloudflare will monitor this process for us, and we will be notified by email when the changes are made. In extreme cases, this can take up to 24 hours.
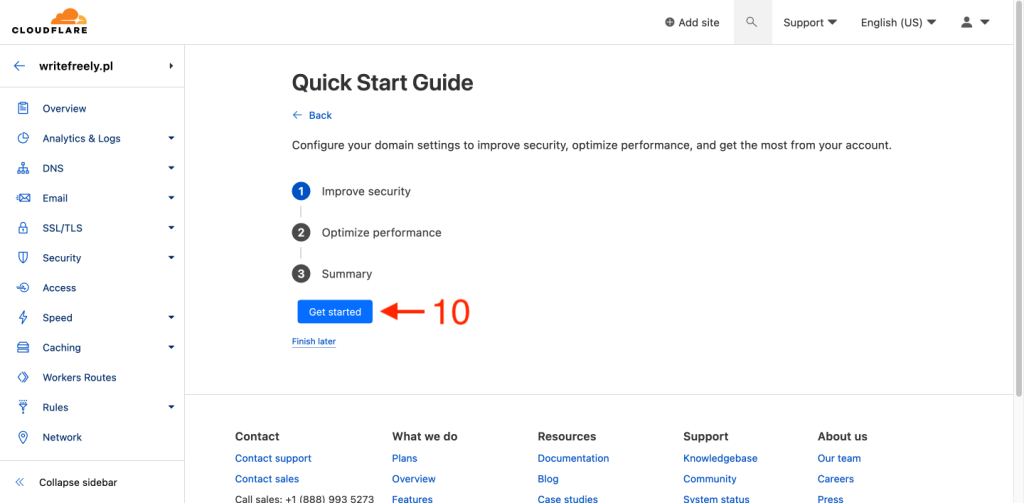
- Meanwhile, we receive a proposal for quick configuration of basic settings. We start this process by clicking the Get started button [10]:
-
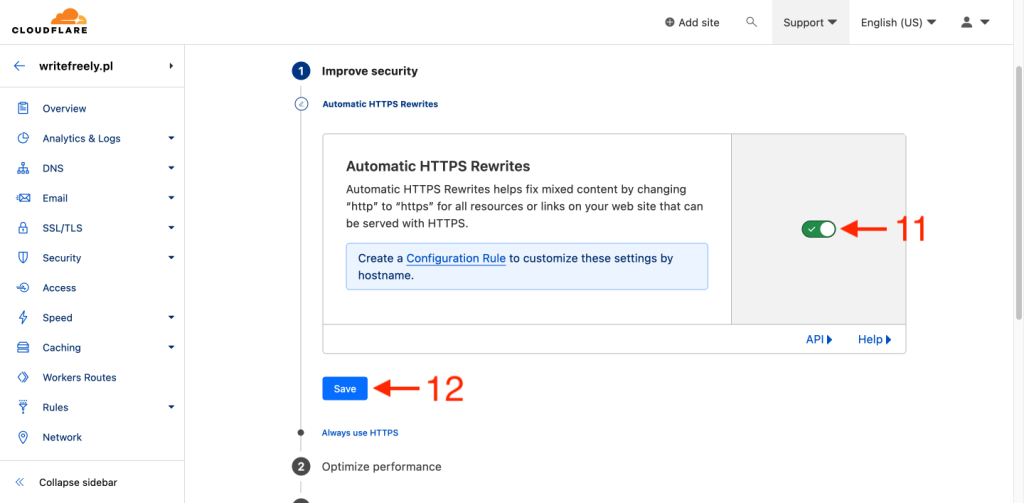
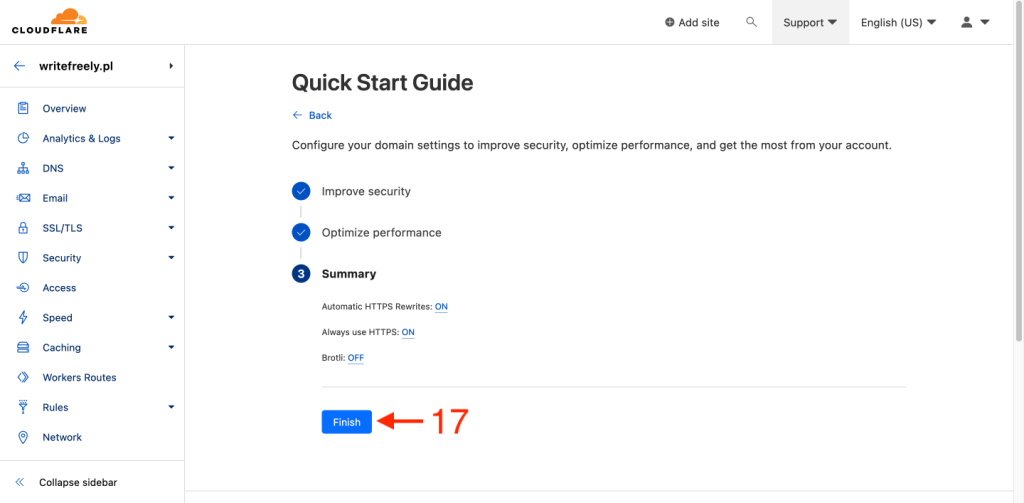
Automatic HTTPS Rewrites [11] - a function that rewrites all HTTP links to HTTPS, I recommend turning it on and proceeding with the Save button [12],
-
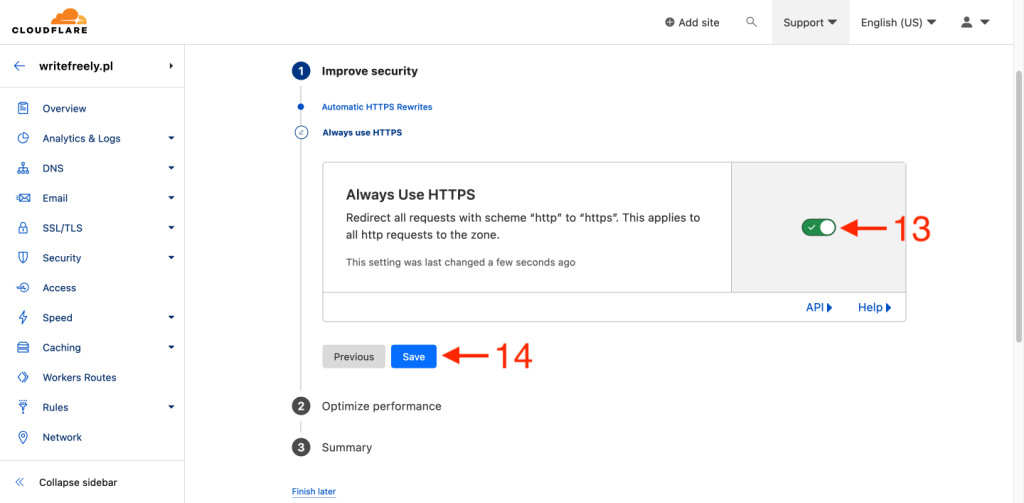
Always Use HTTPS [13] - forcing the use of only HTTPS, i.e., automatically redirecting all unencrypted HTTP traffic to the encrypted channel, I recommend turning it on and proceeding with the Save button [14],
-
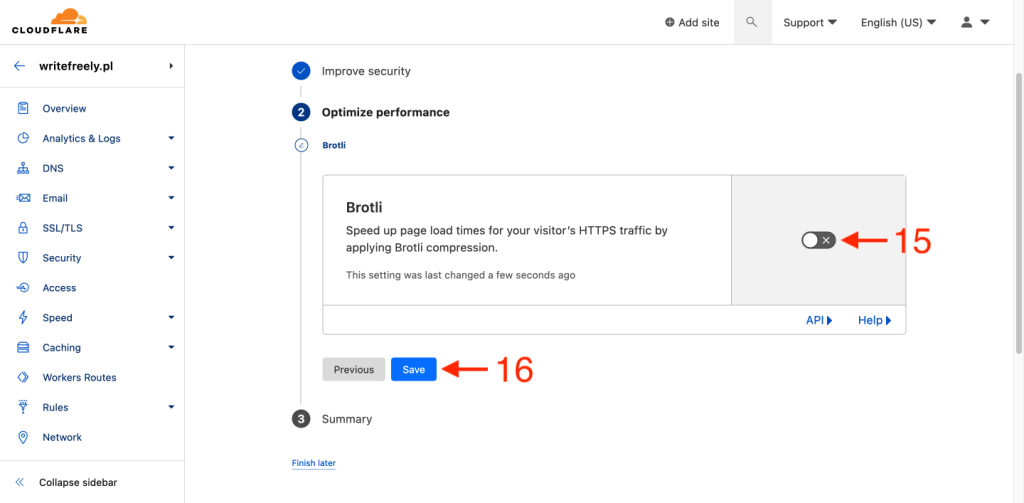
Brotli [15] - a function that optimizes page loading times by using compression, it can cause incorrect operation of running services, so I recommend turning off this function by default and possibly later turning it on and checking if there will be any conflict, proceed with the Save button [16]
-
- We end the whole process by clicking the Finish button [17].
Redirecting a domain to a YunoHost server
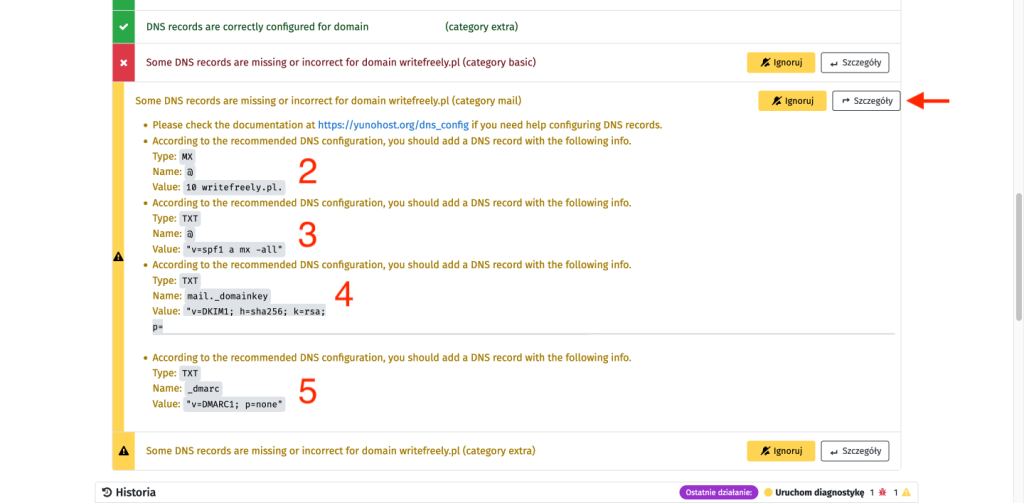
After receiving a confirmation email from Cloudflare that our domain has been properly set up, we can proceed with configuring the DNS records. First, we need to determine what needs to be set. To do this, we go to YunoHost and access the diagnostic tool (just like we did in this post). YunoHost informs us that the most important, necessary for operation, is setting the A(@) record [1], while the rest are only recommended - MX [2], TXT [3][4][5], A(*) [6], CAA [7].

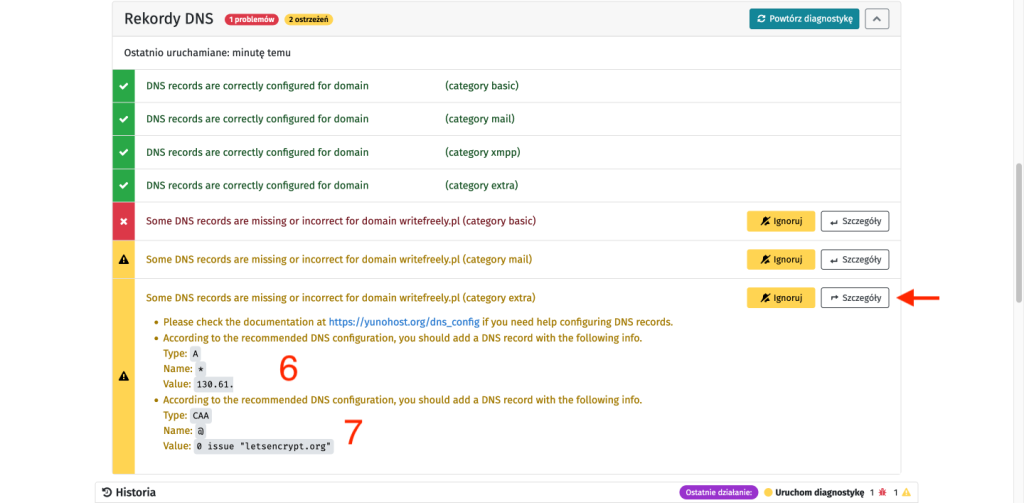
Correctly set DNS records for a WriteFreely instance running on a server with YunoHost look like this:

Note that it is possible to set Proxy status to DNS only for A records, which means that traffic is not filtered in any way by Cloudflare, but only forwarded according to the settings.
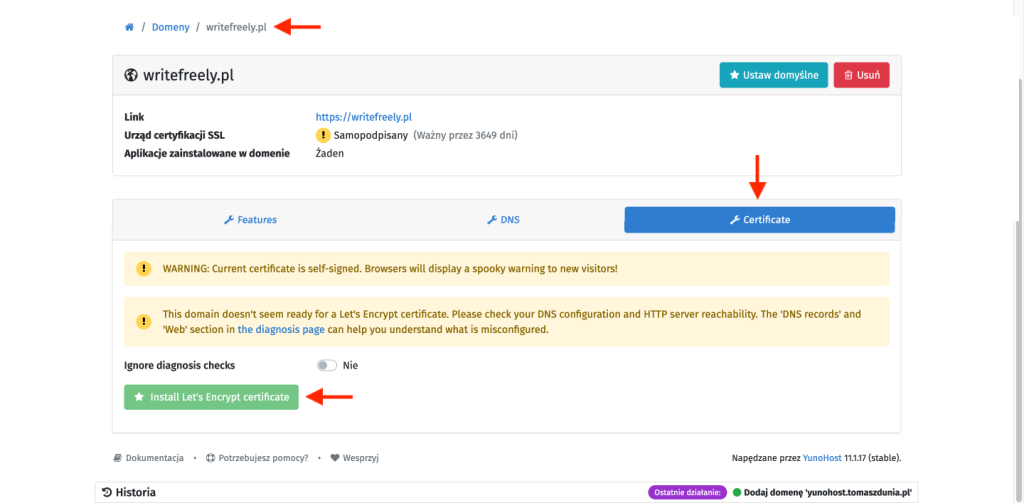
SSL certificate (HTTPS)
Finally, we need to set up an SSL certificate, which is required to establish a secure HTTPS connection. YunoHost has Let’s Encrypt built in by default, which is a tool that allows for free and automatic issuance of SSL/TLS certificates. To use it, simply go to the settings of a specific domain, then to the Certificate tab and find the green Install Let’s Encrypt Certificate button at the bottom.
Ready!
Everything is ready, so now you can go to the aforementioned domain and start using our freshly launched instance of WriteFreely. Configuration can be accessed by logging into the administrator account, which has additional options unavailable to other users.


