![Not only iOS and Android… Ubuntu Touch! (on Google Pixel 3a XL) [ENG 🇬🇧]](/images/ubuntutouch.png)
🇵🇱 Przejdź do polskiej wersji tego wpisu / Go to polish version of this post
Table of contents:
- Choosing the right smartphone
- Preparing the computer for bootloader unlocking
- Unlocking the bootloader
- Restoring the required Android system version
- Flashing Ubuntu Touch
- Ubuntu Touch - first impressions
There’s no possibility to hide the fact that we have a very limited choice in the market for mobile device systems (smartphones), as we can basically choose between two systems - iOS by Apple or Android by Google (fragmented by overlays from individual manufacturers). That’s the version for ordinary mortals, because there’s also a great world of Custom ROMs, which are variations of the Android system created by enthusiasts. For those interested in delving into the topic, I recommend the XDA Developers Forum, which has been reigning in this field for years. However, in this post, I would like to show something outstanding, namely the mobile version of Ubuntu, which I will install on the Google Pixel 3a XL smartphone, which is already quite an old device, as its official premiere was in May 2019. Specifically for the purpose of this post, I purchased such device for 500 PLN (~$120).
Choosing the right smartphone
The list of devices supporting Ubuntu Touch at the time of writing this post consists of 55 items, so it’s not as short as it may seem. As I mentioned in the introduction, I chose the Pixel 3a XL. And it is precisely for this model and its smaller version, the Pixel 3a (without the XL in the name), that I will describe the entire procedure.
When it comes to the purchase, it is important to choose a model that has the ability to unlock the bootloader (the phone’s boot program). Not all Pixels have this capability, and it cannot be determined, for example, by the serial number. Unfortunately, this needs to be checked individually for each phone. In the case of online purchases, we need to ask the seller about it, and in the case of direct purchases, we need to do it ourselves after obtaining permission from the seller.
How to check this? You need to go to the phone’s settings, then About phone, find Build number at the very bottom, and tap it repeatedly until the message You are now a developer! appears. This is how you unlock additional (hidden from the standard user) settings for developers.
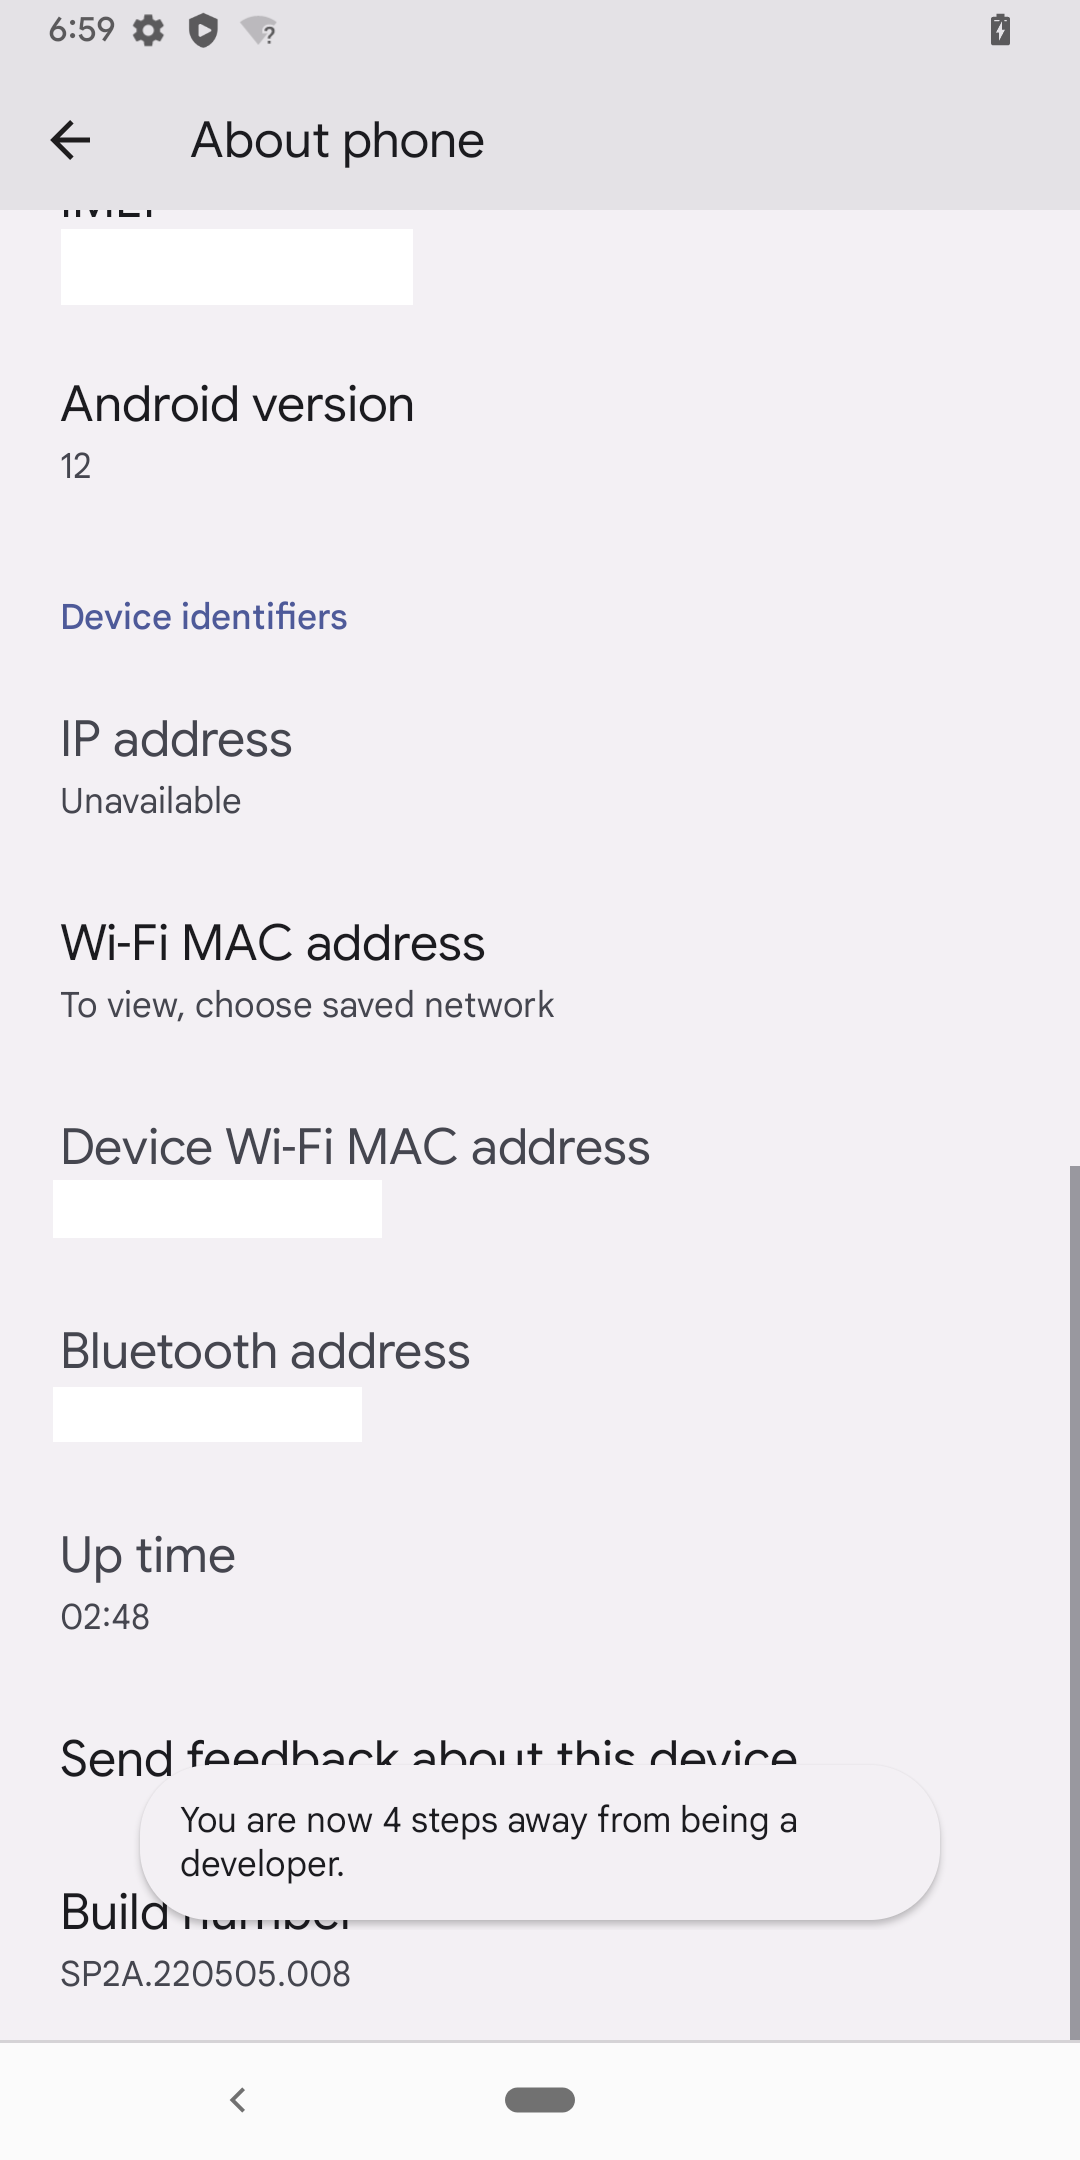
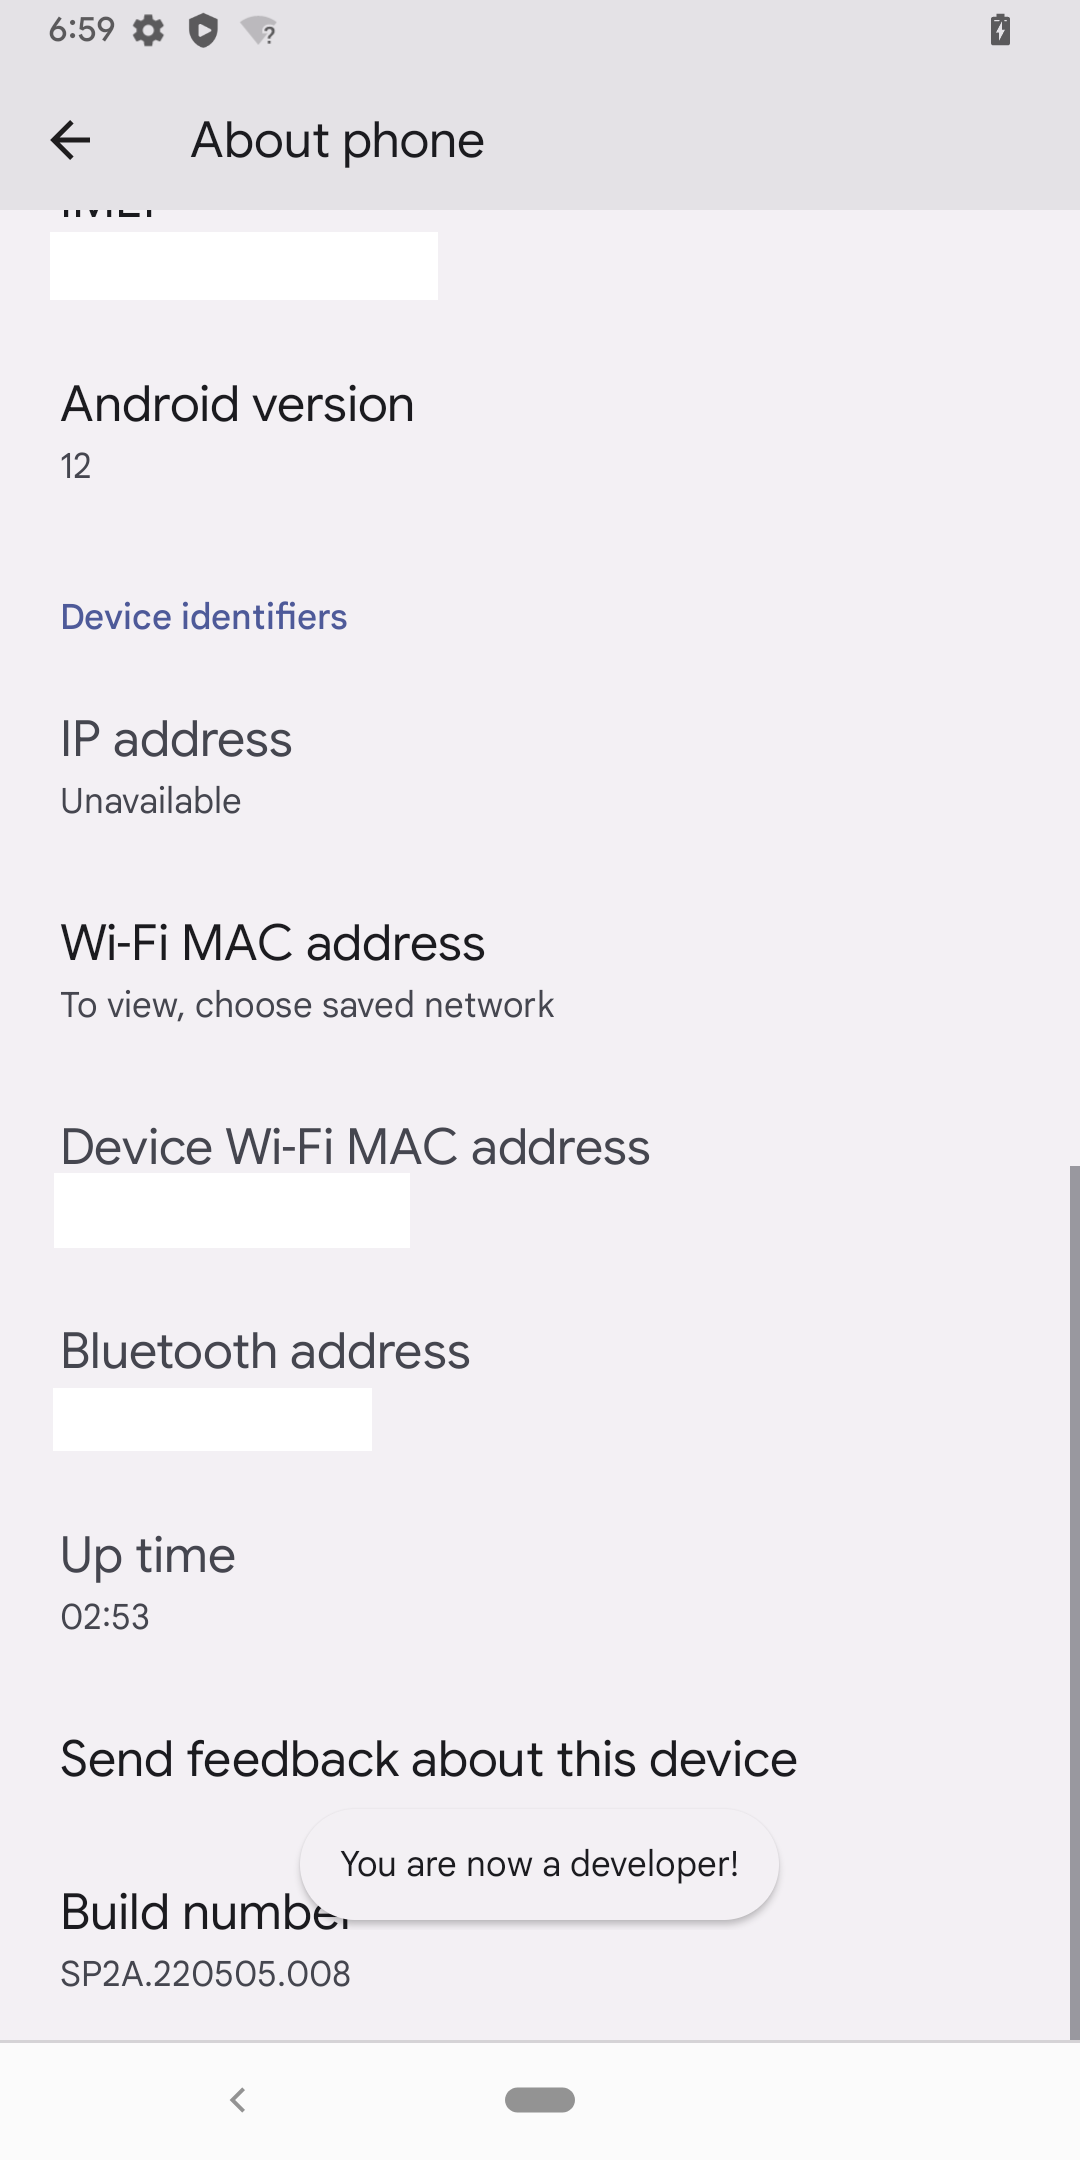
Now we return to the main settings window and go to System and then Developer options, which we have just unlocked. Here we need to enable two options:
-
OEM unlocking (Allow the bootloader to be unlocked) - as the hint suggests, this option allows unlocking the bootloader of this device.
-
USB debugging (Debug mode when USB is connected) - USB debugging mode, which allows manipulating the device via USB, in other words, it enables the interaction with the device from a computer to which we will later connect the Pixel and install a new system along with all the necessary components.
Phones that have the bootloader unlocking option disabled will have the first option (OEM unlocking) grayed out, meaning it’s unavailable. This is how you can identify a phone that should not be purchased.
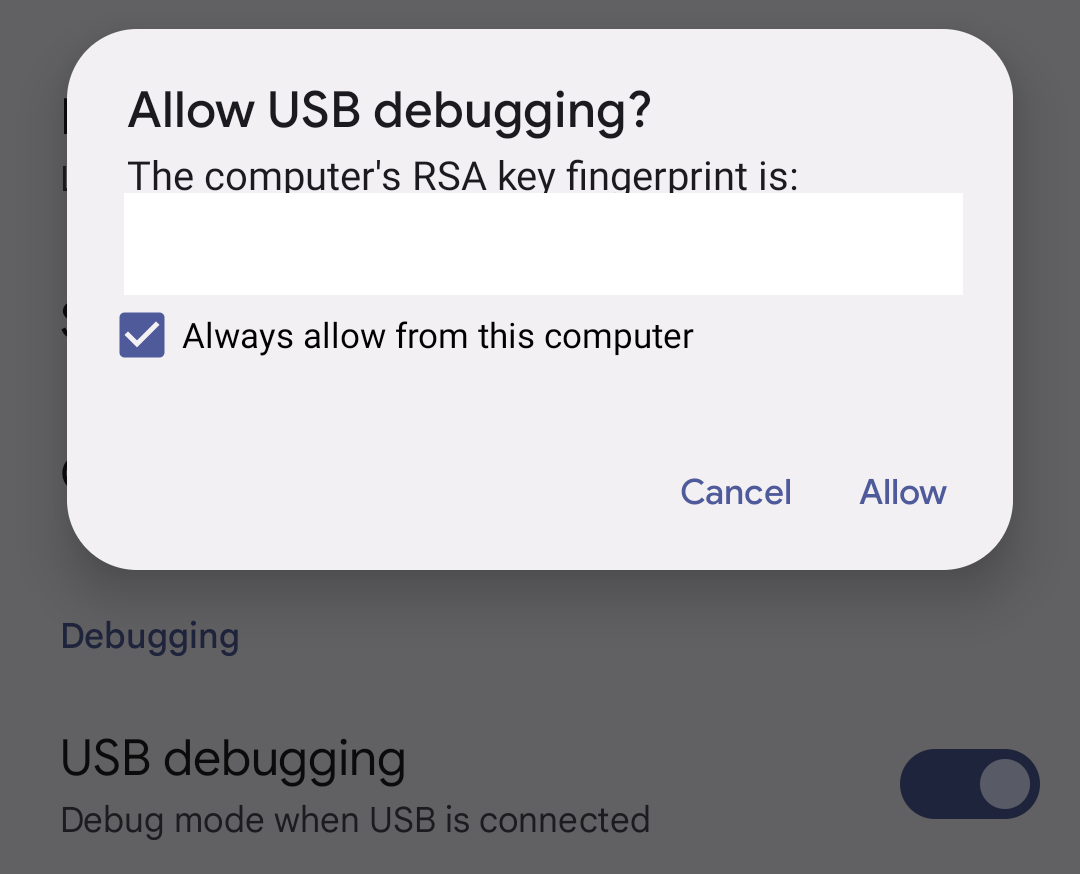
If a prompt appears regarding whether to allow USB debugging (Allow USB debugging?), select the option Always allow from this computer and click Allow.
Before proceeding with further actions, I suggest doing two things:
-
Restart your phone,
-
Charge it fully.
While the phone is charging, let’s prepare the computer accordingly.
Preparing the computer for bootloader unlocking
Before starting the process of unlocking the bootloader and flashing (installing) a new system, we need to prepare the computer that will be used for these actions. I chose my special-purpose laptop (a rugged Getac S410) running on Windows, but there’s nothing stopping you from doing the same on a computer with Linux or even macOS. Just keep in mind that some steps may vary slightly, but the general idea remains the same, and you will achieve the same result. It’s also important to have a reliable and functioning USB cable that allows data transfer, not just charging (yes, such cables are available on the market in case someone hasn’t come across them). Additionally, it is recommended to perform risky actions like installing a system on another device using a laptop. Why? It’s simple. In case of a power outage, the laptop will switch to battery power instead of losing power and bricking your phone.
On a Windows computer, we basically need to perform four actions:
-
install (if not already installed) Microsoft Visual C++, which can be downloaded from the Microsoft website (this is the 2015 version, but I read somewhere that it is also recommended to install the 2012 version available here),
-
install Minimal ADB and Fastboot, for which you can always find the current link in this thread on the XDA Developers forum,
-
install the UBports installer, which is available at this link,
-
install the Google USB Driver, which is available at this link.
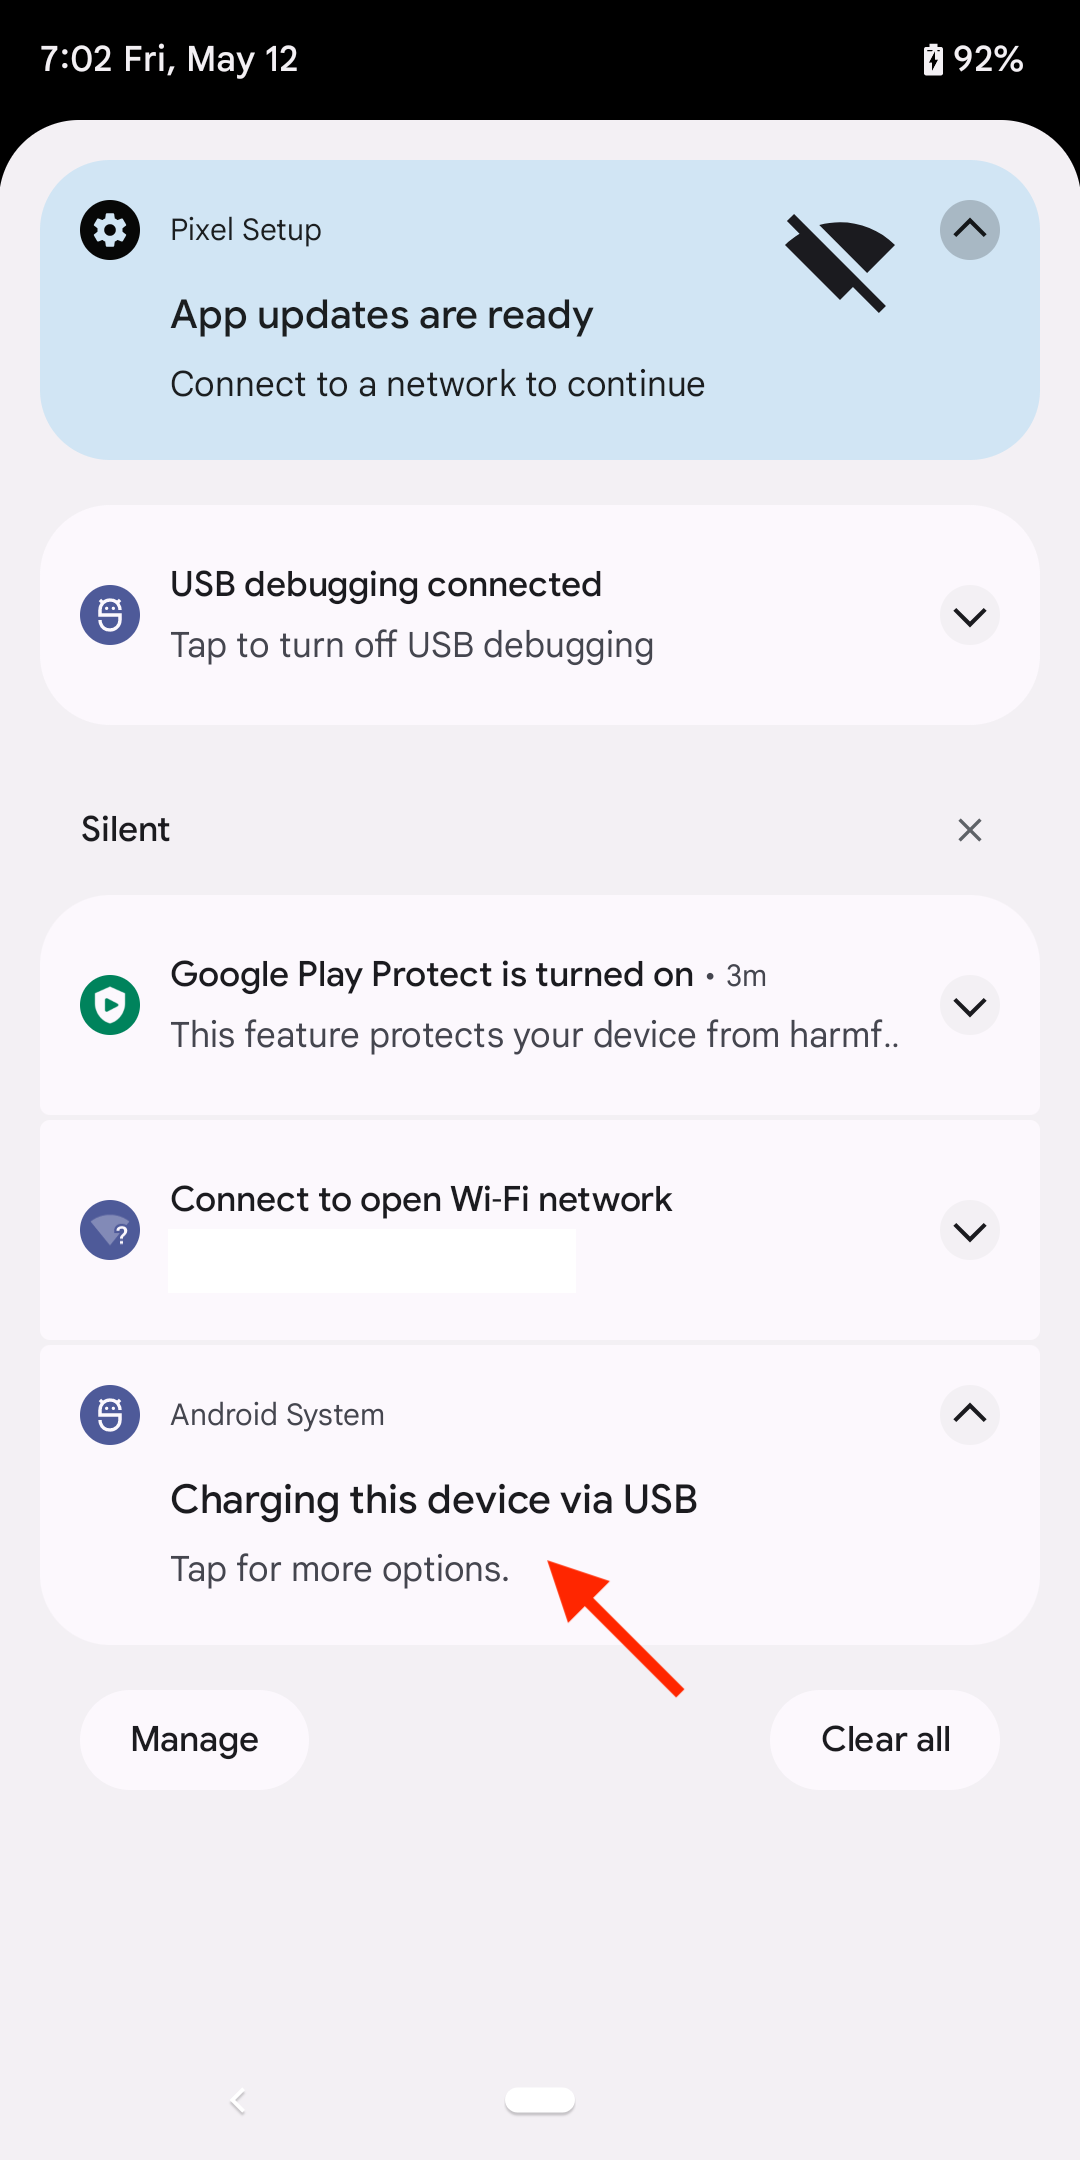
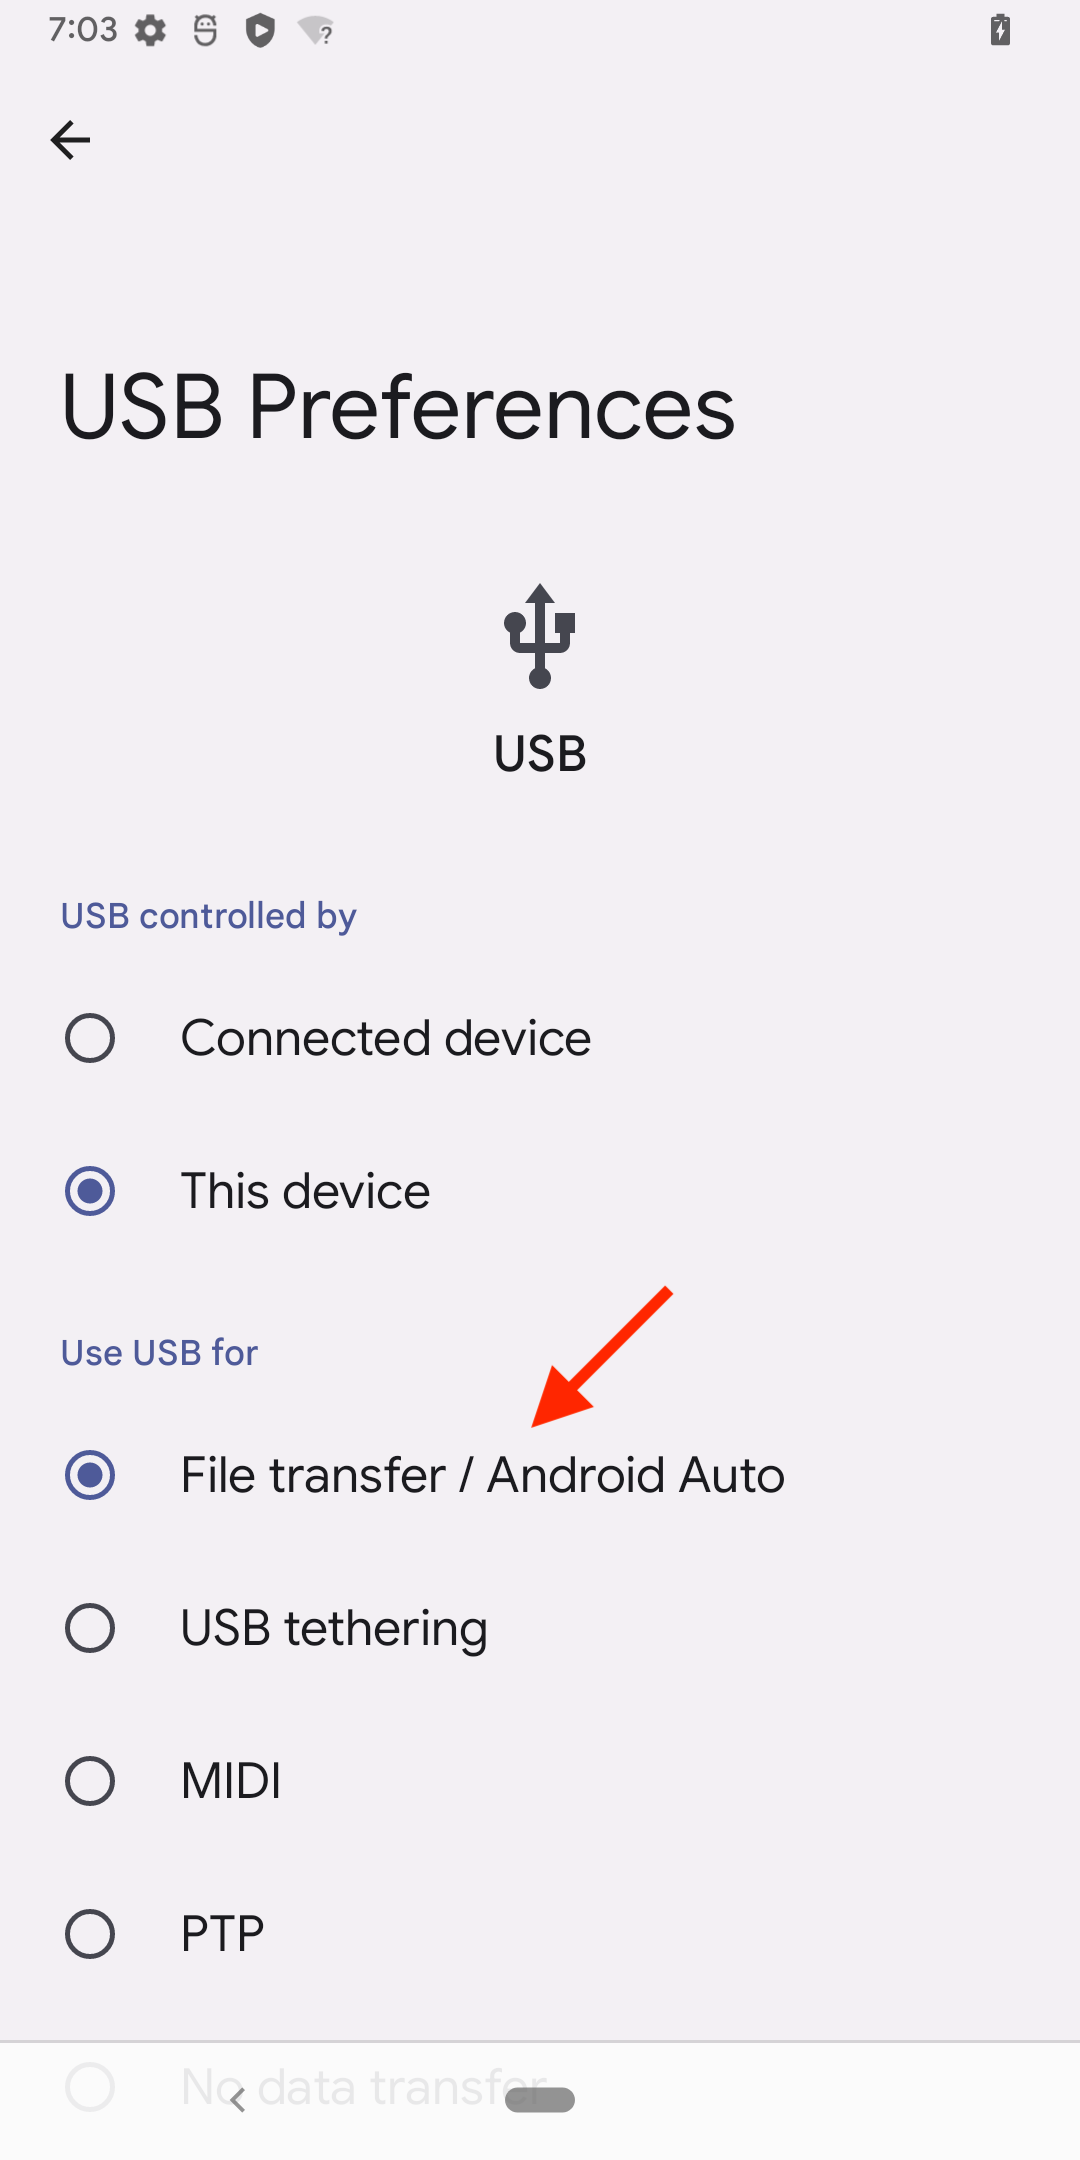
While steps 1-3 shouldn’t be a problem for anyone, I would like to focus for a moment on the action indicated in step 4. Under the provided link, there is a .ZIP package (archive) that needs to be unpacked in any location. Then, connect your phone to the computer and open the Notification Center on your phone (swipe down from the top edge of the device). Find the option Charging this device via USB (Tap for more options) and tap on it. This is the USB Preferences setting that allows you to change how the phone communicates with the computer. By default, the option allowing only charging the phone without data transfer (No data transfer) is selected. However, we want to change it to (Use USB for) File transfer / Android Auto. This way, we enable data transfer between both devices, and the phone will appear on our computer as an external drive.
On the computer, we go to the Start Menu and then Device Manager. A list of all devices connected to or present in our computer will be displayed. If we haven’t previously installed the Google USB Driver, there should be one entry on this list with a yellow triangle icon, with exclamation mark and labeled as Android, Pixel 3a, or something similar. When you see this, you will know what it refers to. For clarification, it will probably be in the Other devices section. Right-click on this device and select Update driver from the context menu. This will open a window where we choose the second option, which is Browse my computer for drivers. Then select Let me pick from a list of available drivers on my computer, click Next, and when you’re in the window asking Select the device driver you want to install for this hardware, use the Have Disk… button. Another window will appear where we need to find the Browse… button, click on it, and locate the android_winsub.inf file from the downloaded and extracted Google USB Driver package. Proceed by clicking Open, OK, Next, Yes, Install, and after successful installation, finish by clicking Close. After all this, the device that previously had a yellow triangle with an exclamation mark should no longer have it and should be recognized as a normal device with the correct drivers installed.
If someone needs a visual guide for the above steps, I recommend watching this video by a (presumably) Hindu gentleman.
Unlocking the bootloader
Leave the Pixel still connected to the computer. On the computer, launch the previously installed Minimal ADB and Fastboot program, which should open a command prompt window. Start by checking if our phone is properly connected, configured, and visible to the bootloader unlocking tool:
adb devices
When you first enter this command under List of devices attached, you may see a message with a device identifier (serial number) and the phrase unauthorized next to it, which means you need to give permission for USB debugging on your phone again. Repeat the above command, and this time you should see the phrase device next to the device identifier. This confirms that everything has been done correctly up to this point.
The next command will trigger the phone to enter Bootloader mode:
adb reboot bootloader
On the phone, something similar to what is visible in the photo below should appear:
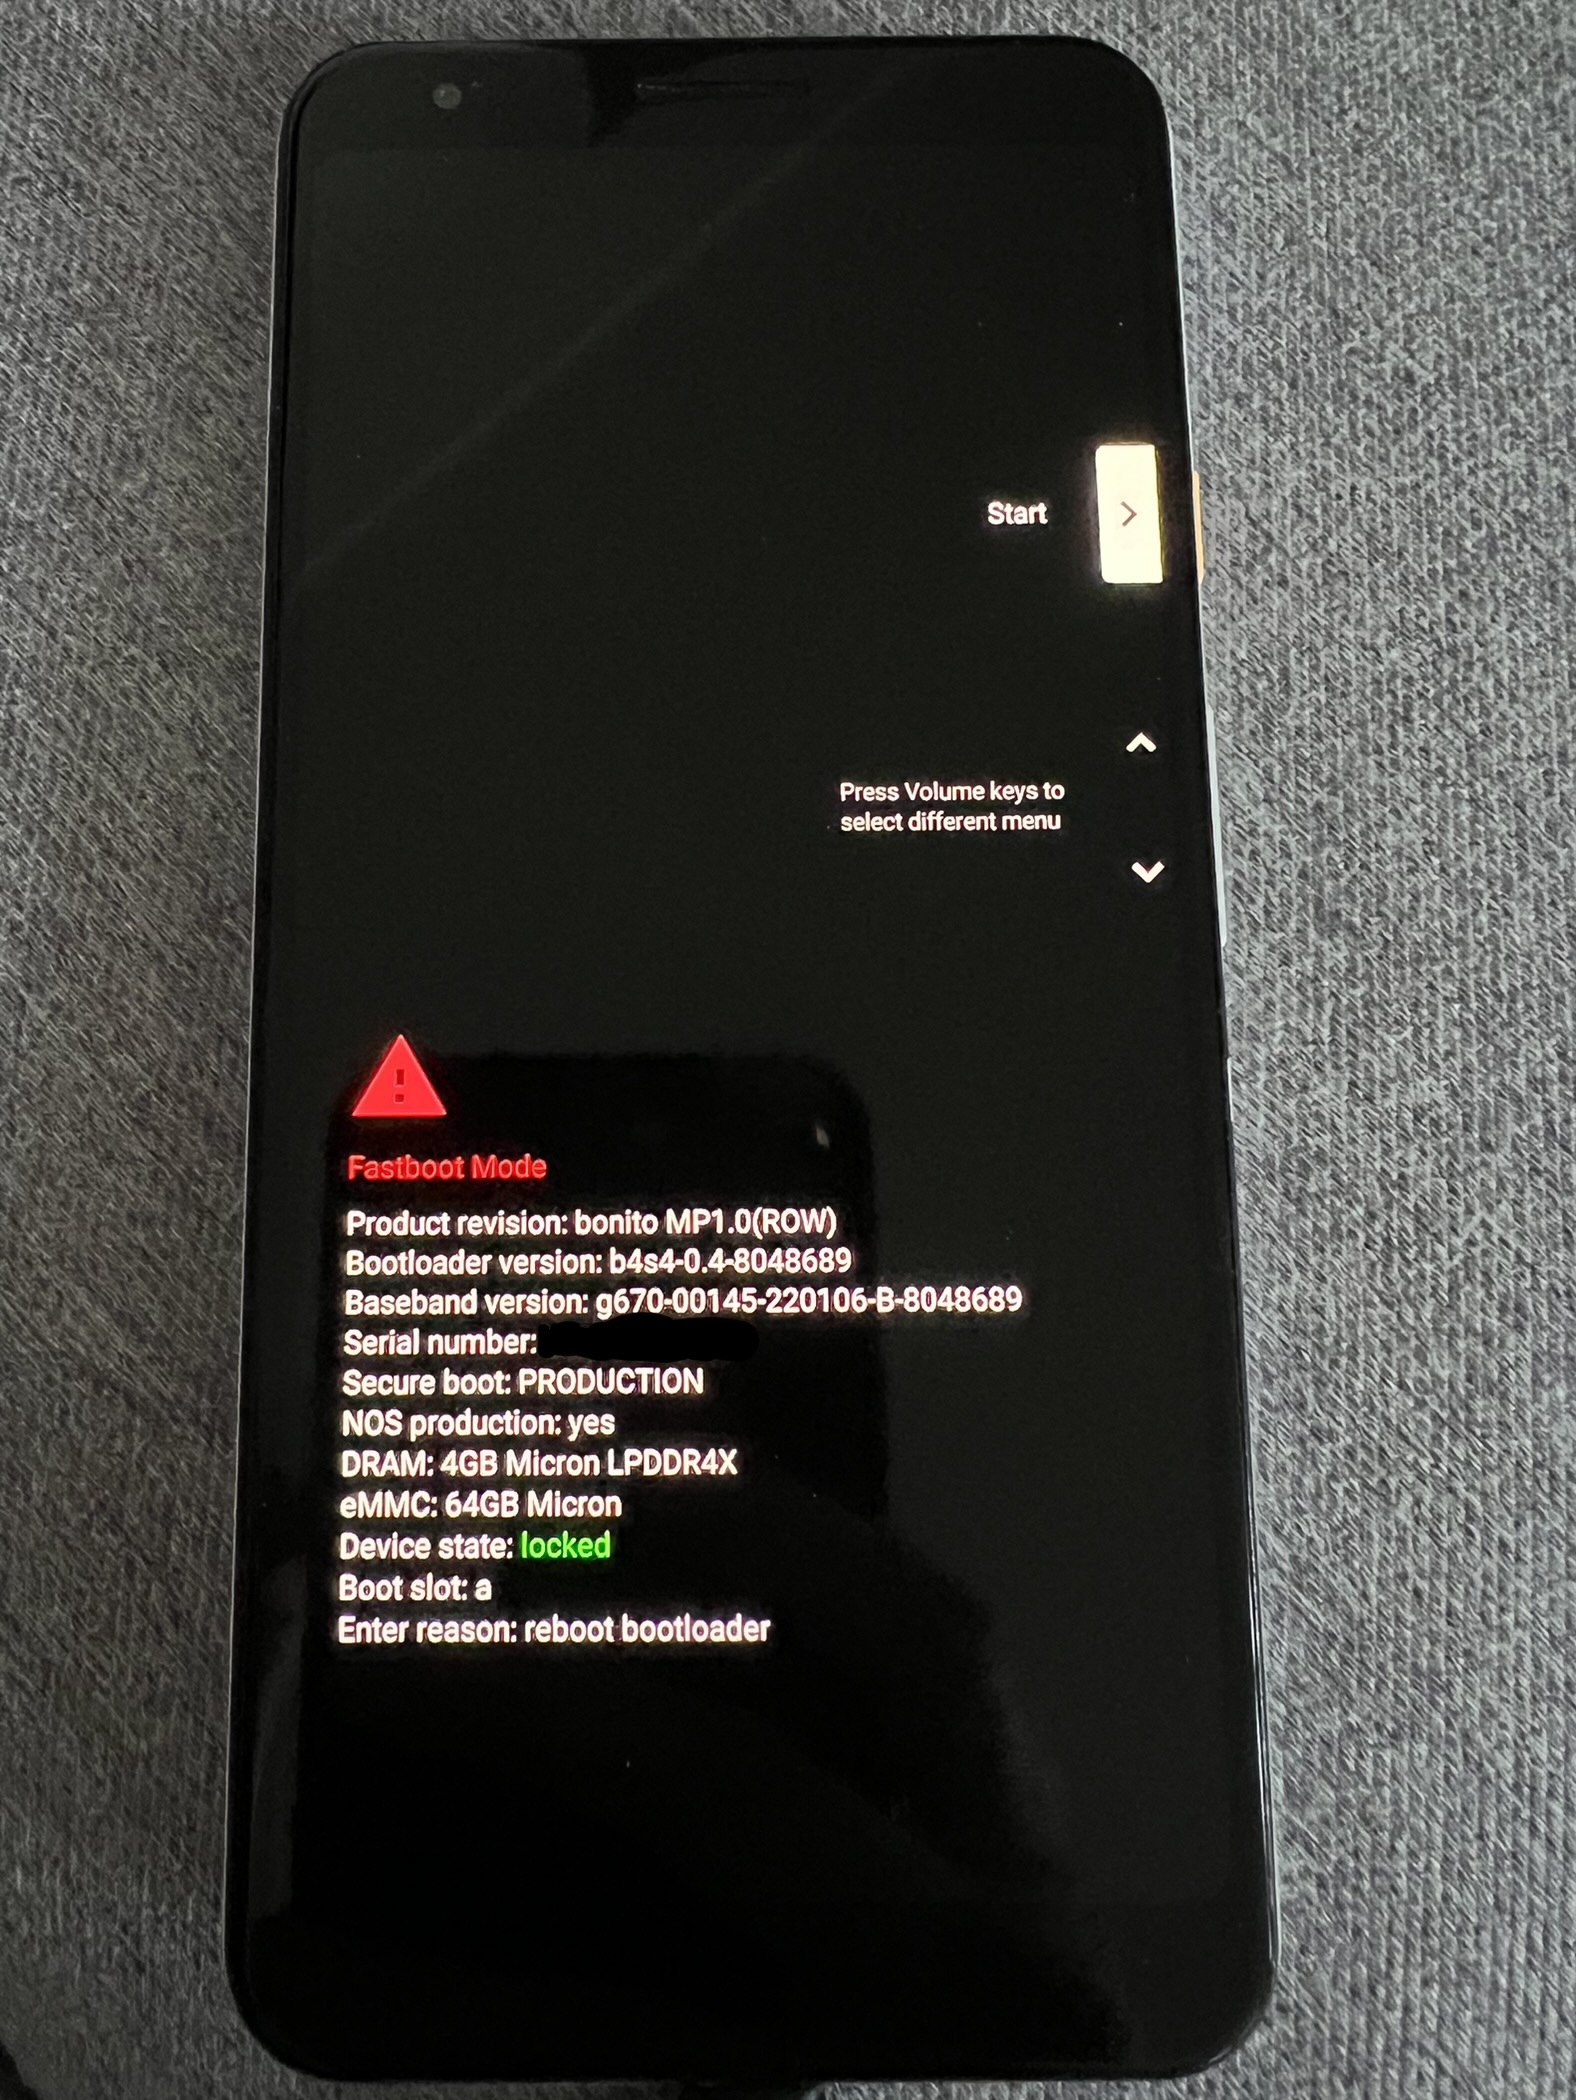
As you can see, we have entered the Bootloader, but the Device state is displayed as locked. Our goal is to change this state to unlocked. We go back to the command line on the computer and this time we enter:
fastboot flashing unlock
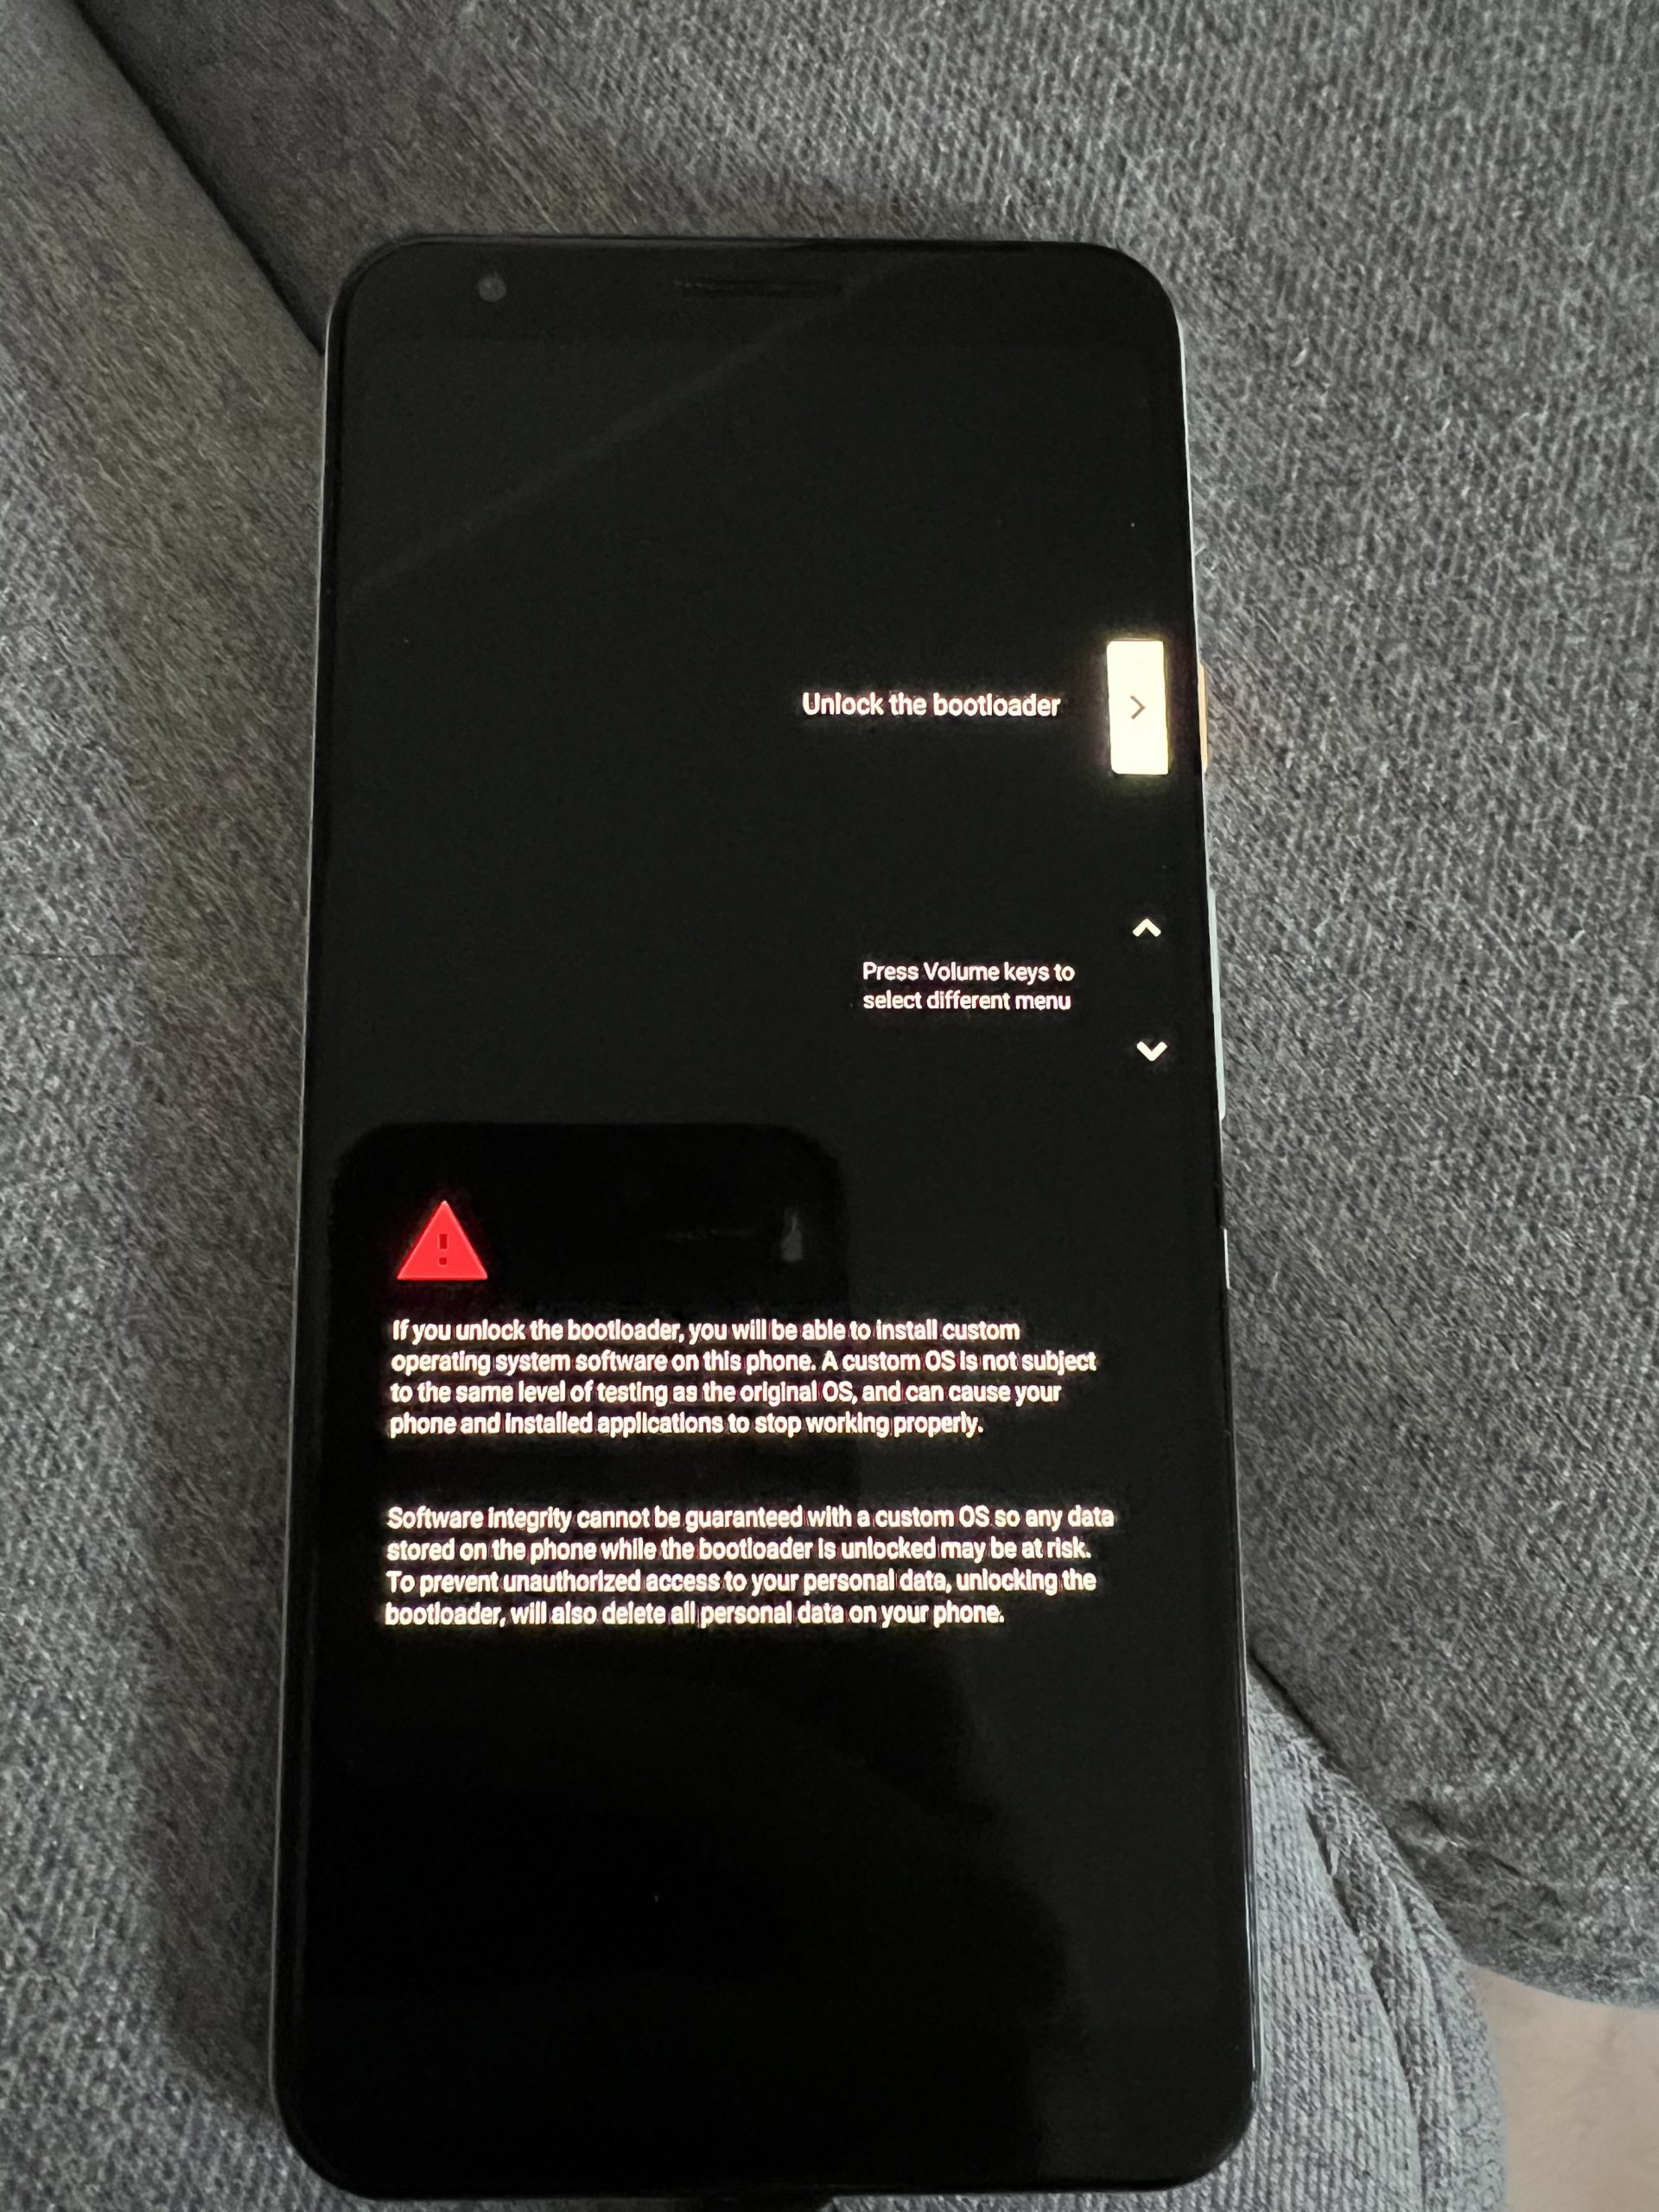
We switch to the phone, where we need to confirm that the bootloader should be unlocked. To do this, press any volume button once (in this mode, they are used to switch between options we want to select) until the Unlock the bootloader option is selected, and confirm the selection with the Power button.
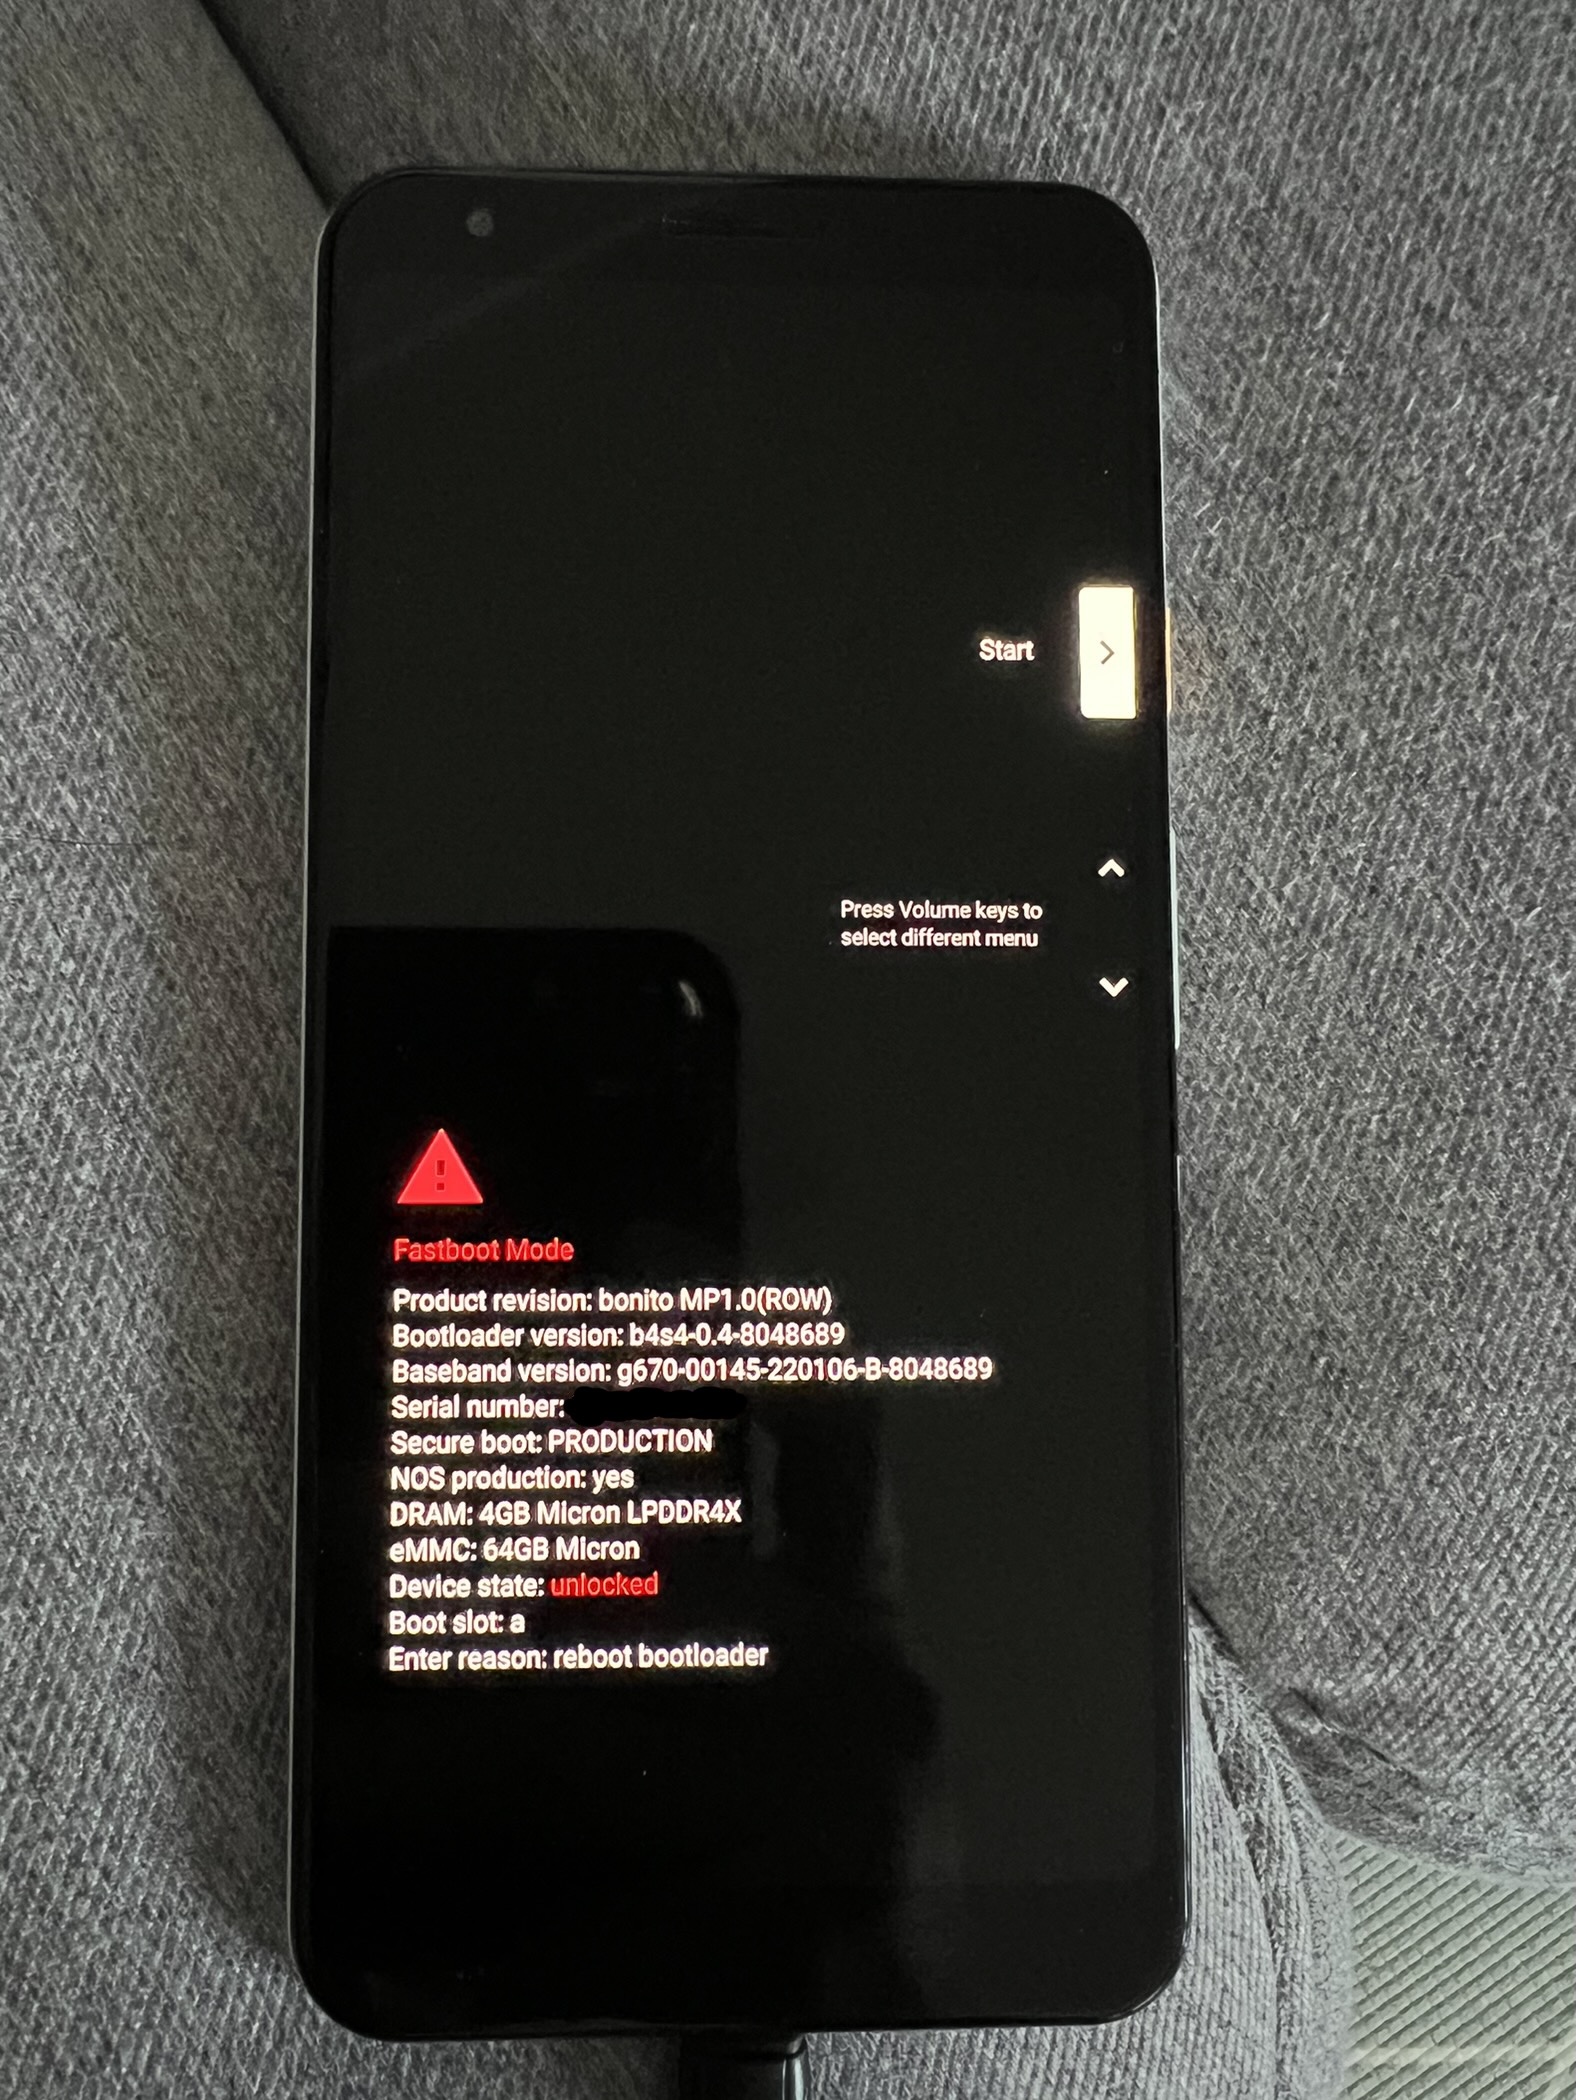
After a short while, we will return to the main bootloader menu, where we should see “Device state: unlocked.” Success! The bootloader is unlocked, and the device is now open before us.
Finally, it is good to properly end the operation of the Minimal ADB and Fastboot tool by issuing the command:
adb kill-server
and then close the command prompt window.
Restoring the required Android system version
In the UBports documentation, you can read that in order to install Ubuntu Touch, it is necessary to revert the Android operating system version on our device to a specific release. At the time of writing this guide, the designated release is PQ3B.190801.002. I mention this because I do not know how much time has passed since this guide was written until you are using it, and it is possible that newer versions of Ubuntu Touch will require a different version of Android for installation. That is why I always recommend going here and checking this information just before proceeding with further steps. The so-called code names are also important, and they are different for each Pixel model:
-
for Google Pixel 3a, it is SARGO,
-
for Google Pixel 3a XL, it is BONITO.
This is important later on, and knowing these names will help avoid confusion between system images and taking an image for the wrong model, which can essentially cripple the phone in the worst case. I will be working with Bonito since I have a Pixel 3a XL, but the same steps can be performed for the Pixel 3a using the image labeled Sargo.
Flashing the system onto Pixel devices is done using the Chrome browser. Well… it’s a phone from Google, so they made it so their browser is necessary. Clever, right? Maybe, but we’re even more clever because not many people may know that you don’t actually need the specific Chrome browser, but any browser based on the Chromium engine, which means we can just as well use Microsoft Edge! We’ll use it to take a step towards removing the Google system from the phone, so we’re totally outsmarting the corporation 😉
We launch the Microsoft Edge browser, go to the website https://developers.google.com/android/images?hl=en#bonito, scroll to the bottom where we see the blue Confirm button next to I have read and agree to the above terms and conditions, and click it. We will be taken to a list of factory images for Nexus and Pixel smartphones. As mentioned before, we are looking for the release labeled PQ3B.190801.002, making sure it is an image dedicated to our device.
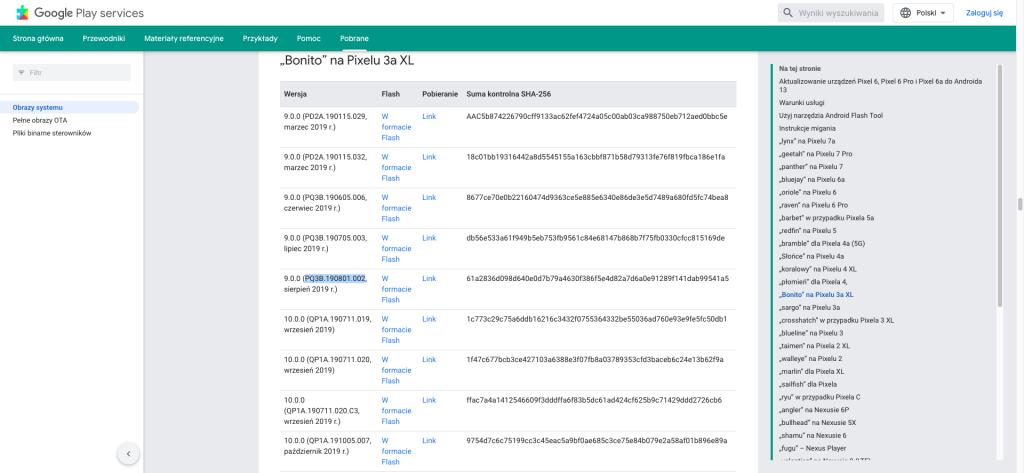
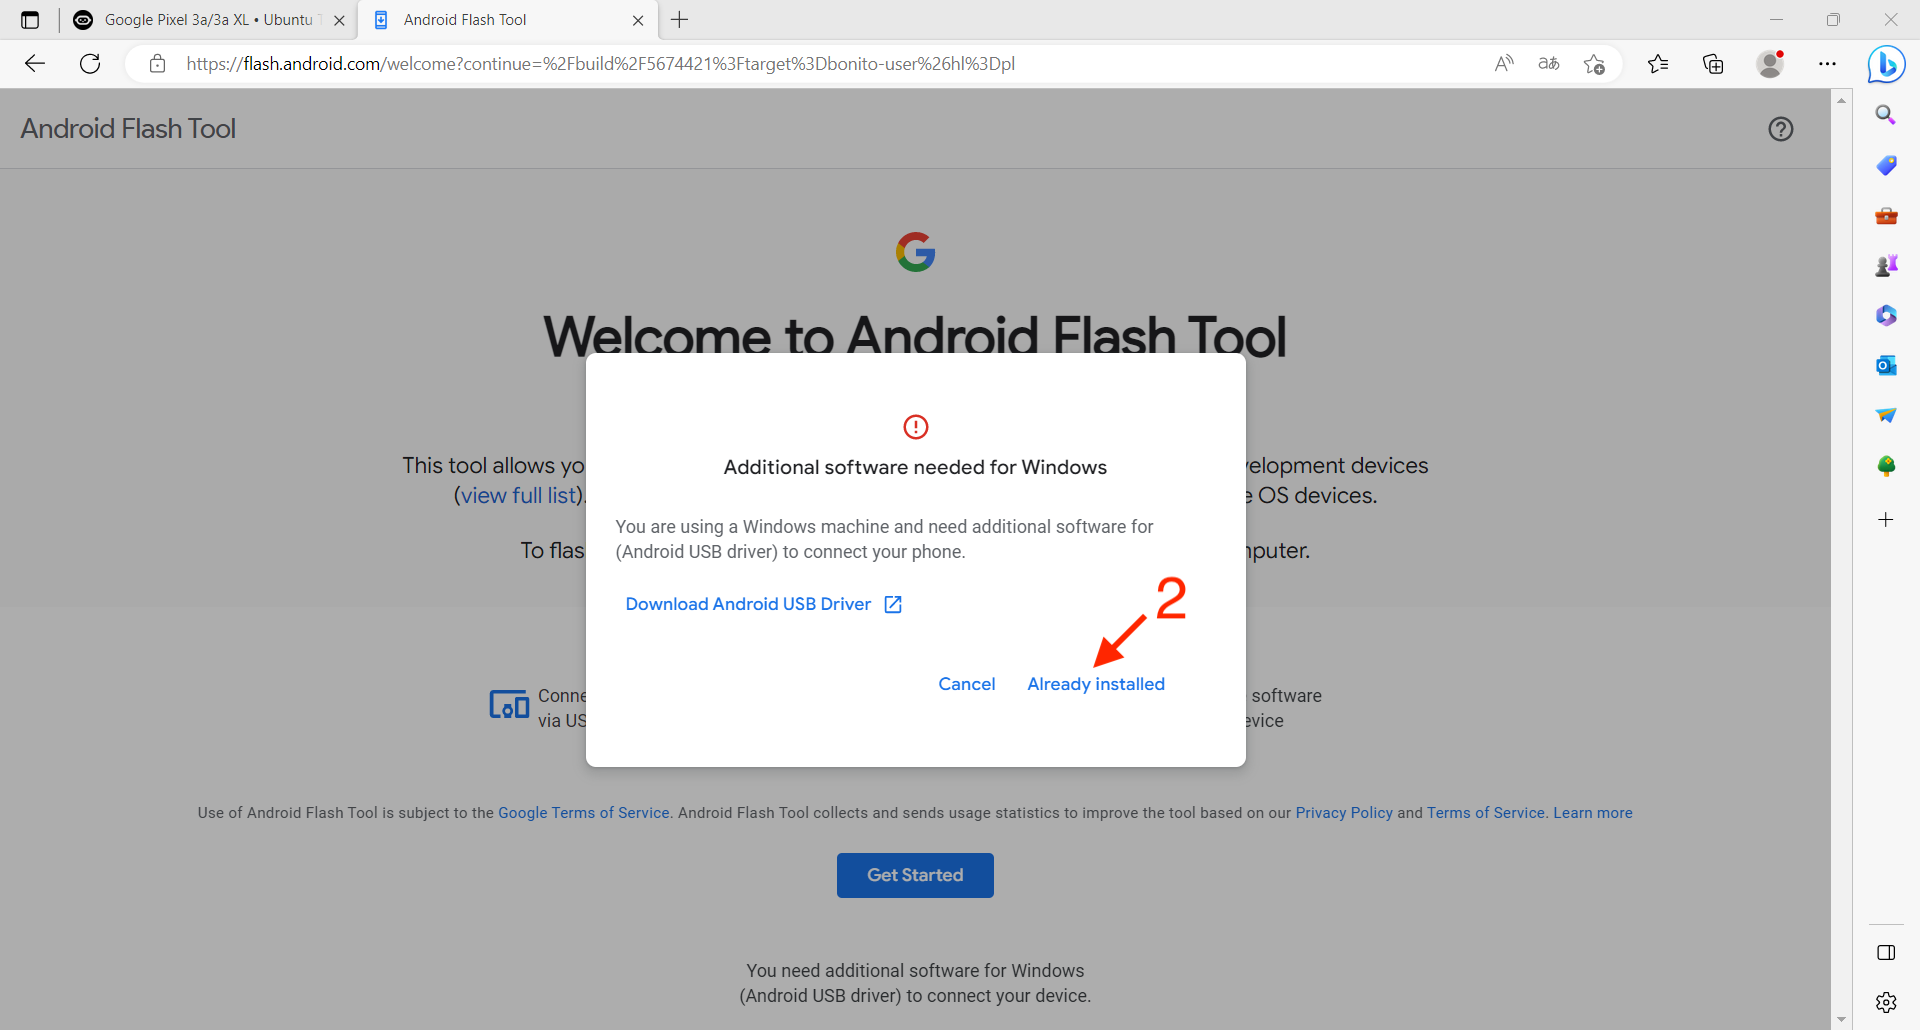
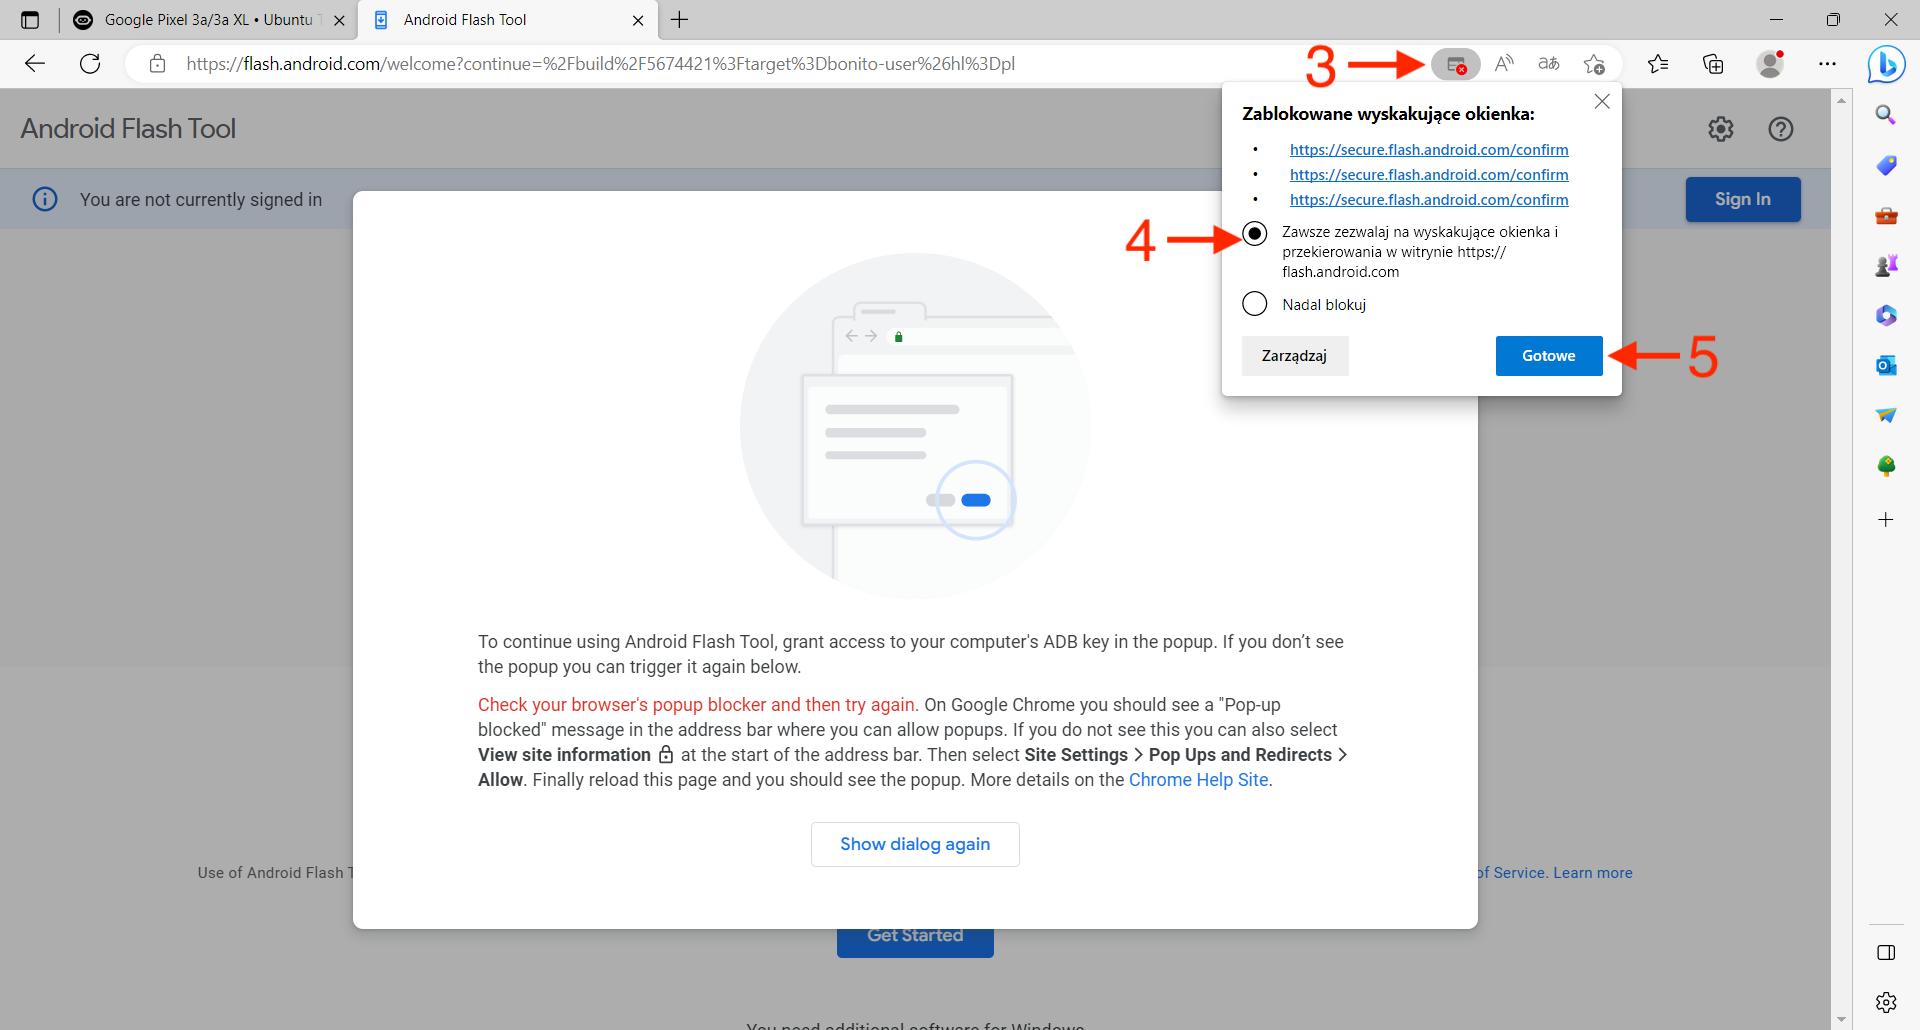
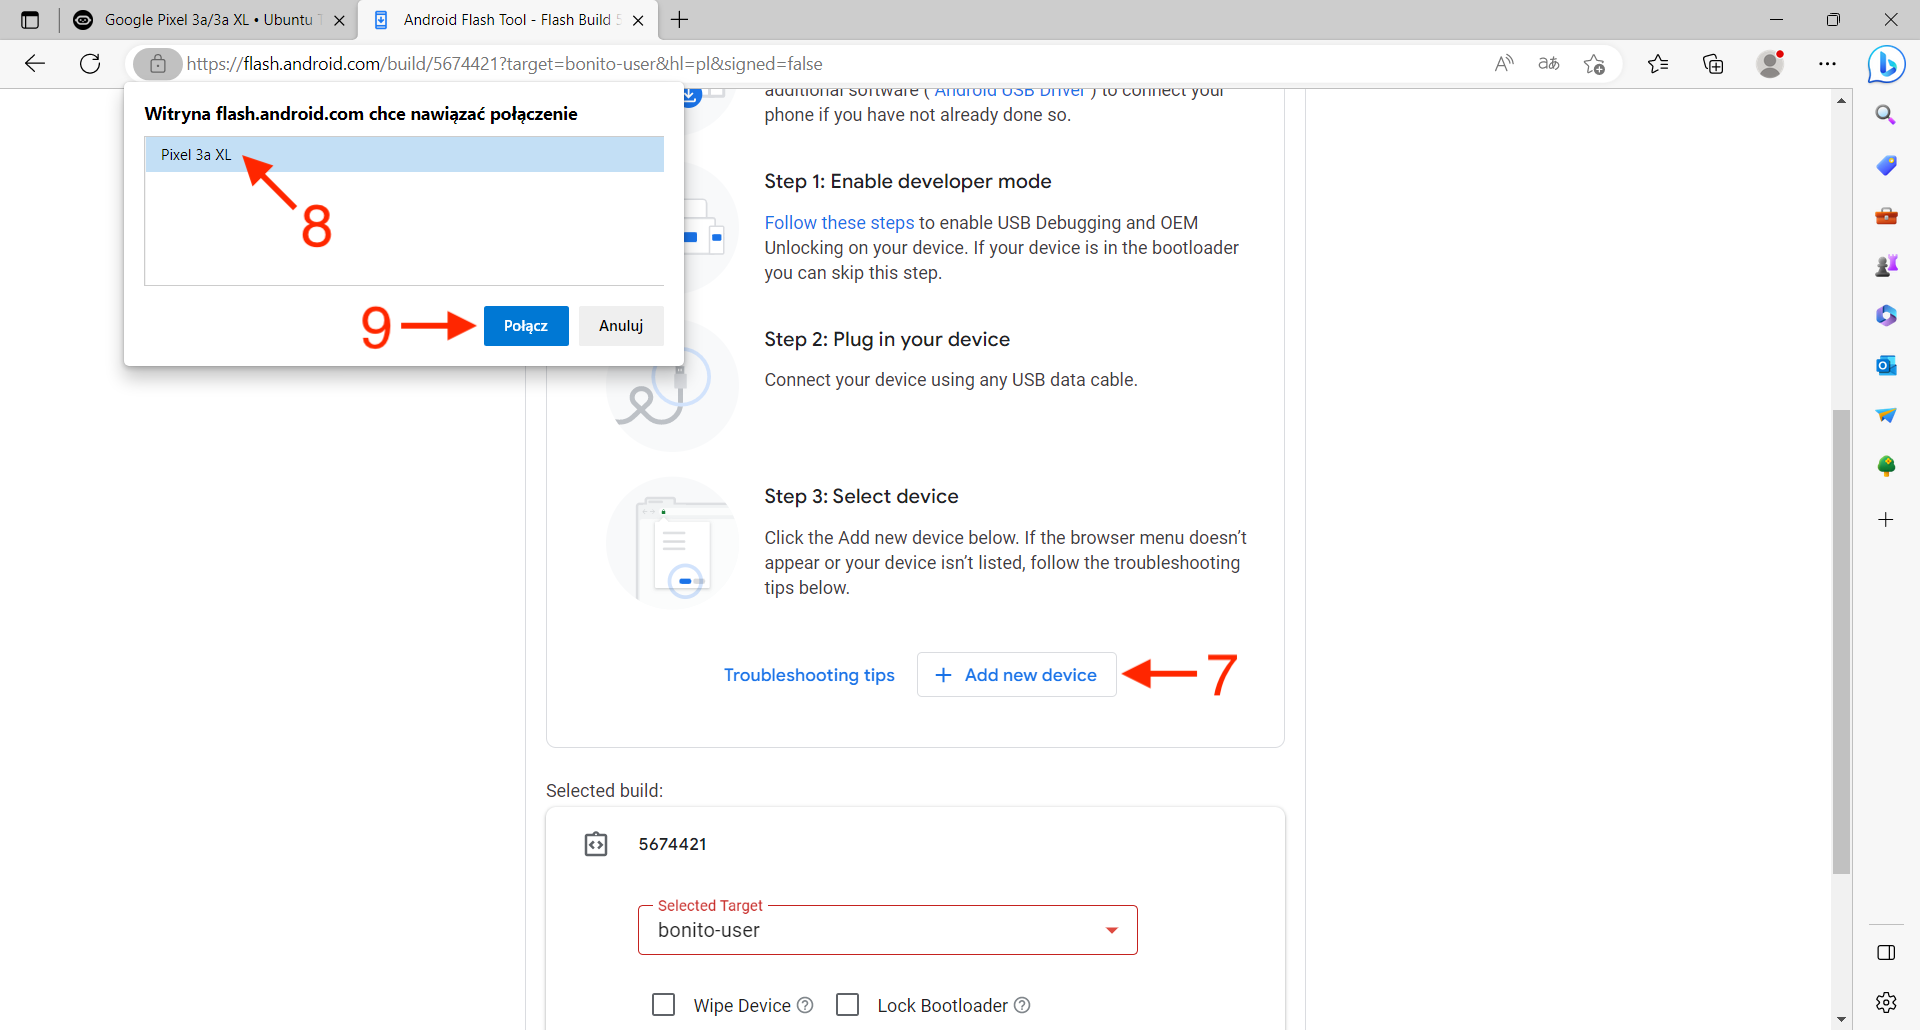
After finding the appropriate image, we click Flash which is next to. We will be taken to a web-based Android system flashing tool. This time, I won’t describe the process in detail because what needs to be done step by step is perfectly visible in the screenshots below.


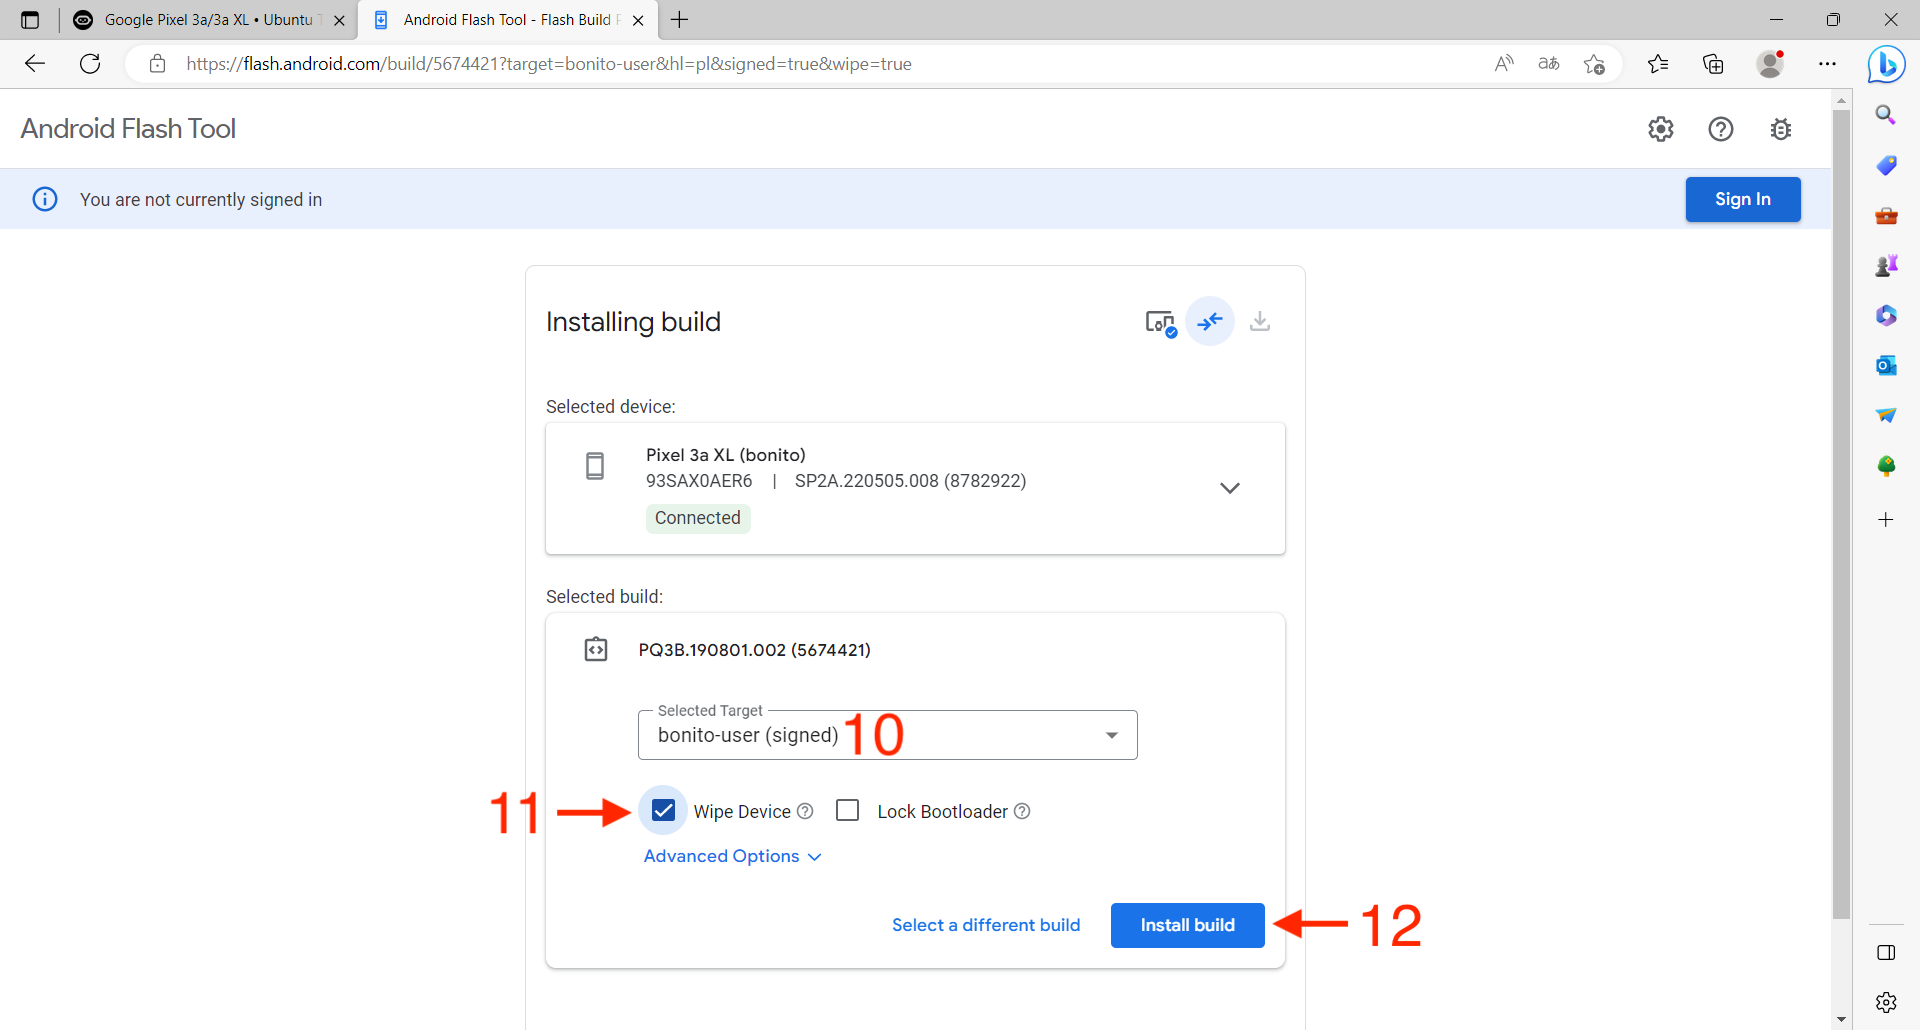
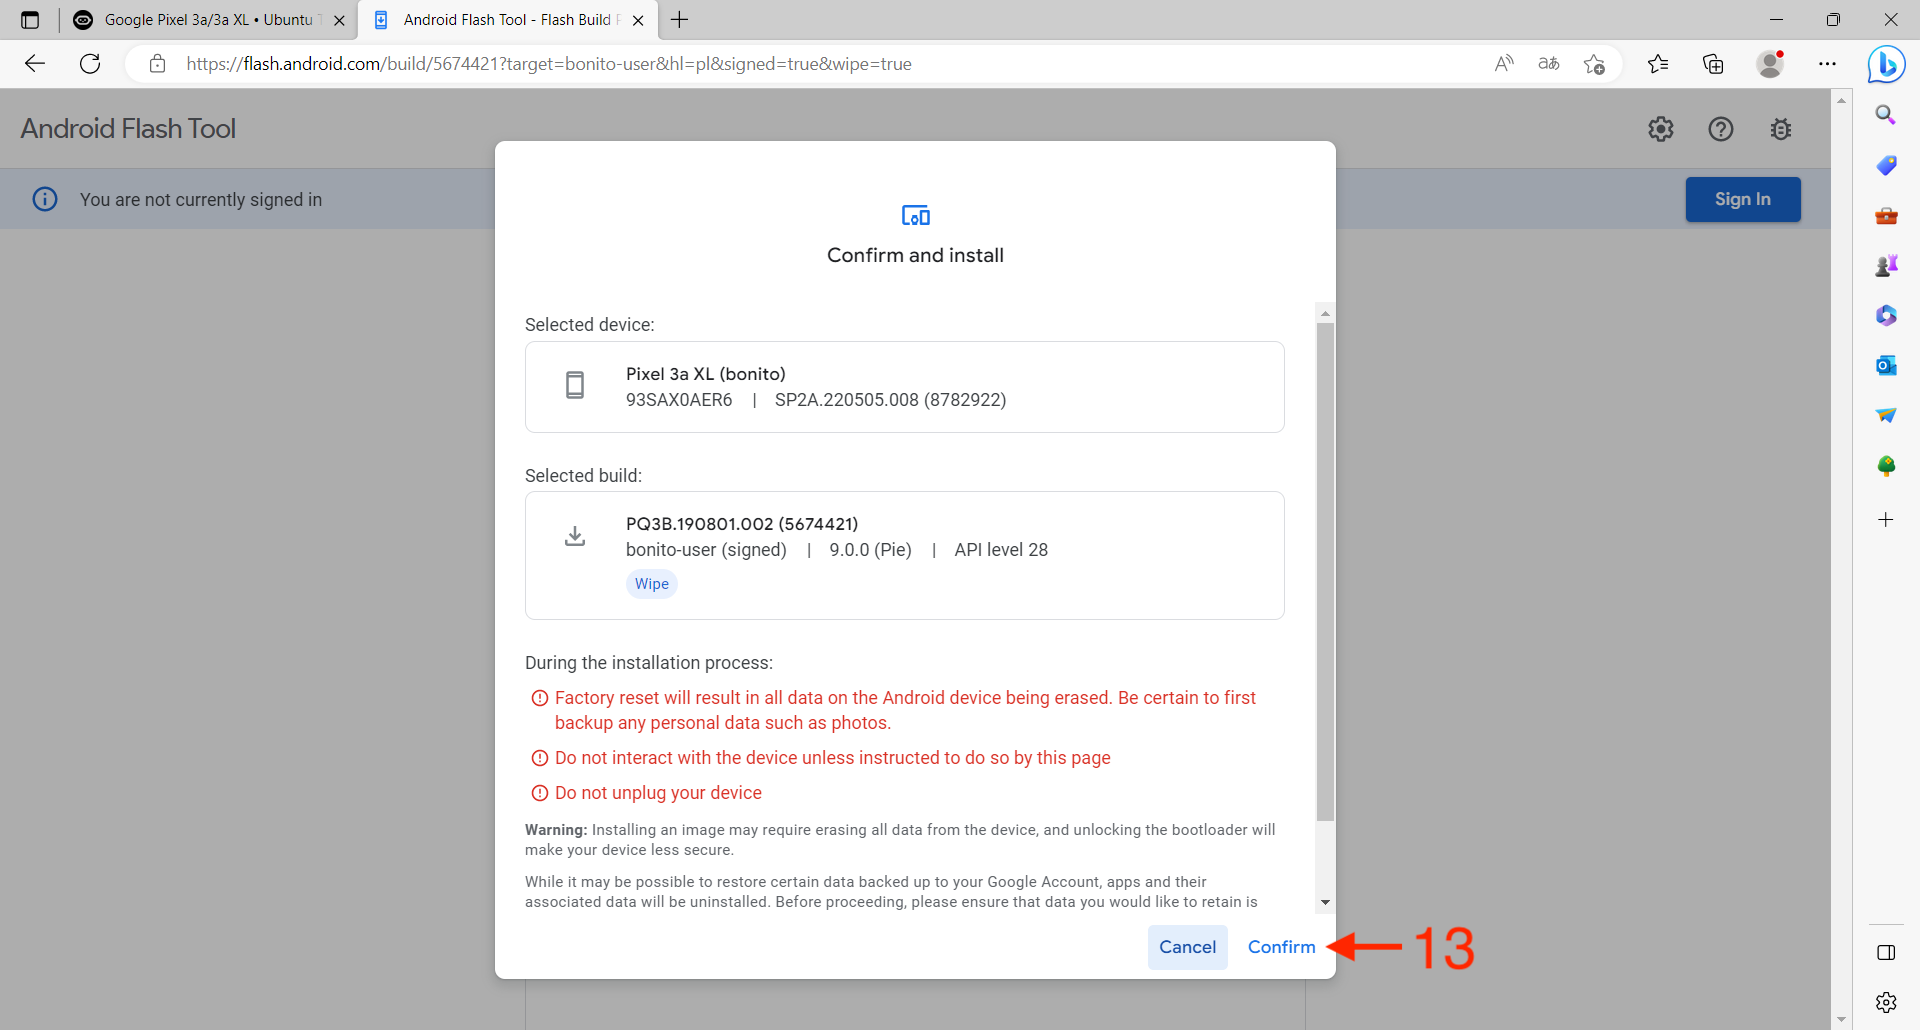
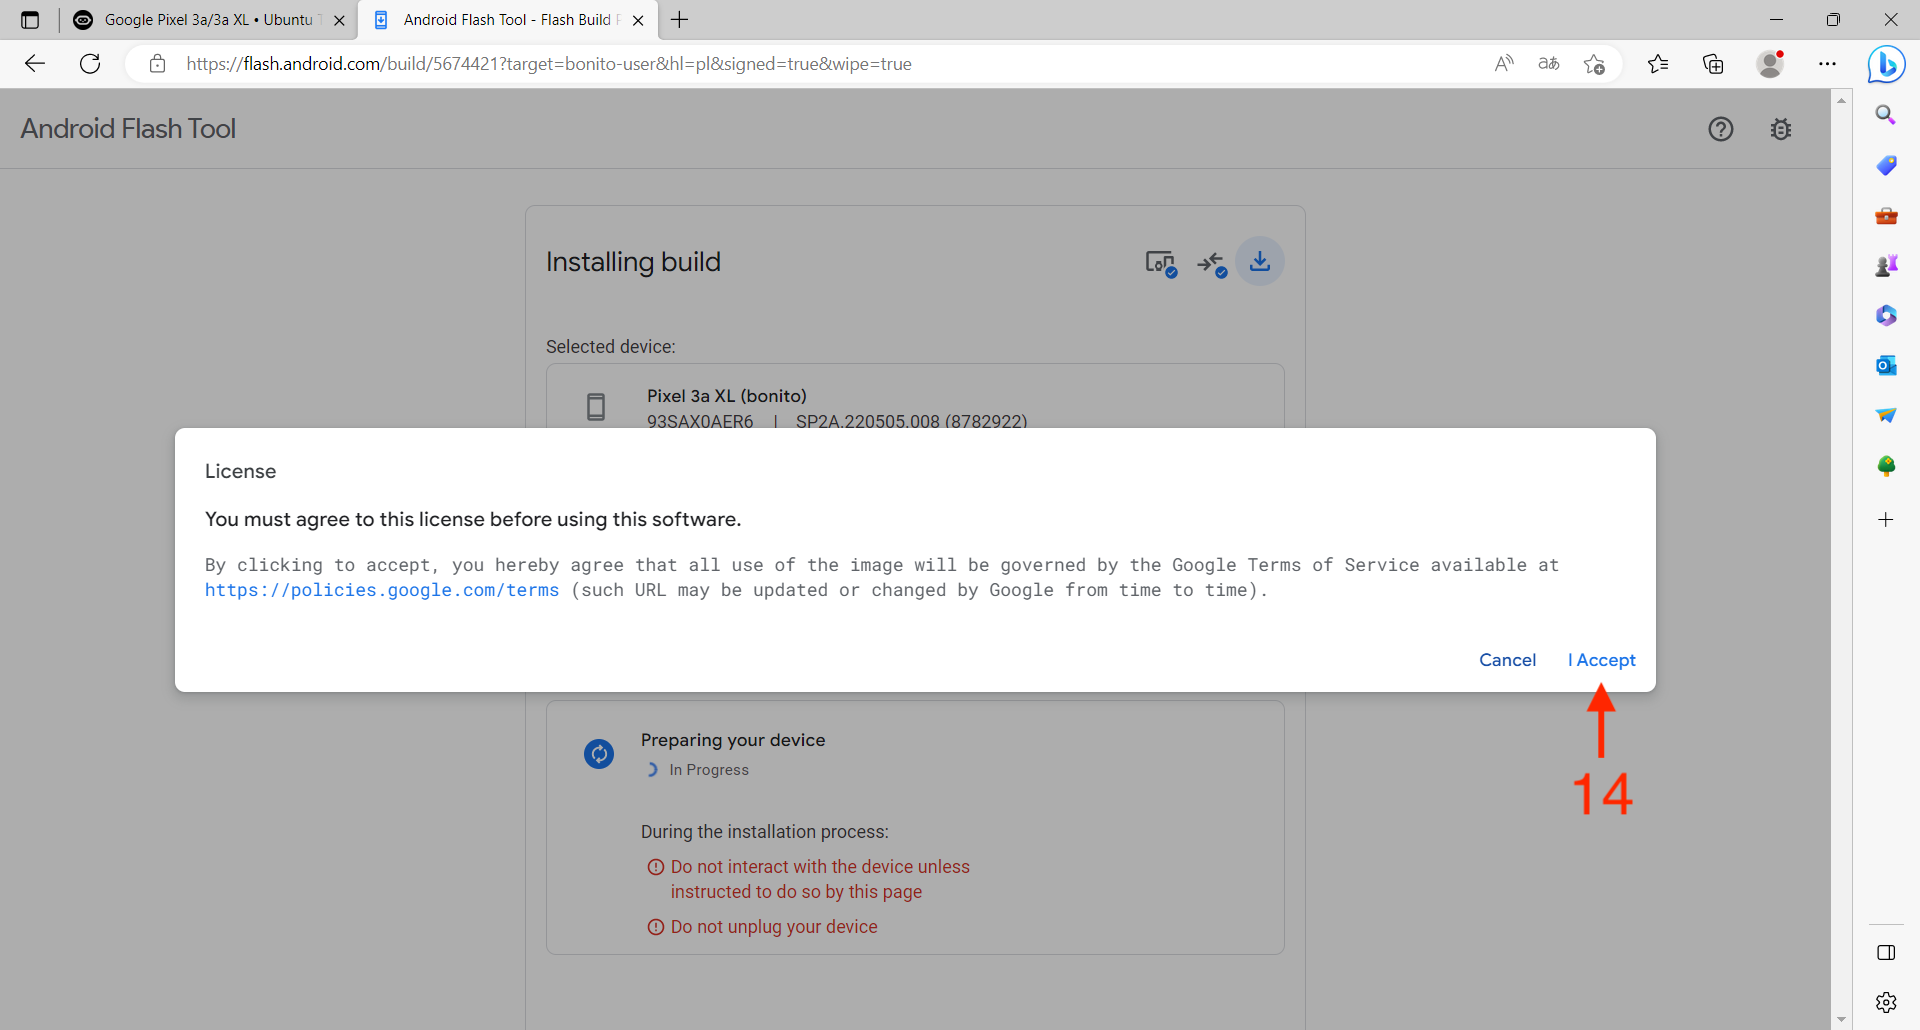
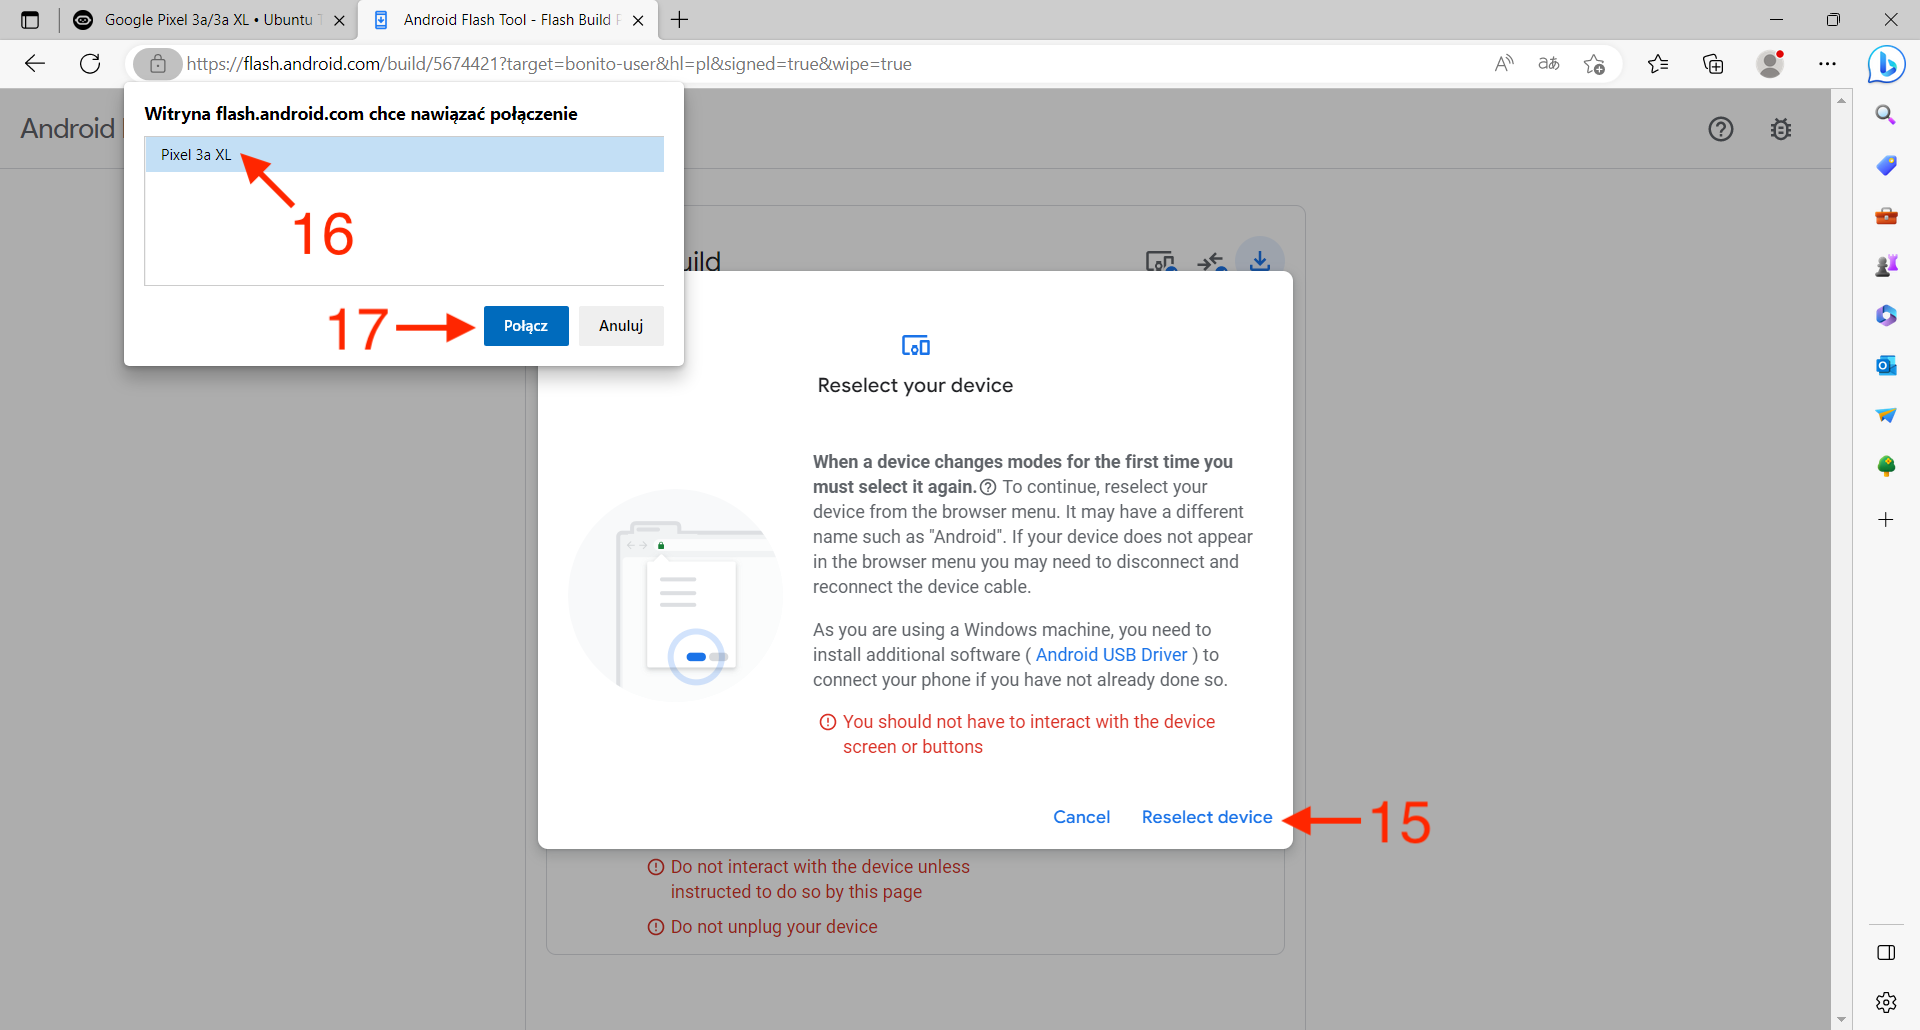
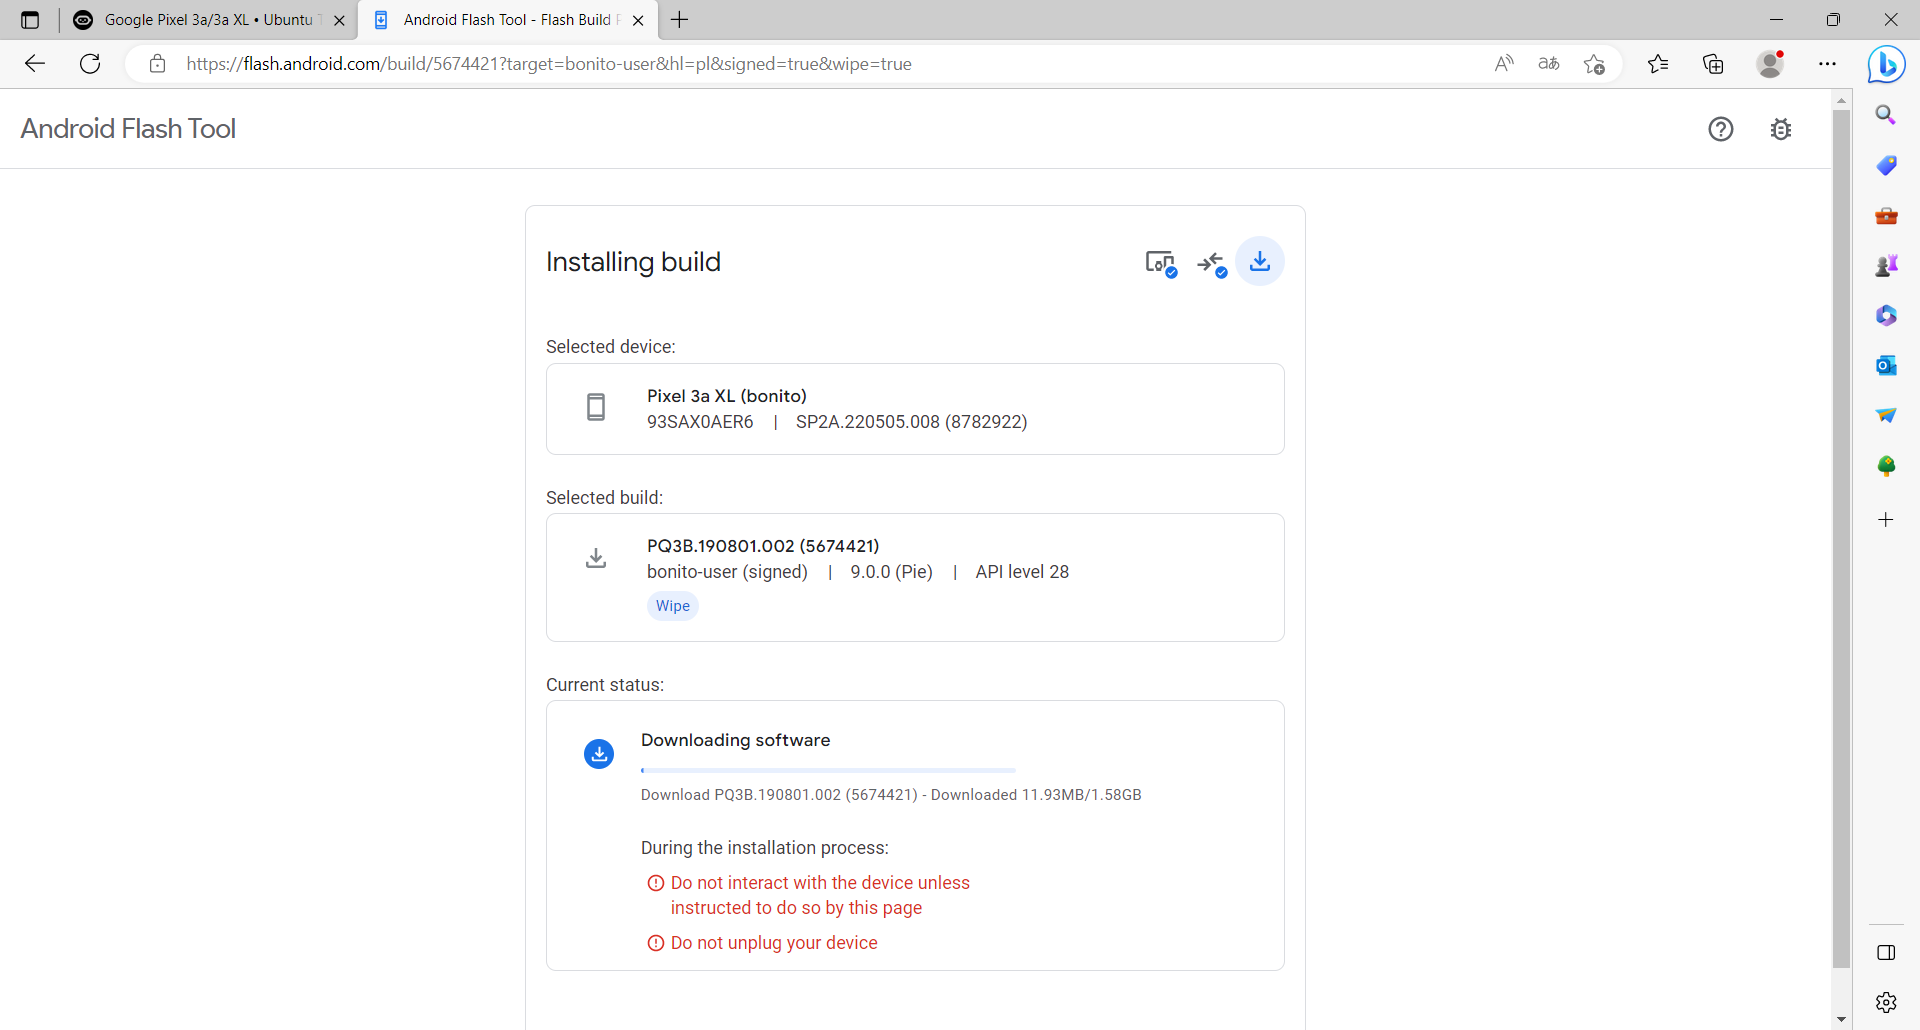
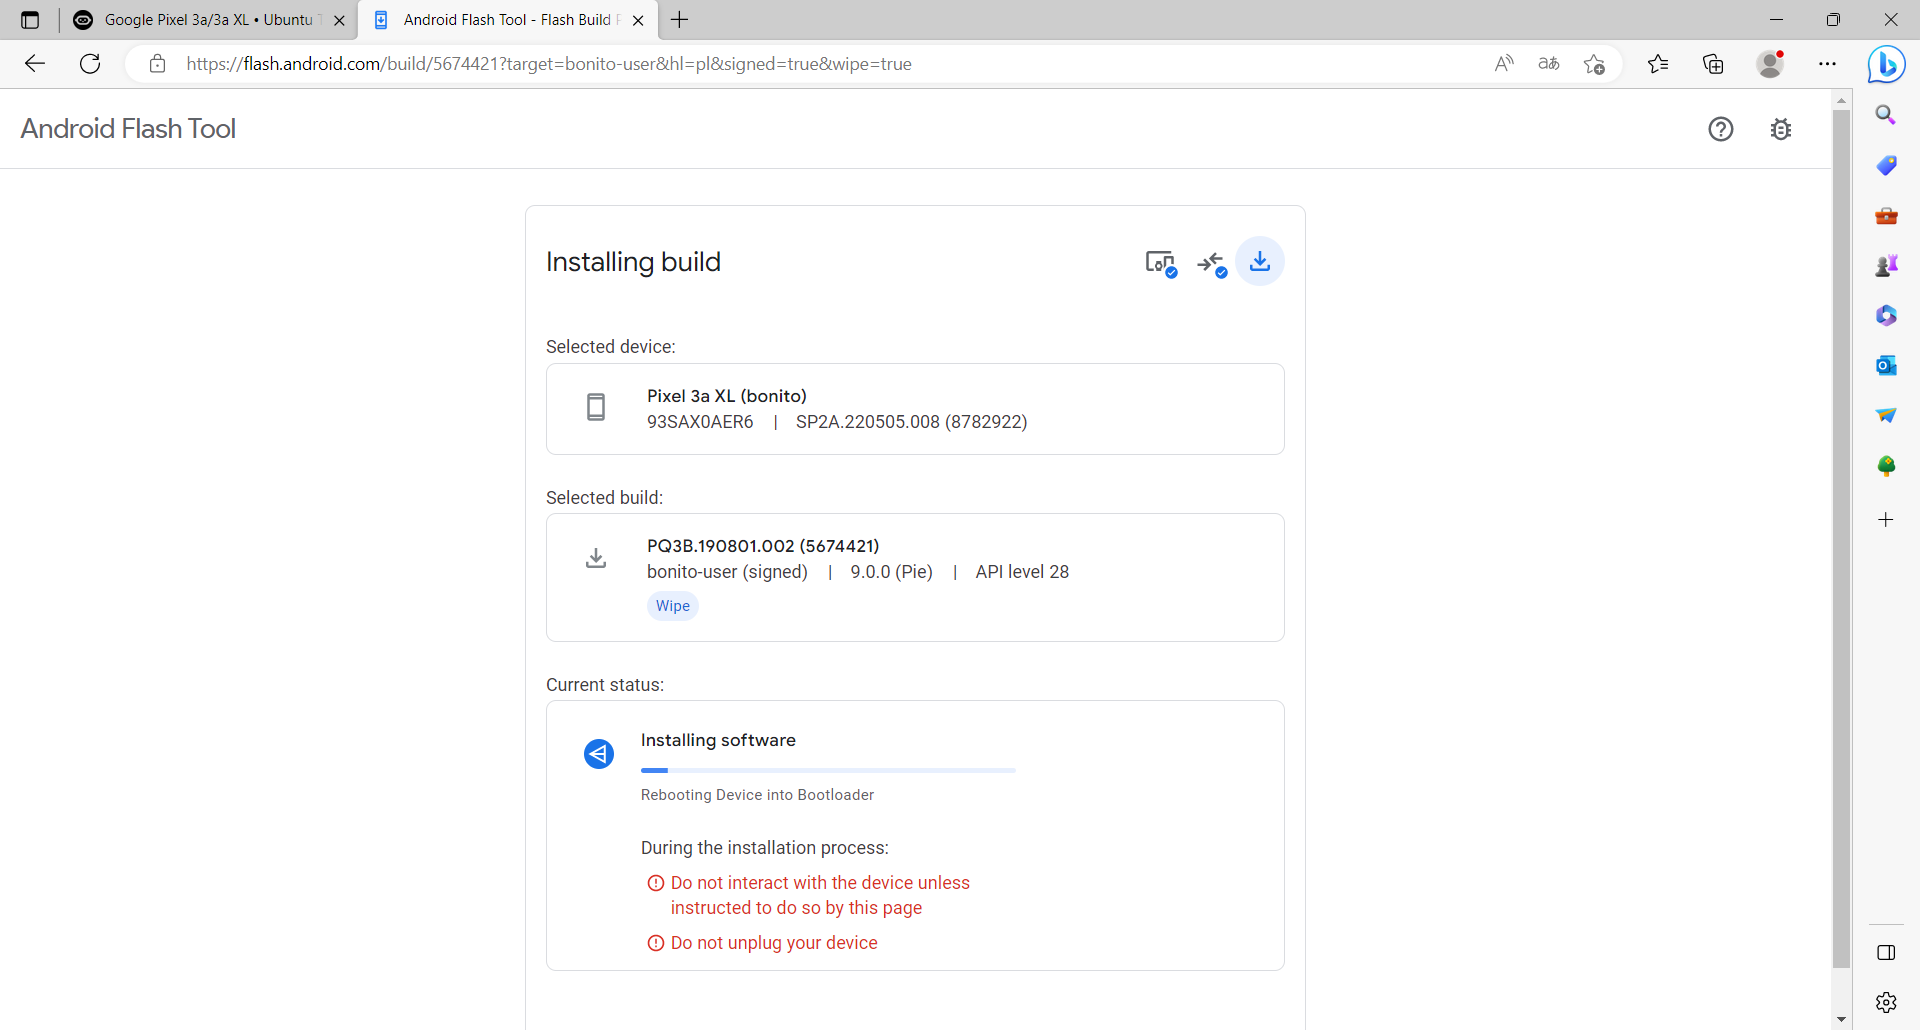
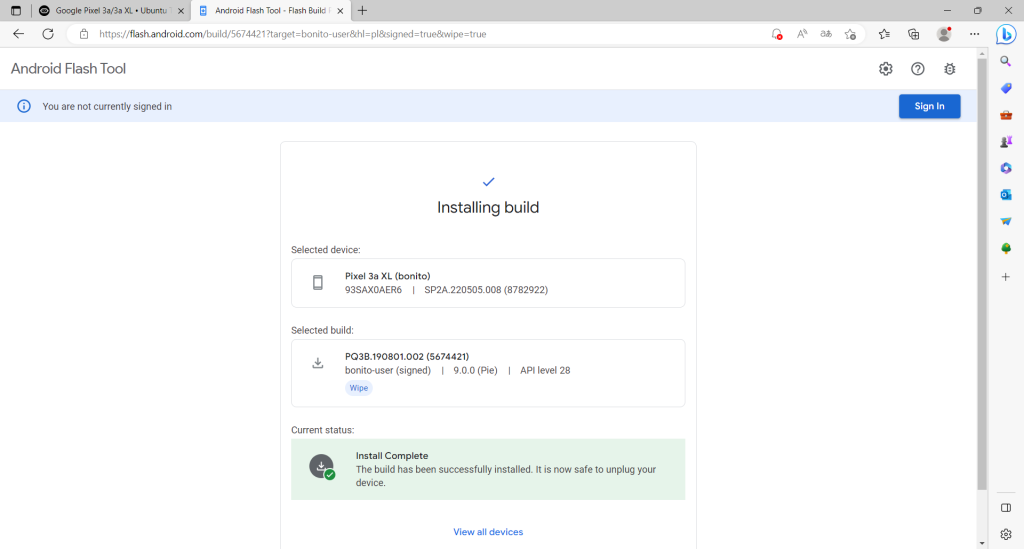
The result will be restoring the Android 9 system on our Pixel. The phone has also been wiped clean, so we need to go through the basic configuration again, where I suggest skipping most options and simply using the Skip button. It’s not even worth configuring the Wi-Fi because the phone will be wiped again after installing the target system (Ubuntu Touch). The only thing that matters after the basic system configuration is to go to the settings, re-enable developer options, and check if USB debugging is enabled. If it’s not, we obviously enable it and allow USB debugging from our laptop (as I described earlier).
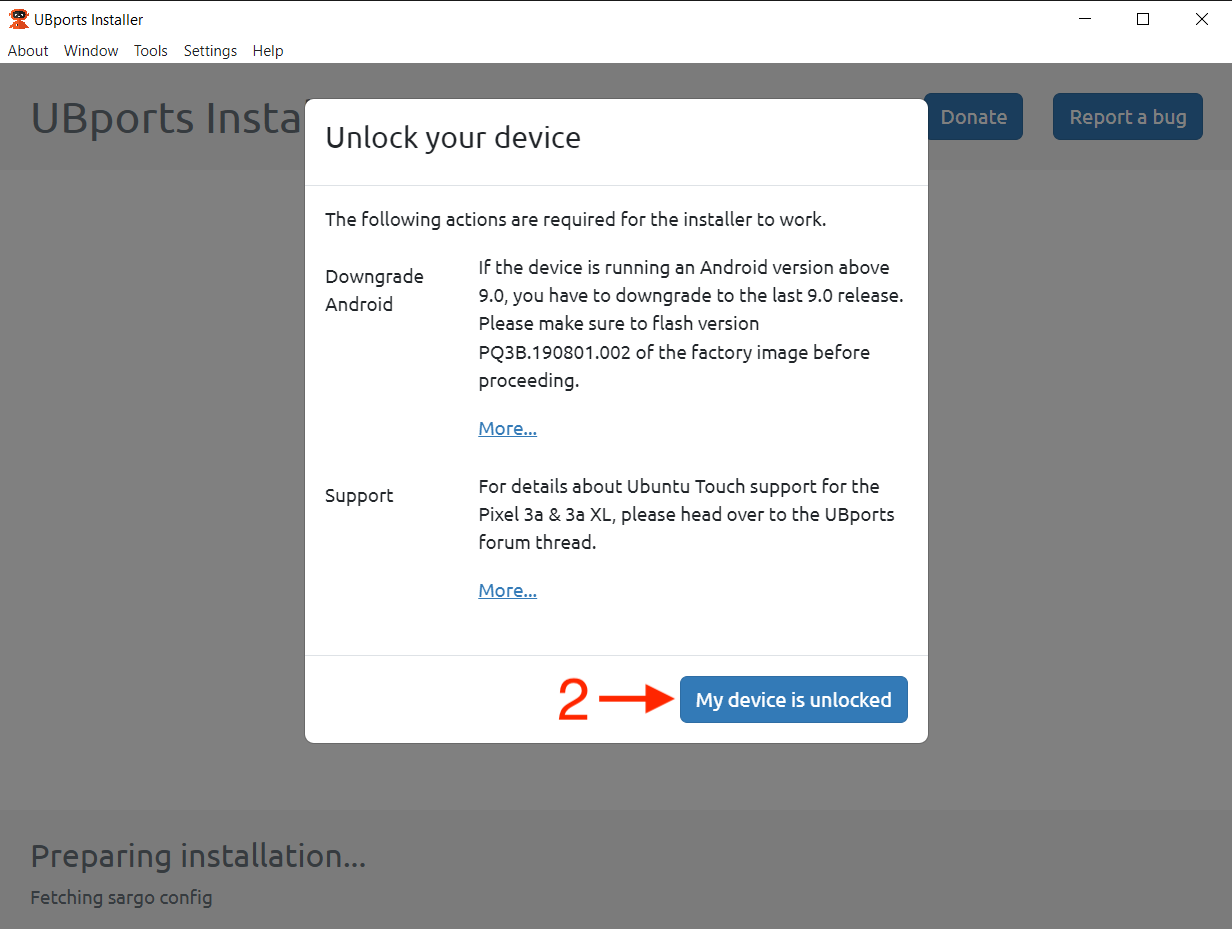
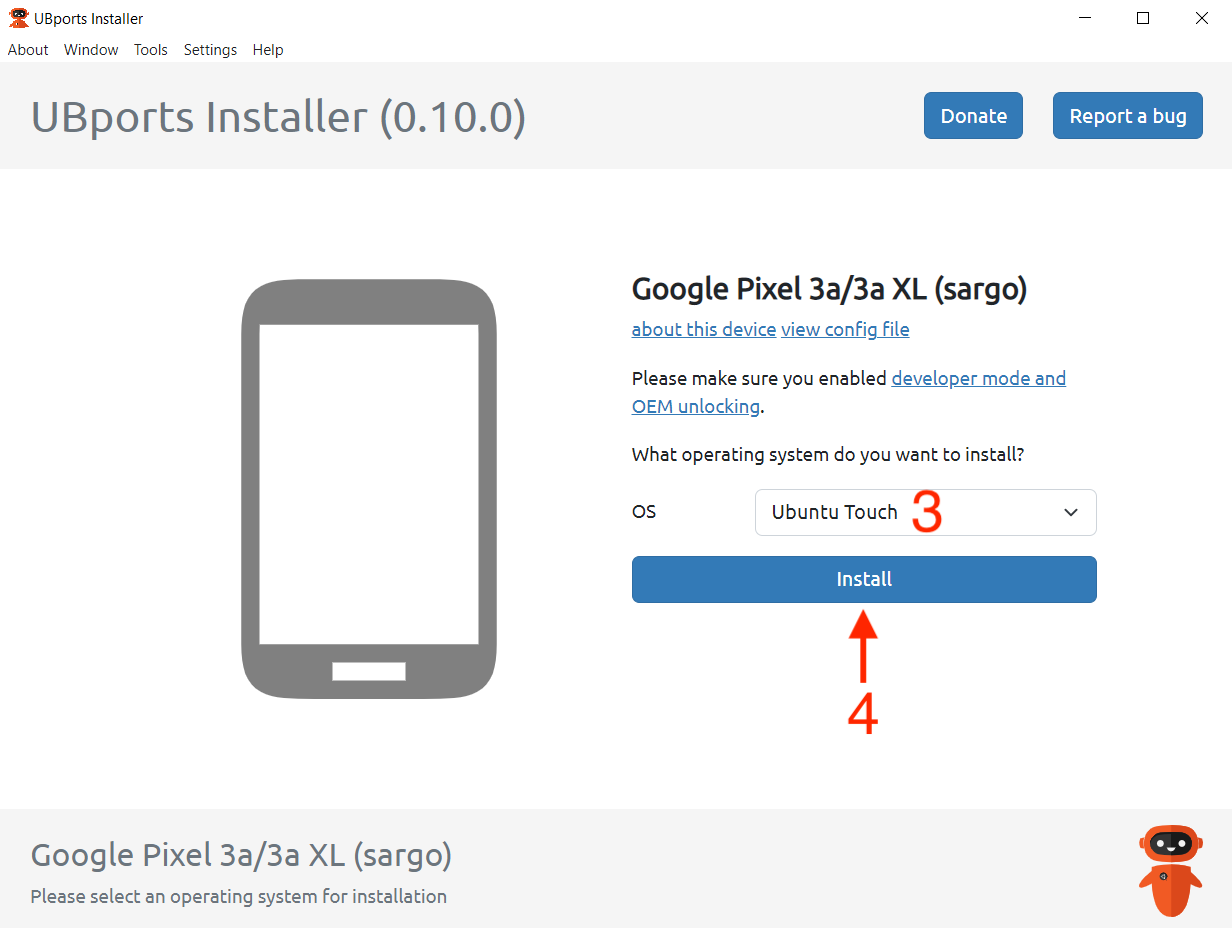
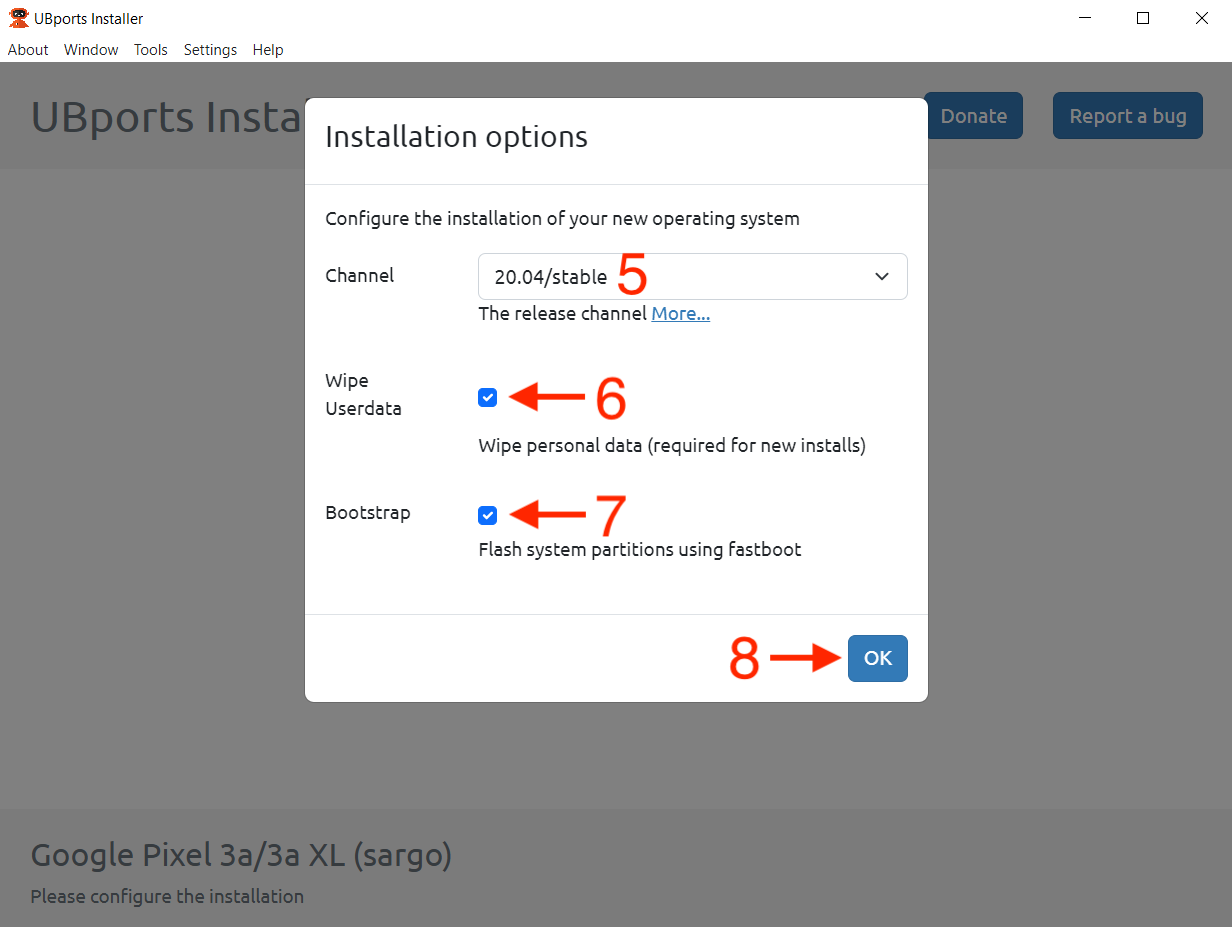
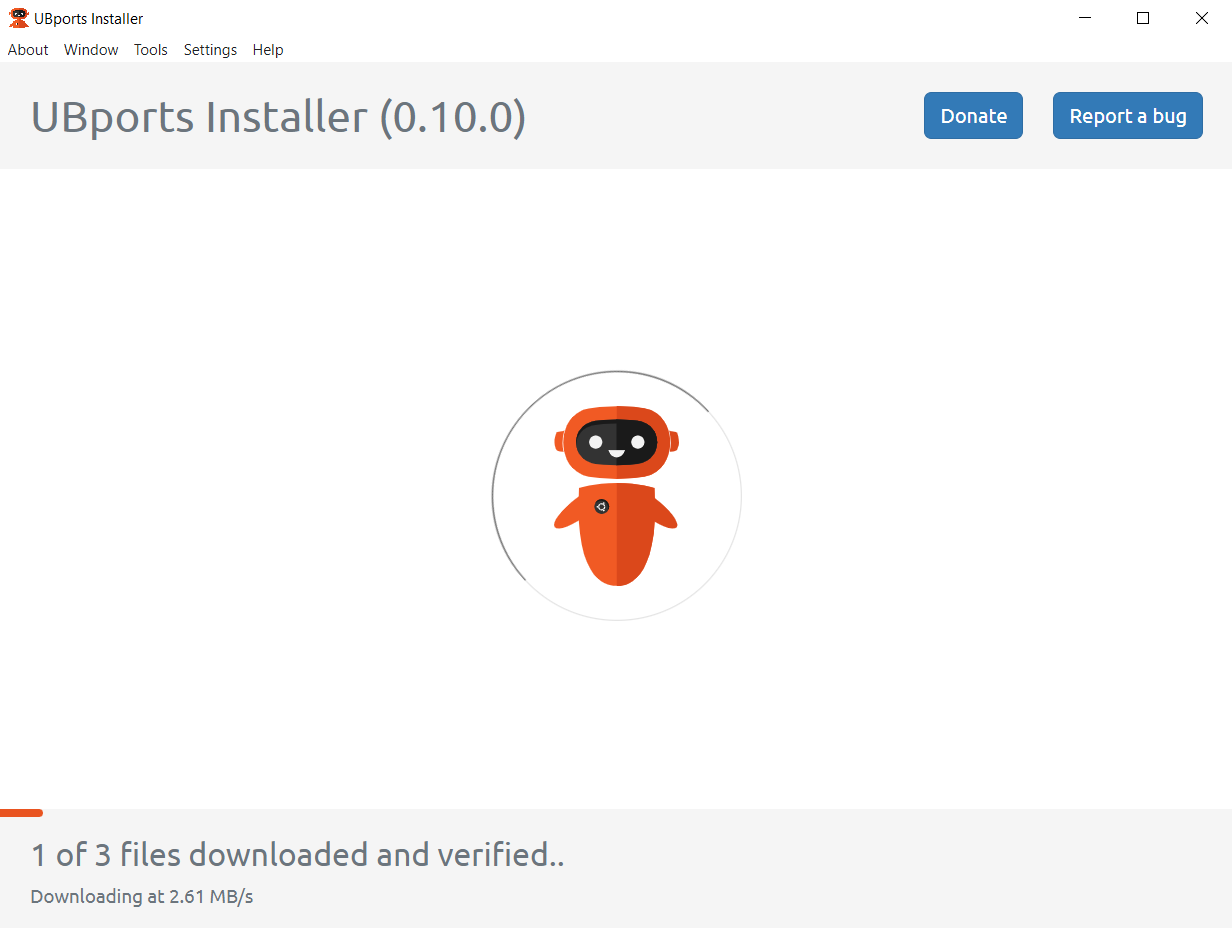
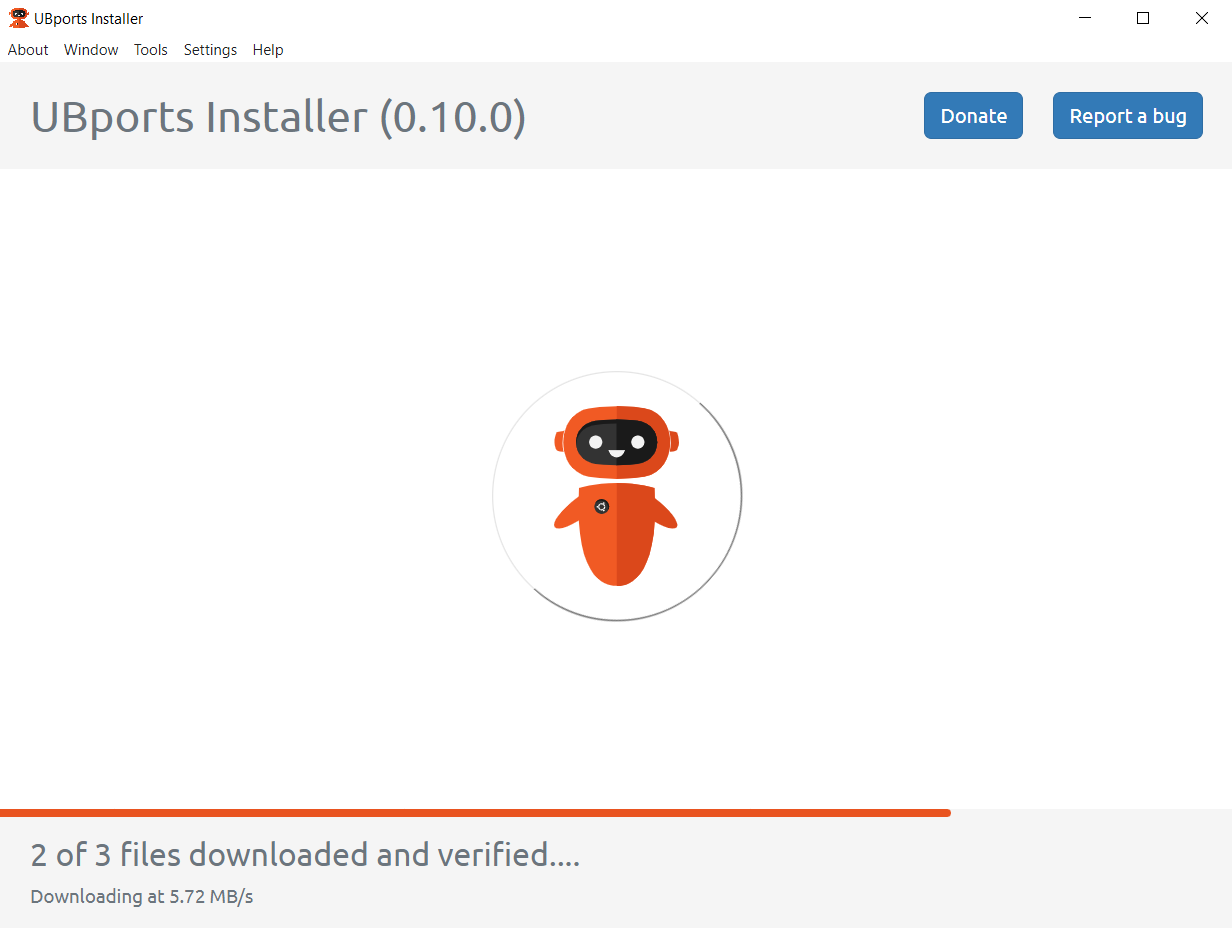
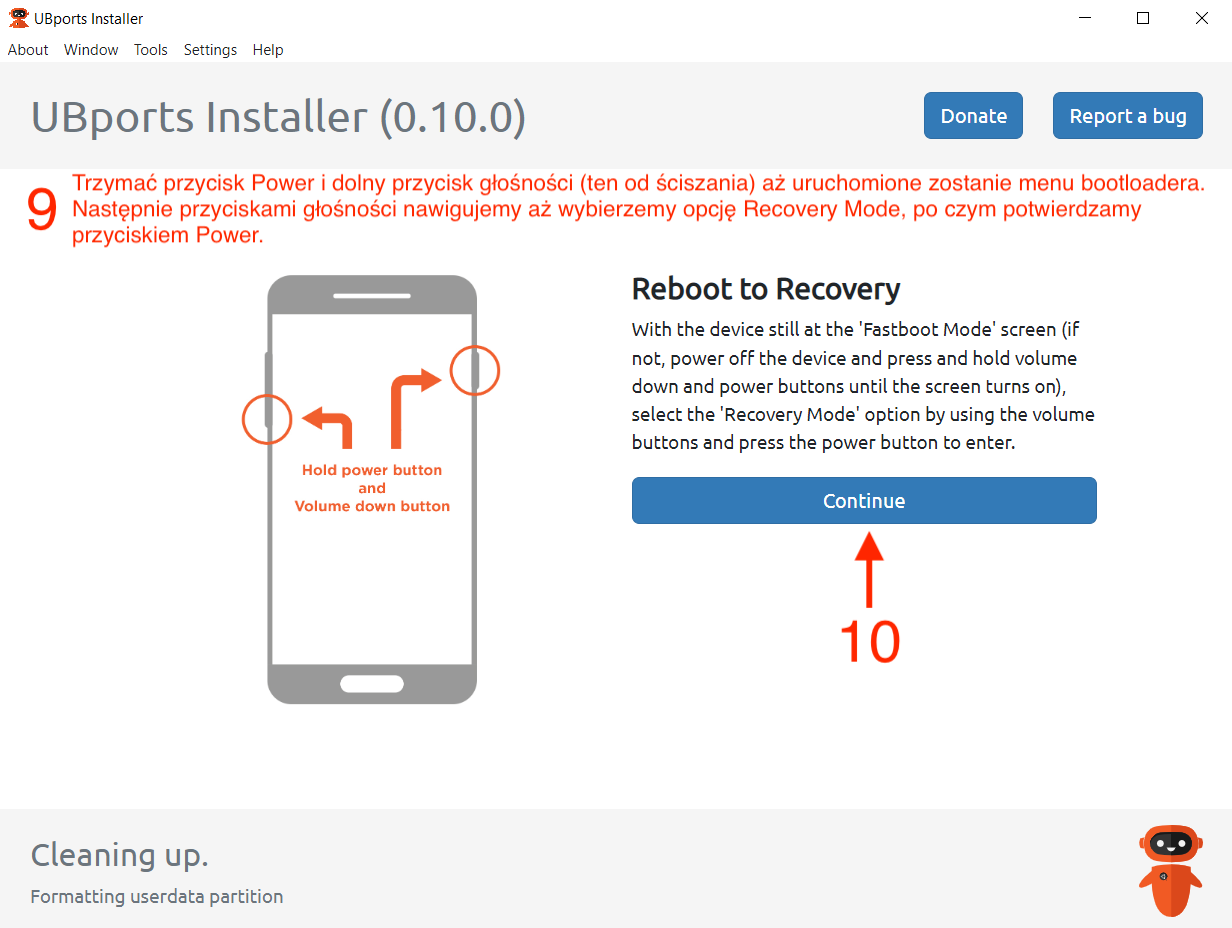
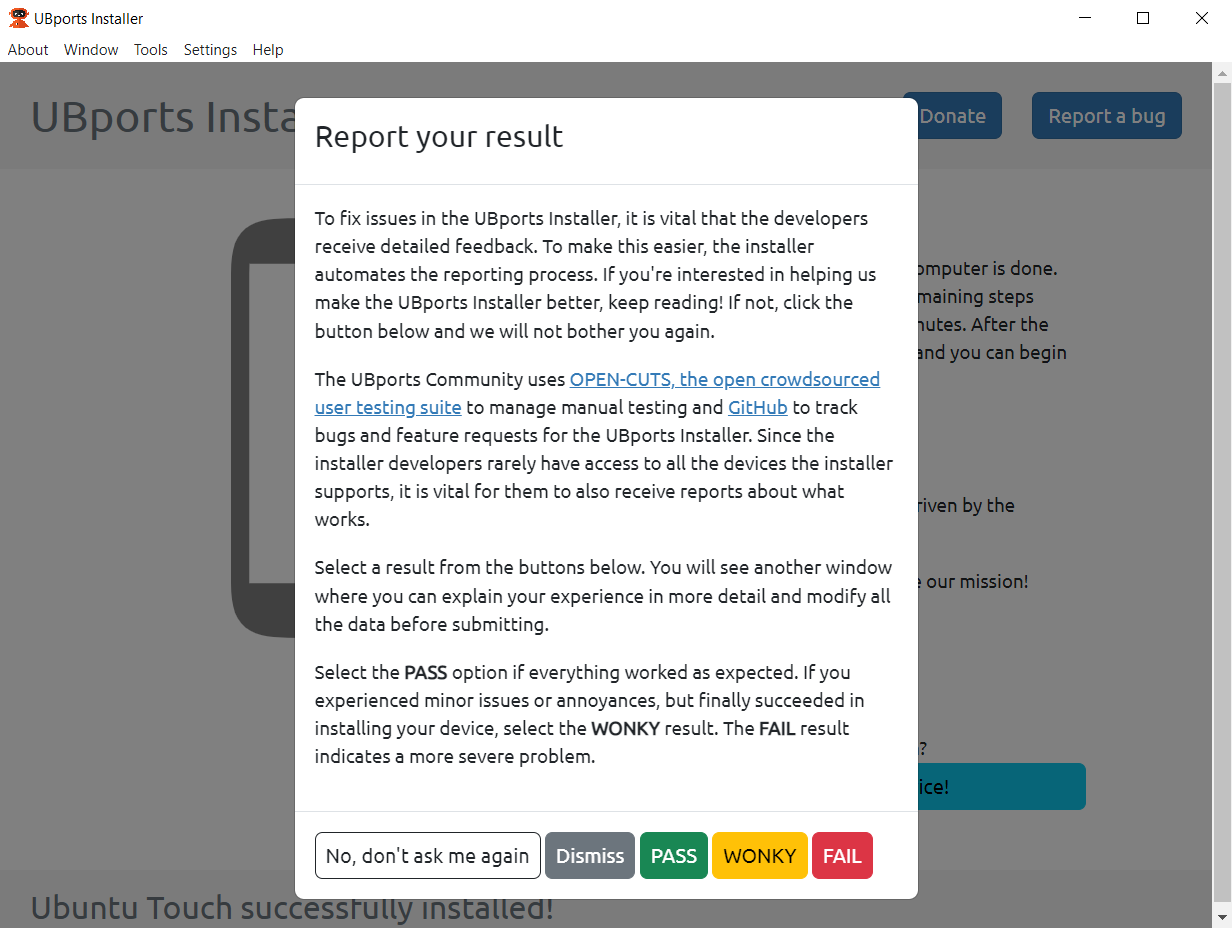
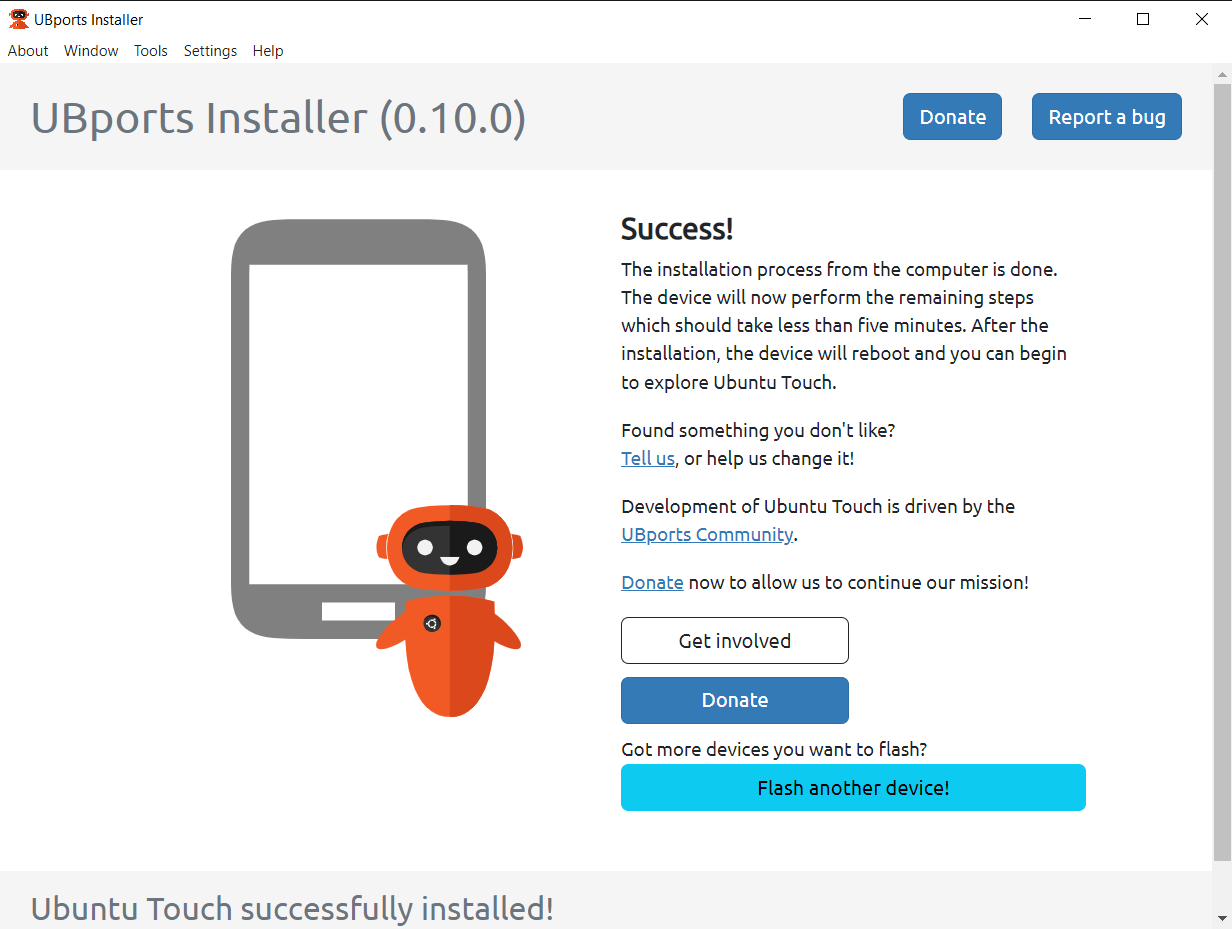
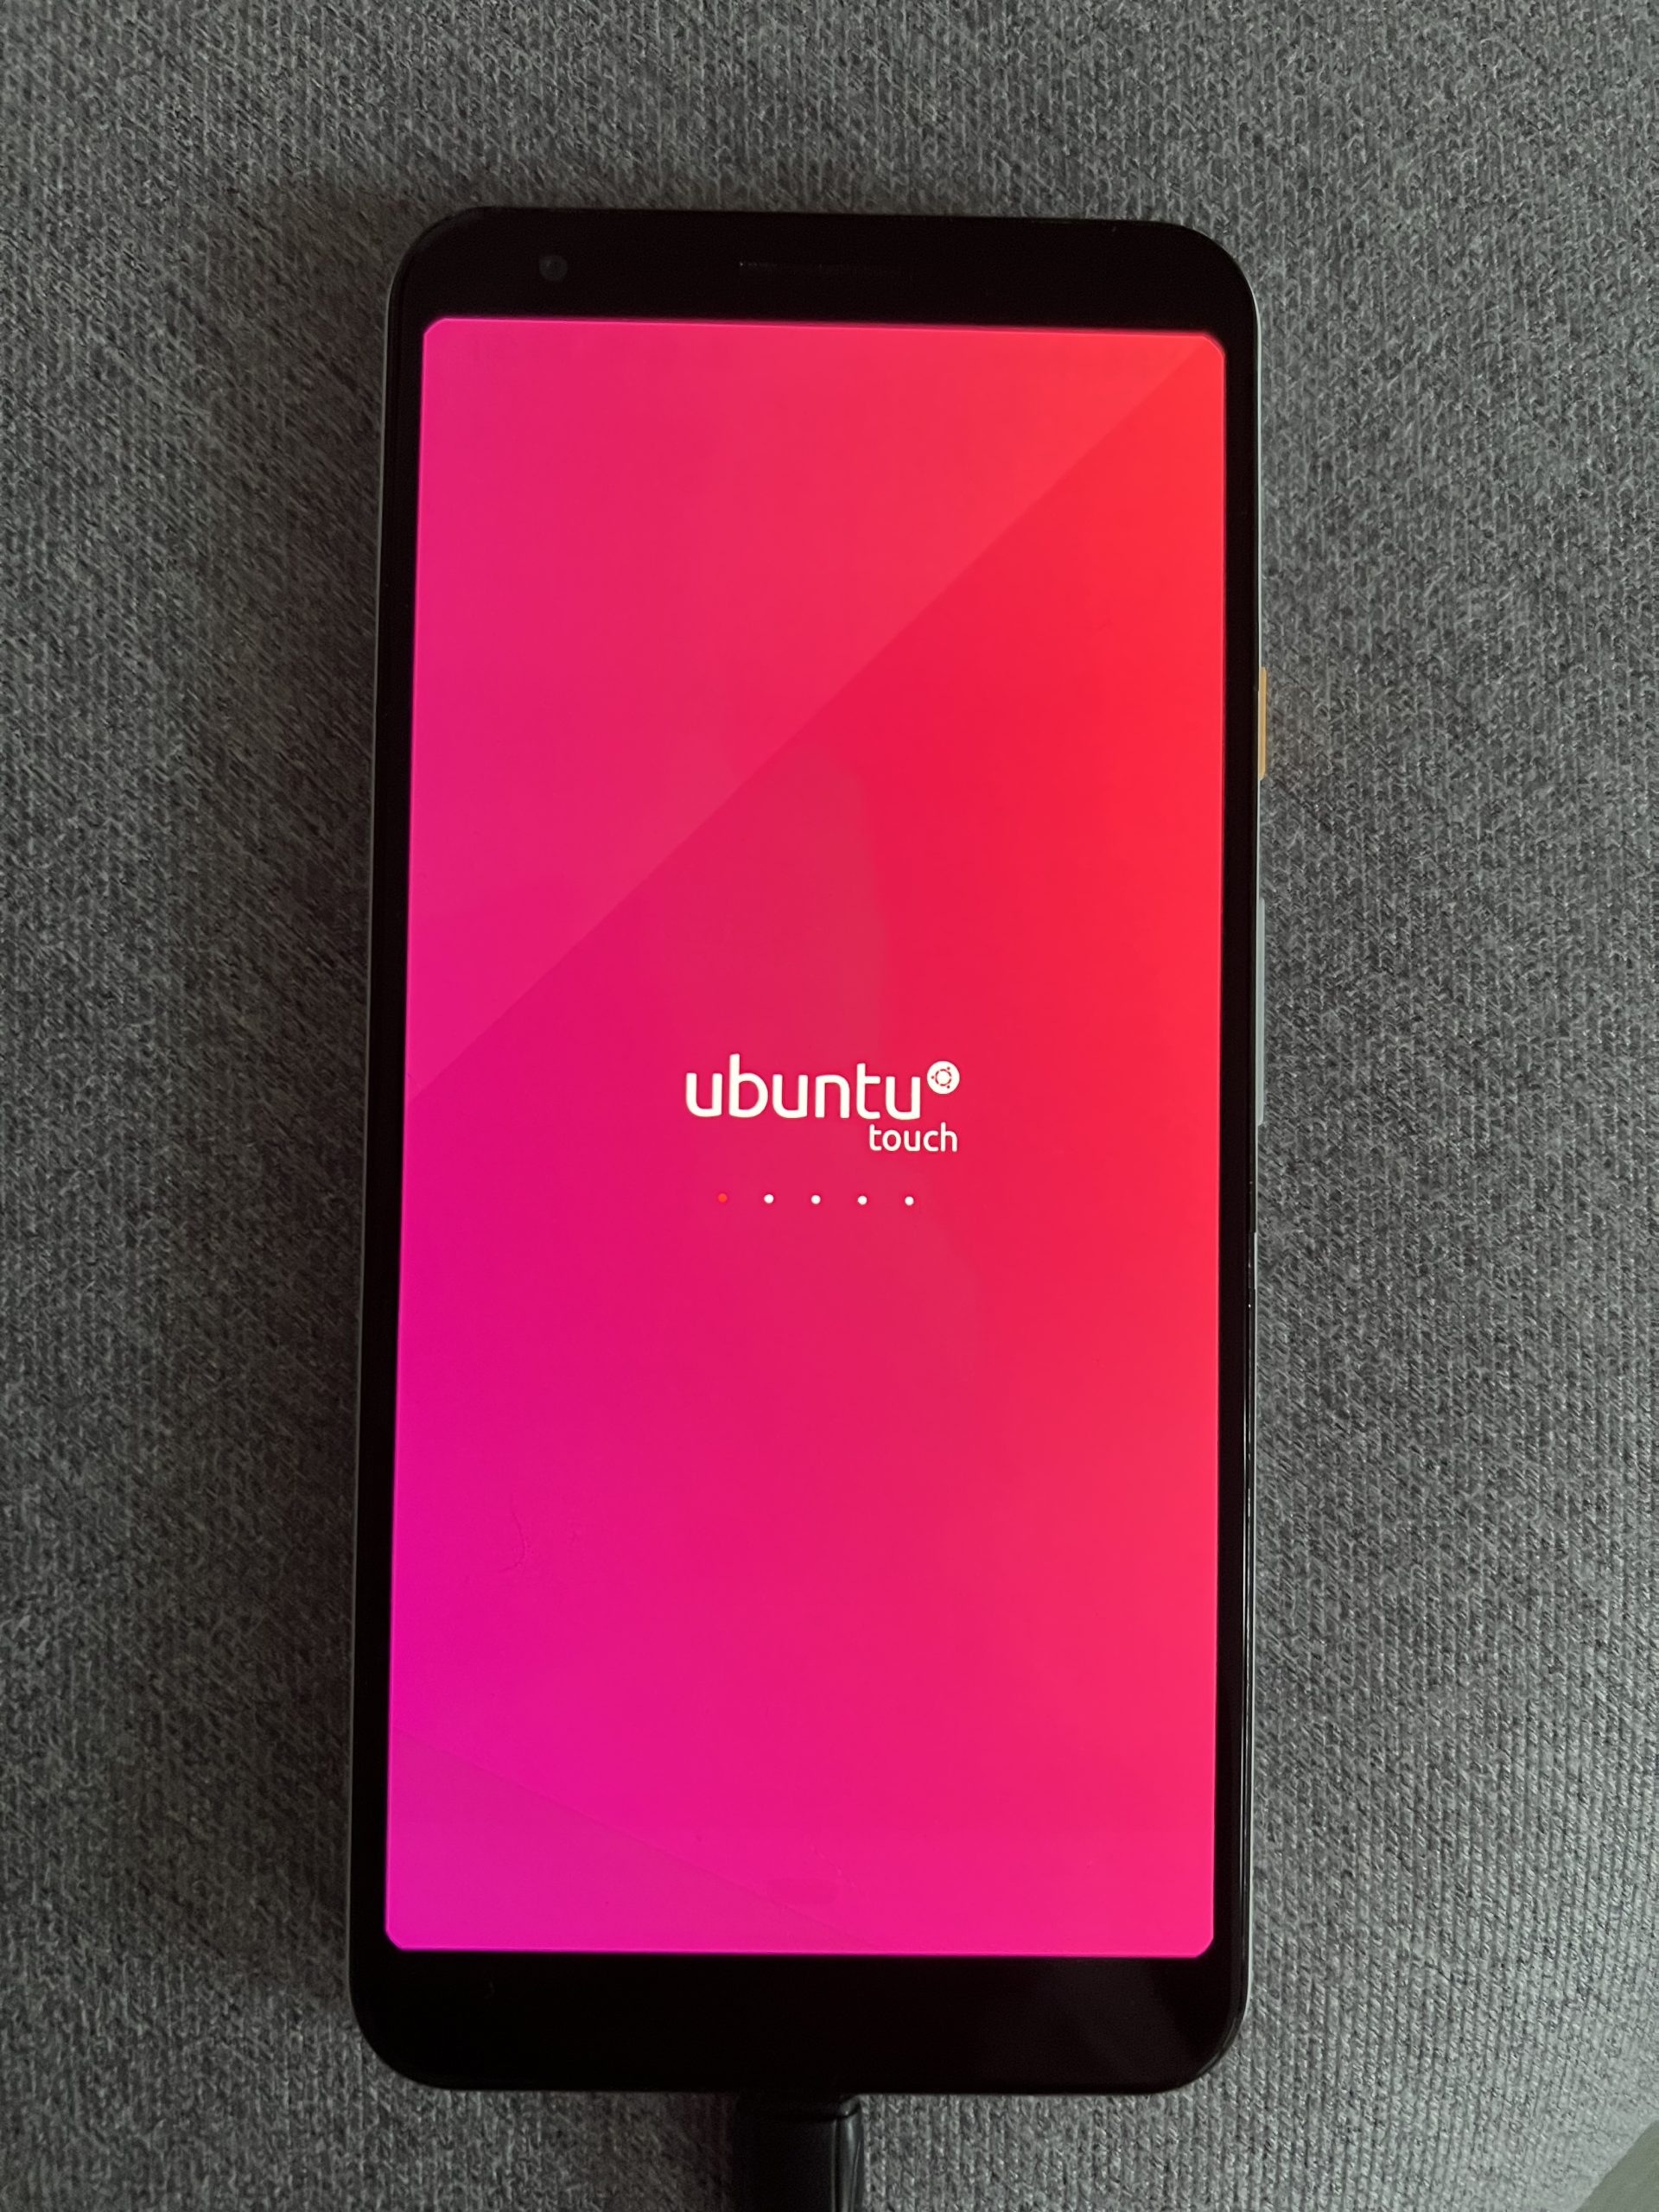
Flashing Ubuntu Touch
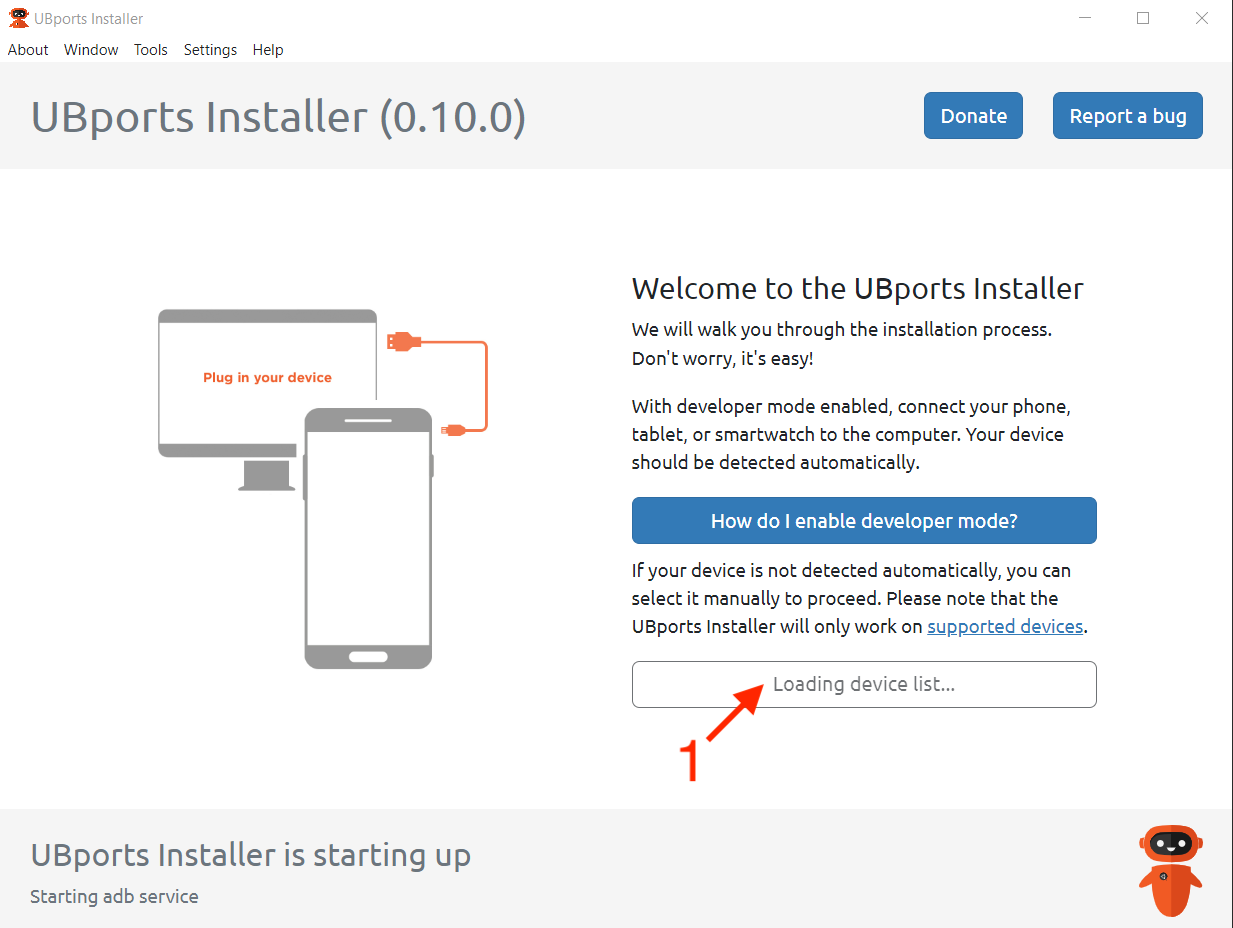
We will flash Ubuntu Touch using the previously installed UBports installer. Just like before, I have shown the entire process in the screenshots below.

Ubuntu Touch - first impressions
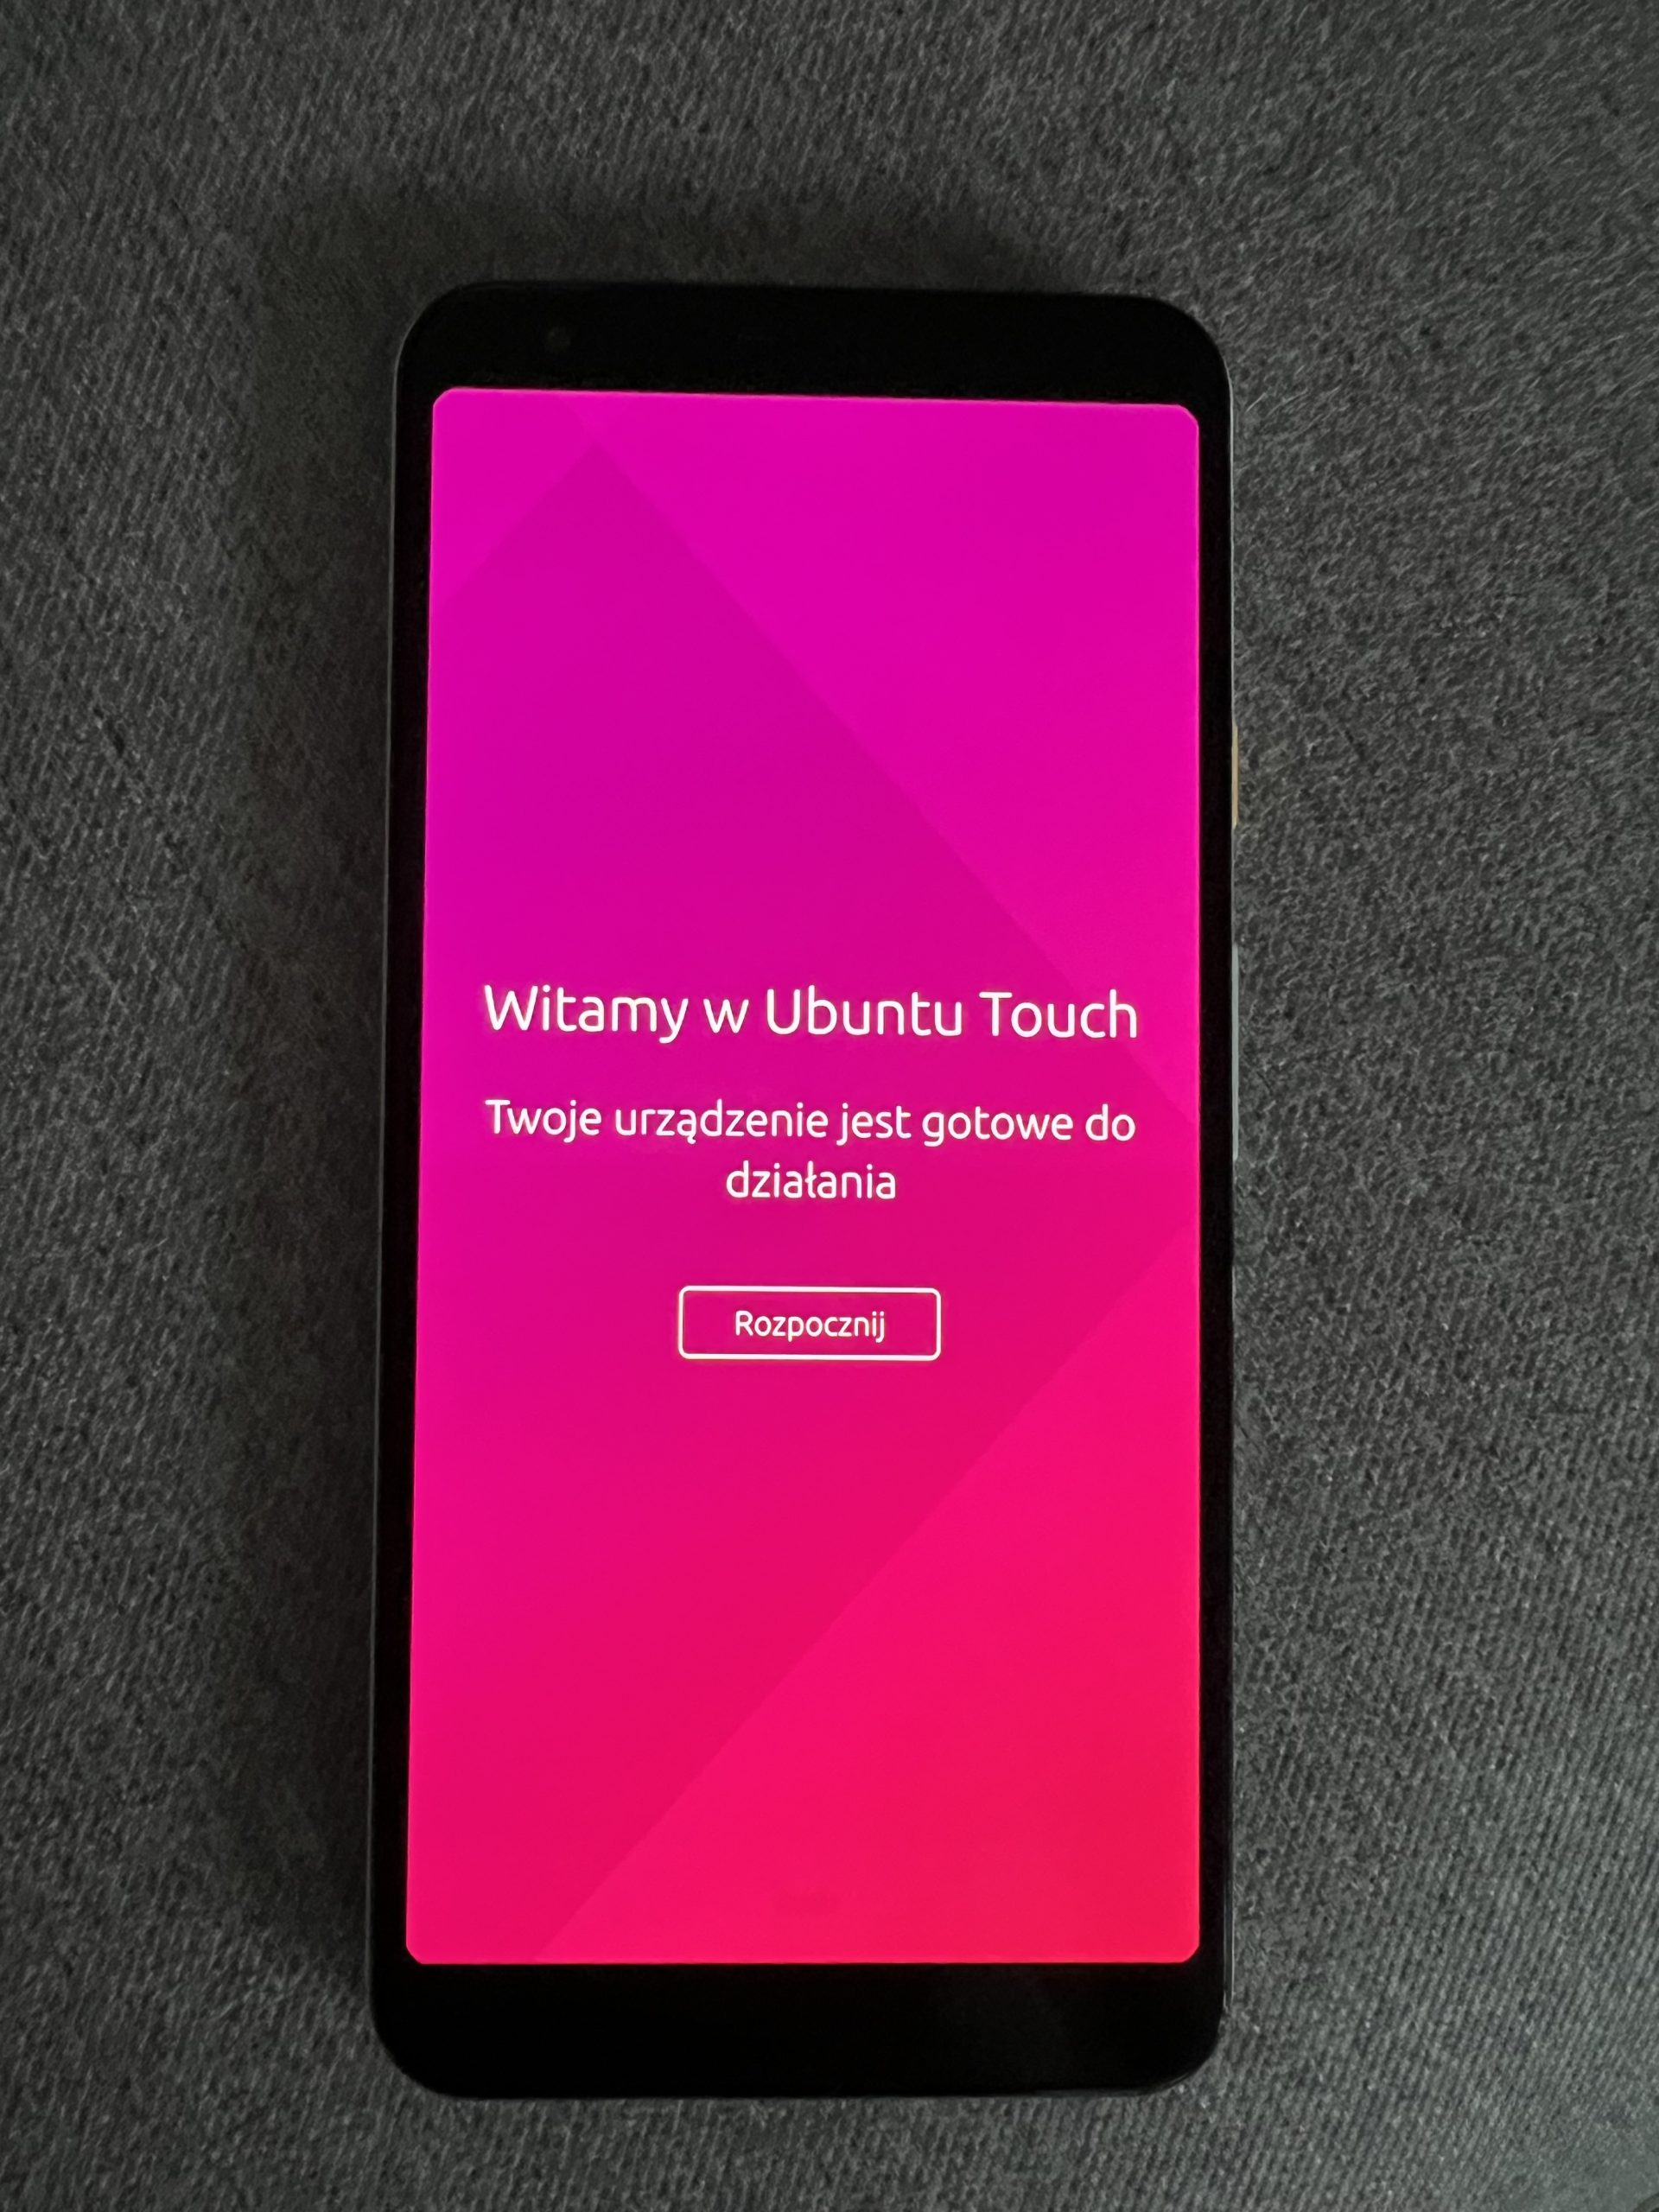
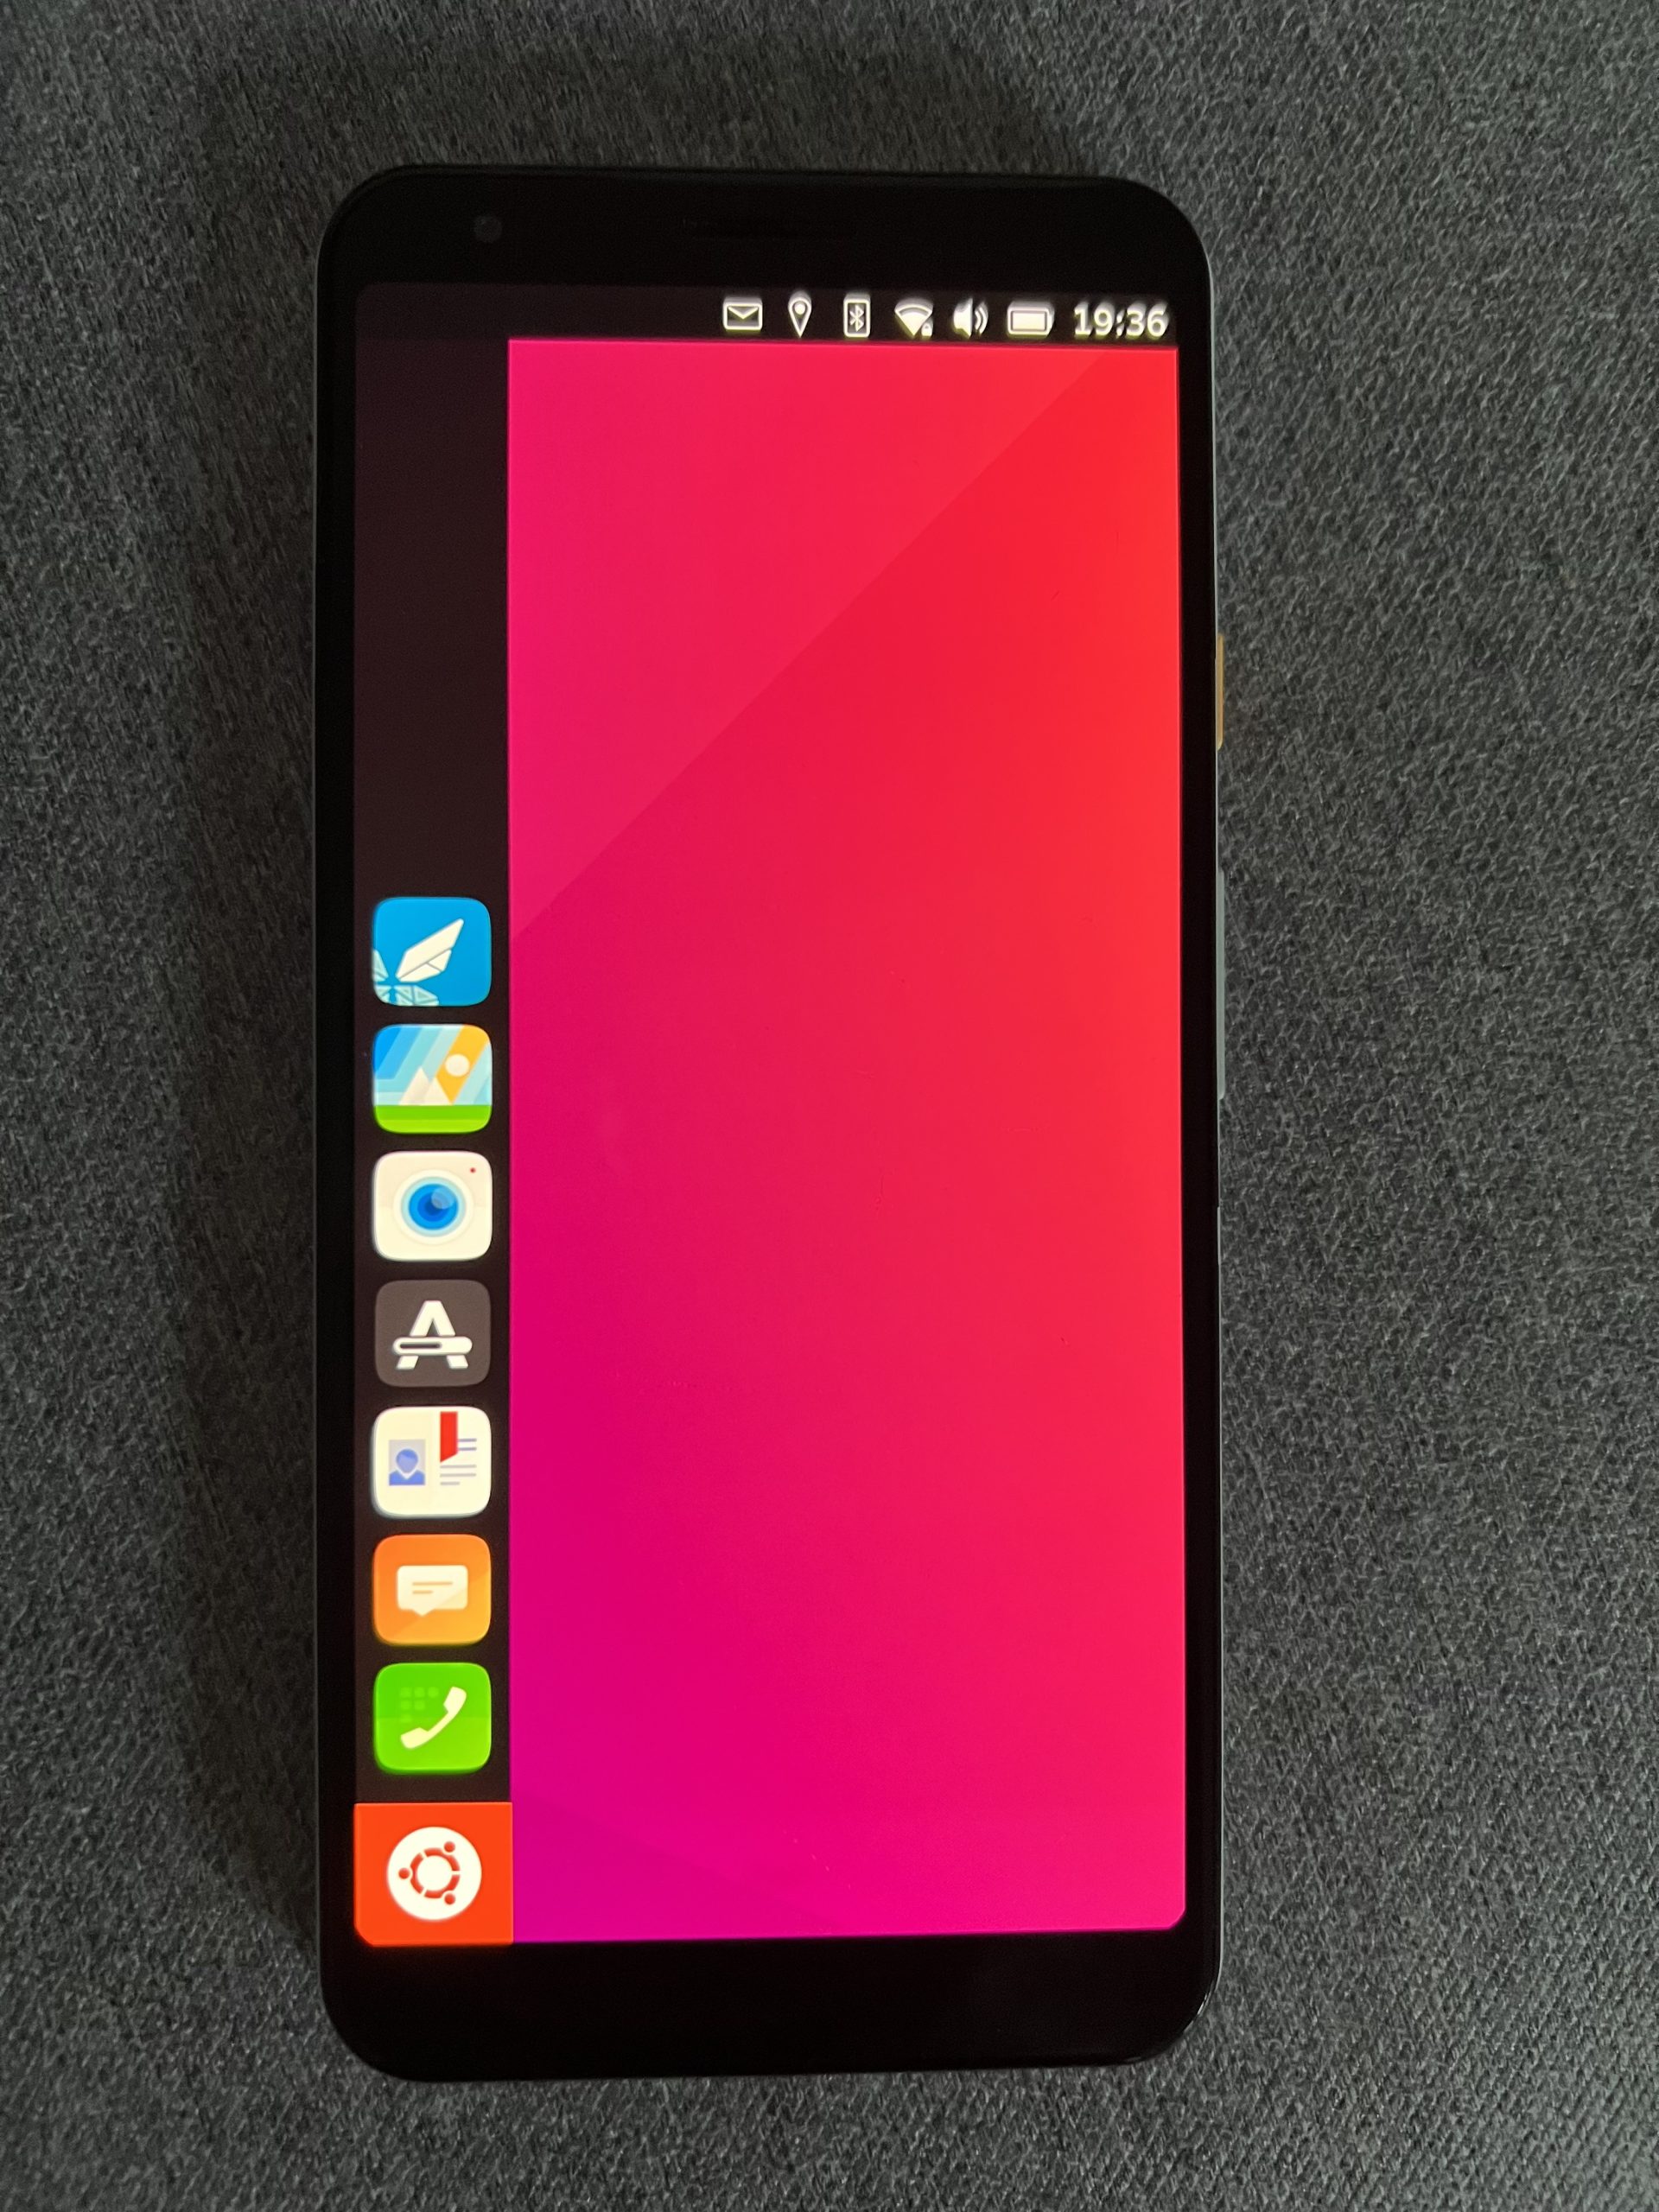
The initiative that is the Ubuntu Touch project is very, and I mean very, significant, worthy of respect, and deserving of support. It is clearly an attempt to give people freedom in choosing an operating system that won’t spy on them at every step. Moreover, it is open and completely free. The system is quite well adapted to the size of the devices on which it is intended to run, and it is evident that the authors prioritized ensuring that all basic phone functionalities work. I have here working basics like Wi-Fi or cellular data transmission, but also details such as a fingerprint reader.
![]()
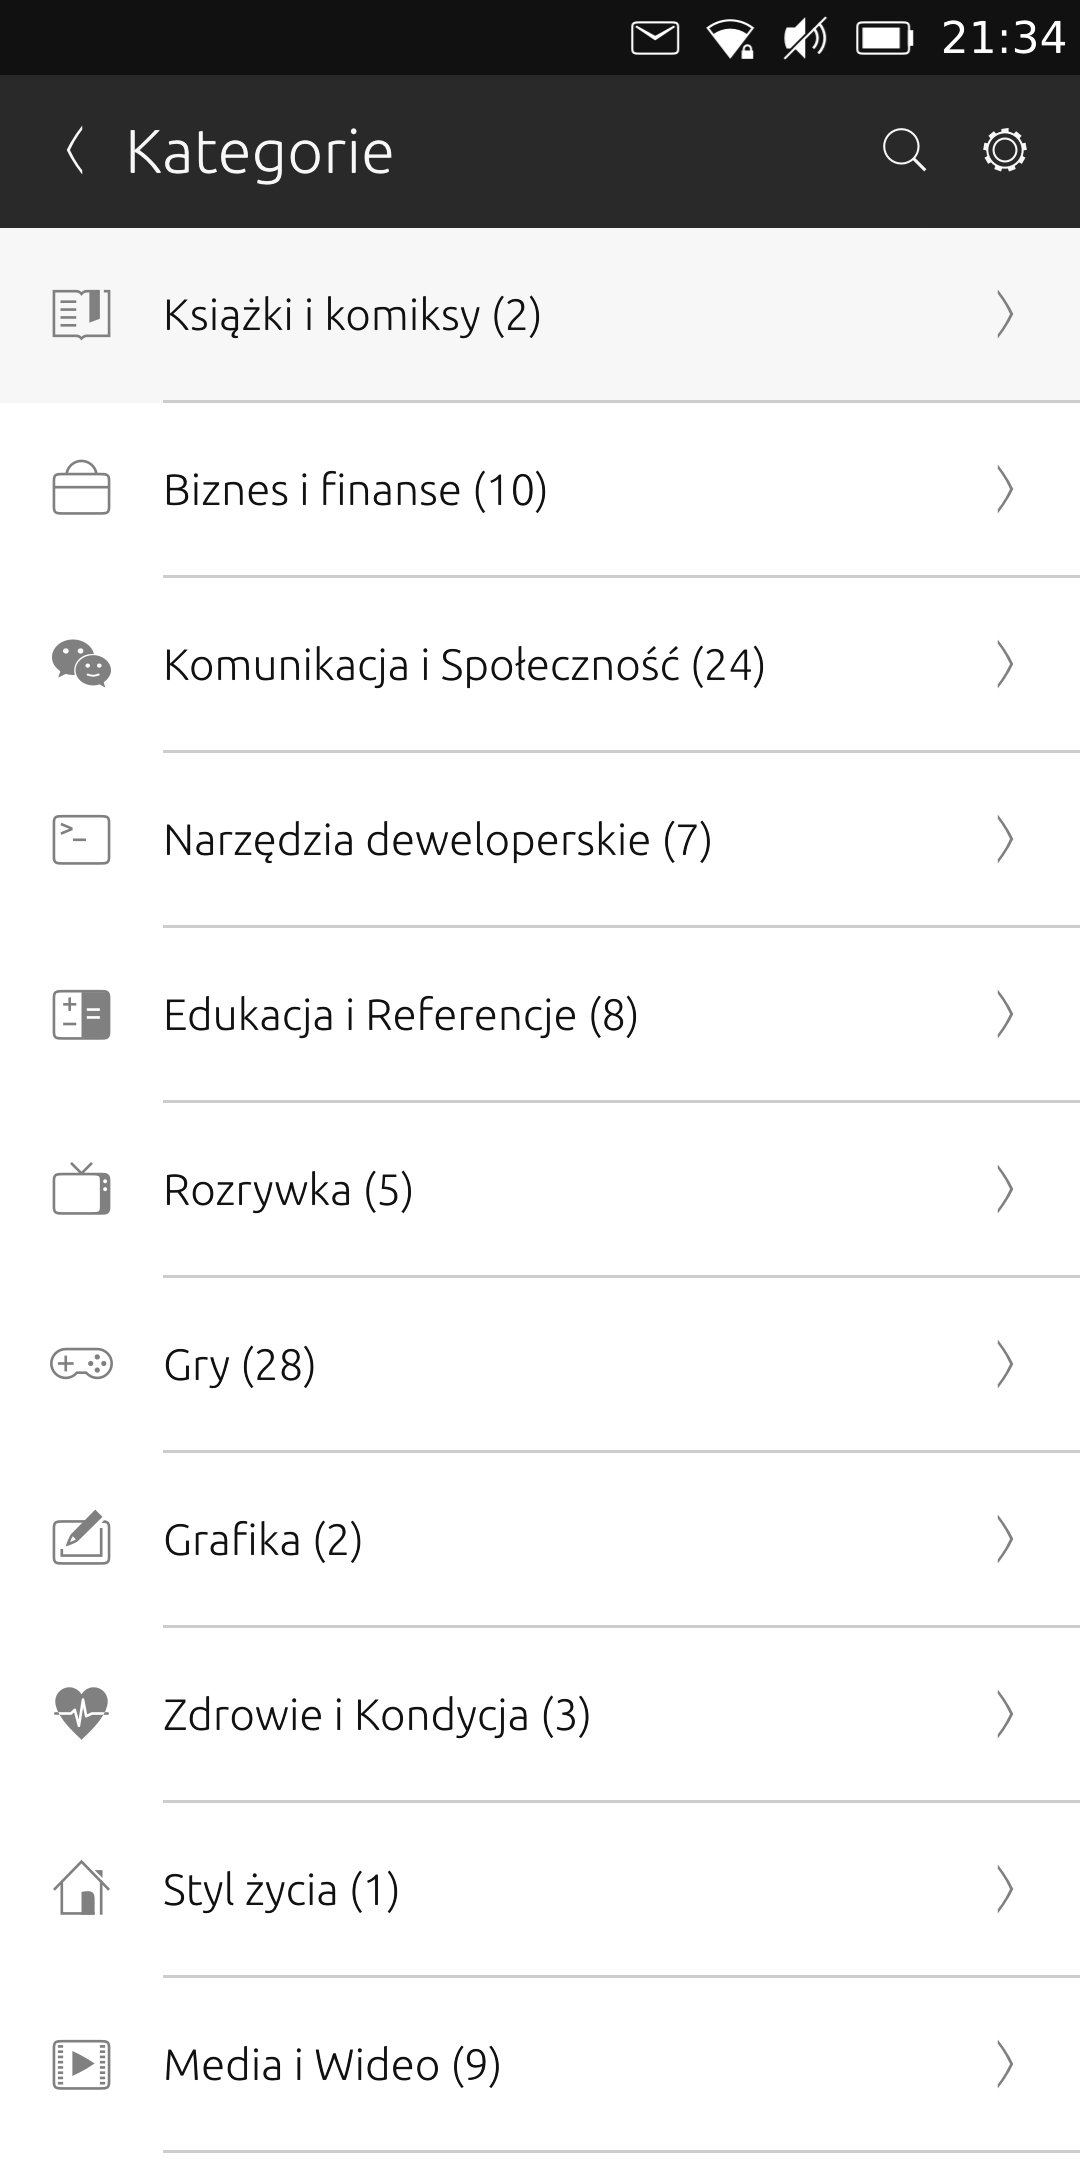
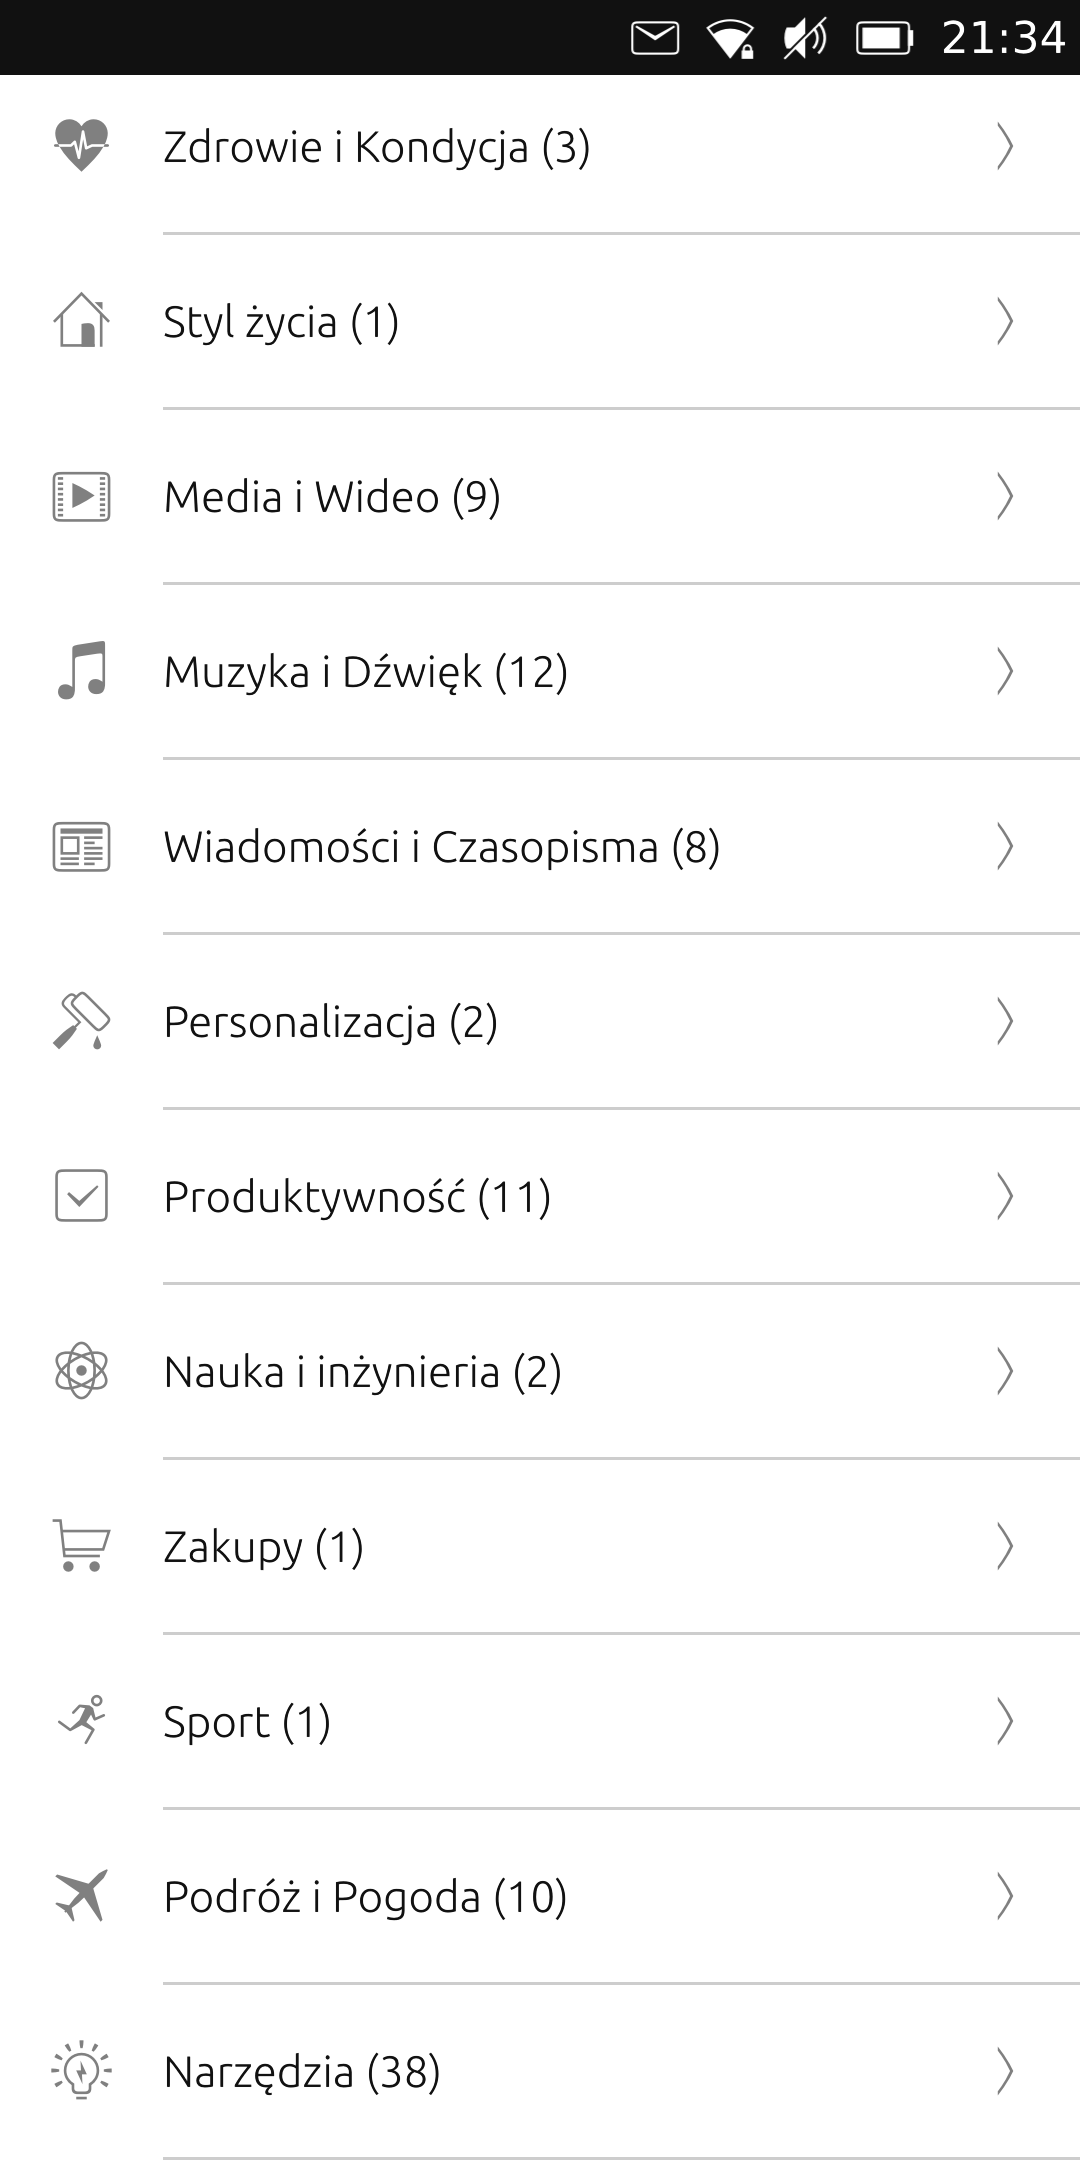
However, the aforementioned basics are not everything. The worst part about using Ubuntu Touch is the absolute lack of applications. Unfortunately, there are dramatically few items in the “store” of applications, as can be seen in the screenshots below. I played the role of a pharmacist and counted all of them - at the time of writing this post, there are 184 items…
Can Ubuntu Touch installed on the Google Pixel 3a XL smartphone be used as a daily device? In my opinion, unfortunately not. However, it is definitely a very interesting topic and I recommend everyone to give it a try. I dream that this project will be taken much further than where it currently stands. I will definitely continue to observe it.


